Installing SMTP Server Feature on Windows Server 2008 R2 is an easy process requiring only a few steps to complete.
To install SMTP Server Features
- Open “Server Manager Console”
- Start ➤ Administrative Tools ➤ Server Manager
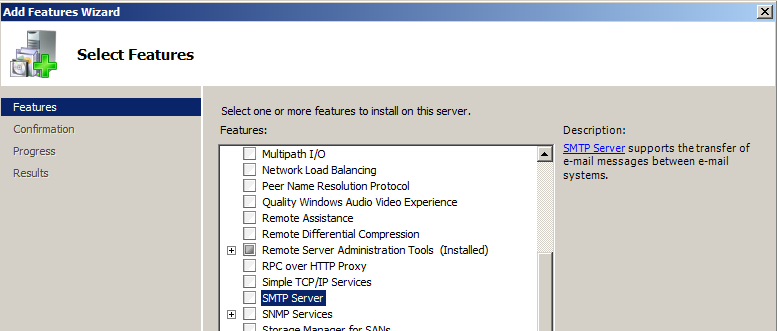
- Under “Features” select “Add Features”
- In “Select Features” screen, select “SMTP Server” option
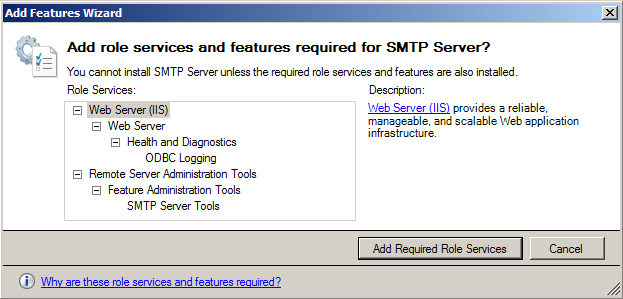
- In “Add role services and features required for SMTP Server?” screen, click “Add Required Role Services”
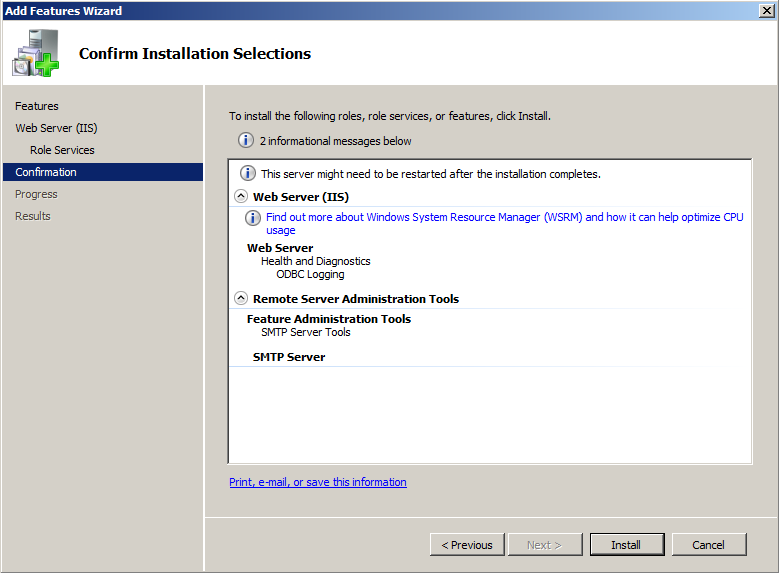
- Click “Next”
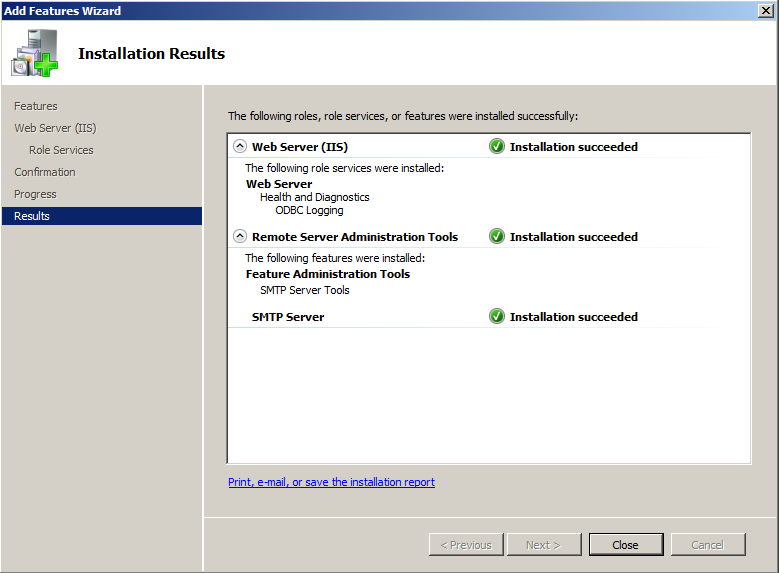
- In “Installation Result” screen, ensure that the installation is fully successfully, and then click Close.
To configure a local SMTP Service for the report server
- Verify that the service is running in the Services console.
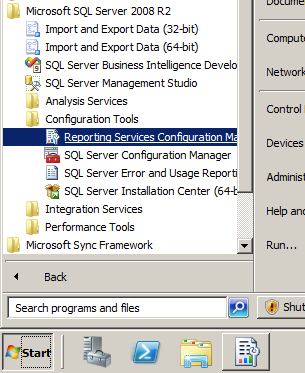
- Click Start, point to “All Programs”, point to “Microsoft SQL Server 2008 R2”, point to “Configuration Tools”, and then select “Reporting Services Configuration Manager”
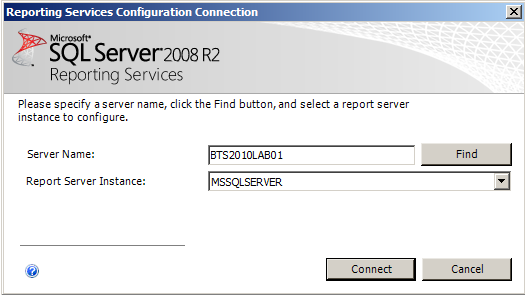
- On the “Reporting Services Configuration Connection” page, ensure that the “Server Name” is your server, in my case “BTS2010LAB01”, and ensure that the “Report Server Instance” name is “MSSQLSERVER”, and then click “Connect”.
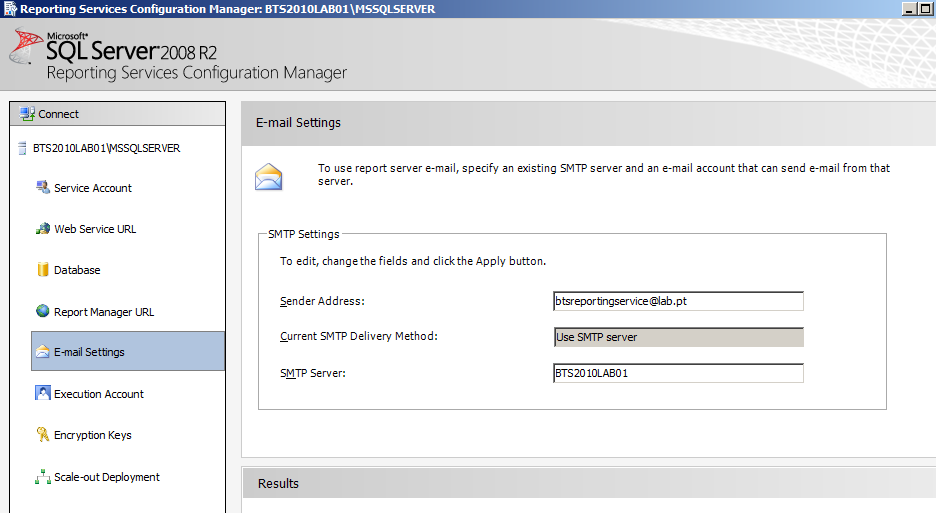
- Select “E-mail Settings” tab on the left tree
- E-mail Settings: Reporting Services includes a report server e-mail delivery extension that allows report subscribers to get reports delivered to an electronic mailbox. The e-mail delivery extension uses a Simple Mail Transport Protocol (SMTP) to deliver the report or notification. You can use the Reporting Services Configuration Manager to specify which SMTP server or gateway on your network to use for e-mail delivery.
- On the Email Settings page, enter the name of the SMTP server. This value can be an IP address, a UNC name of a computer on your corporate intranet, or a fully qualified domain name.
- In Sender Address, enter the name an account that has permission to send e-mail from the SMTP server.
- E-mail Settings: Reporting Services includes a report server e-mail delivery extension that allows report subscribers to get reports delivered to an electronic mailbox. The e-mail delivery extension uses a Simple Mail Transport Protocol (SMTP) to deliver the report or notification. You can use the Reporting Services Configuration Manager to specify which SMTP server or gateway on your network to use for e-mail delivery.
-
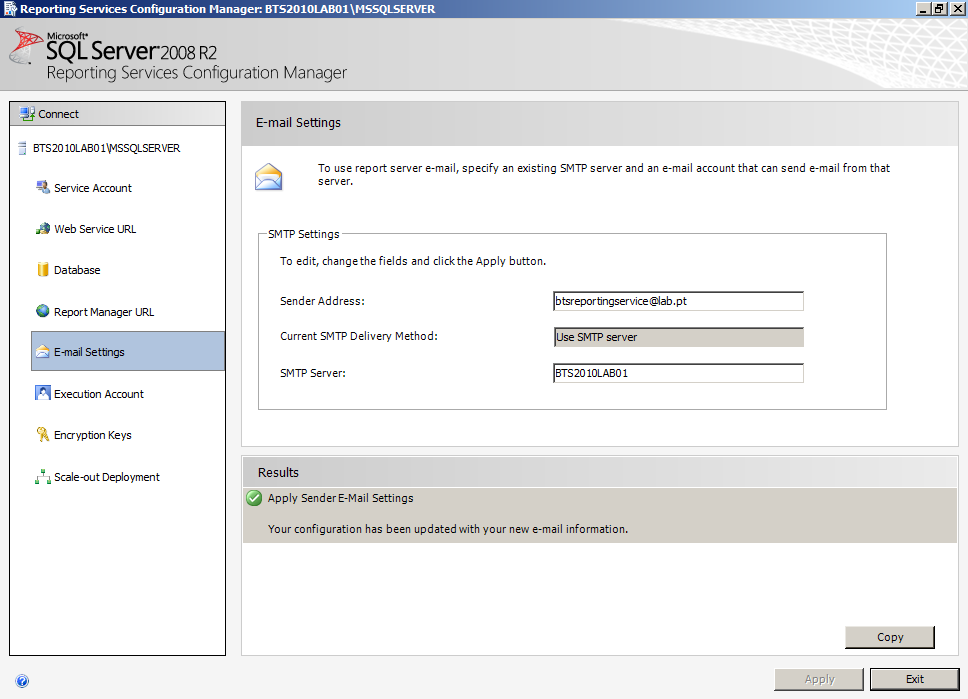
- Then click “Apply”
- In the result page, ensure that the configuration is fully successfully, and click “Exit”
To use the Reporting Services Configuration Manager, you must have the following
- Local system administrator permissions on the computer that hosts the report server you want to configure. If you are configuring a remote computer, you must have local system administrator permissions on that computer as well.
- You must have permission to create databases on the SQL Server Database Engine used to host the report server database.
- Windows Management Instrumentation (WMI) service must be enabled and running on any report server you are configuring. The Reporting Services Configuration tool uses the report server WMI provider to connect to local and remote report servers. If you are configuring a remote report server, the computer must allow remote WMI access.
- Before you can connect to and configure a remote report server instance, you must enable remote Windows Management Instrumentation (WMI) calls to pass through Windows Firewall.
You can use the Reporting Services Configuration Manager to perform the following tasks
- Configure the Report Server service account. The account is initially configured during setup but can be modified by using the Reporting Services Configuration Manager if you update the password or want to use a different account.
- Create and configure URLs. The report server and Report Manager are ASP.NET applications accessed through URLs. The report server URL provides access to the SOAP endpoints of the report server. The Report Manager URL is used to open Report Manager. You can configure a single URL or multiple URLs for each application.
- Create and configure the report server database. The report server is a stateless server that requires a SQL Server database for internal storage. You can use the Reporting Services Configuration Manager to create and configure a connection to the report server database. You can also select an existing report server database that already contains the content you want to use.
- Configure a scale-out deployment. Reporting Services supports a deployment topology that allows multiple report server instances to use a single, shared report server database. To deploy a report server scale-out deployment, you use the Reporting Services Configuration Manager to connect each report server to the shared report server database.
- Backup, restore, or replace the symmetric key that is used to encrypt stored connection strings and credentials. You must have a backup of the symmetric key if you change the service account, or move a report server database to another computer.
- Configure the unattended execution account. This account is used for remote connections during scheduled operations or when user credentials are not available.
- Configure report server e-mail. Reporting Services includes a report server e-mail delivery extension that uses a Simple Mail Transfer Protocol (SMTP) to deliver reports or report processing notification to an electronic mailbox. You can use the Reporting Services Configuration tool to specify which SMTP server or gateway on your network to use for e-mail delivery.
Related links
- BizTalk 2010 Installation and Configuration – Enable Internet Information Services (Part 1)
- BizTalk 2010 Installation and Configuration – Install Microsoft Office Excel 2007 (Part 2)
- BizTalk 2010 Installation and Configuration – Install Visual Studio 2010 (Part 3)
- BizTalk 2010 Installation and Configuration – Install SQL Server 2008 R2 (Part 4)
- BizTalk 2010 Installation and Configuration – Install SQL Server 2005 Notification Services on top of SQL Server 2008 R2 (Part 5)
- BizTalk 2010 Installation and Configuration – Install and Configure Windows SharePoint Services (Part 6)
- BizTalk 2010 Installation and Configuration – Install and Configure SharePoint Foundation 2010 (Part 6.1)
- BizTalk 2010 Installation and Configuration – Disable the Shared Memory Protocol (Part 7)
- BizTalk 2010 Installation and Configuration – Installing and Configuring BizTalk Server (Part 8 )
- BizTalk 2010 Installation and Configuration – Installing BizTalk Adapter Pack 2010 and BizTalk AppFabric Connect feature (Part 10)
- BizTalk 2010 Installation and Configuration – Configure BizTalk Server SQL Jobs (Part 11)
- BizTalk 2010 Installation and Configuration – Enable TCP/IP, Named Pipes protocols and DTC on the Local Host Server (Part 12)
- BizTalk 2010 Installation and Configuration – Configure the Application Event Log (Part 13)


