Windows SharePoint Services is a collection of services for Windows Server that enables you to share information, collaborate with other users on documents, and create lists and Web part pages. For information and procedures on installing Windows SharePoint Services, see Appendix A.
📝 One-Minute Brief
The BizTalk 2010 BAM Portal is hosted on SharePoint. This guide explains how to install Windows SharePoint Services 3.0 SP2 on Windows Server 2008 R2. Key steps include choosing the “Gradual” installation type (to use an existing SQL Server 2008 R2 instance), configuring the SharePoint Central Administration, and ensuring the WSS web application is correctly provisioned before running the BizTalk Configuration Wizard.
Note
You do not need to install WSS if you do not also plan to install the WSS adapter. However, if you are installing WSS, you must do it before continuing with the rest of the BizTalk Server prerequisites.
BizTalk Server 2010 supports these two versions of WSS:
- SharePoint Foundation 2010
- Windows SharePoint Services 3.0 with SP2
Installing and configuring Windows SharePoint Services consists of the following procedures:
- Install Windows SharePoint Services
- Configure Windows SharePoint Services
- Extend the Default Web Site as a virtual server
I chose to install WSS 3.0 with SP2 for no particular reason.
Install Windows SharePoint Services 3.0 with SP2
In the following procedure, you install Windows SharePoint Services 3.0.
- Windows SharePoint Services 3.0 requires Microsoft .NET Framework 3.0, which must be installed before installing Windows SharePoint Services 3.0.
- Download the installation package to a location on your hard disk.
- Locate the package you just downloaded (SharePoint.exe), and then double-click the package to start the setup.
- On the End User License Agreement screen, select I accept the terms in the License Agreement. On this screen and several others that follow, the setup wizard will automatically move to the next screen when you have made your selection.

- Under Type of installation, choose the Advanced button.

- On the Server Type tab, select Web Front End, then click Install Now.

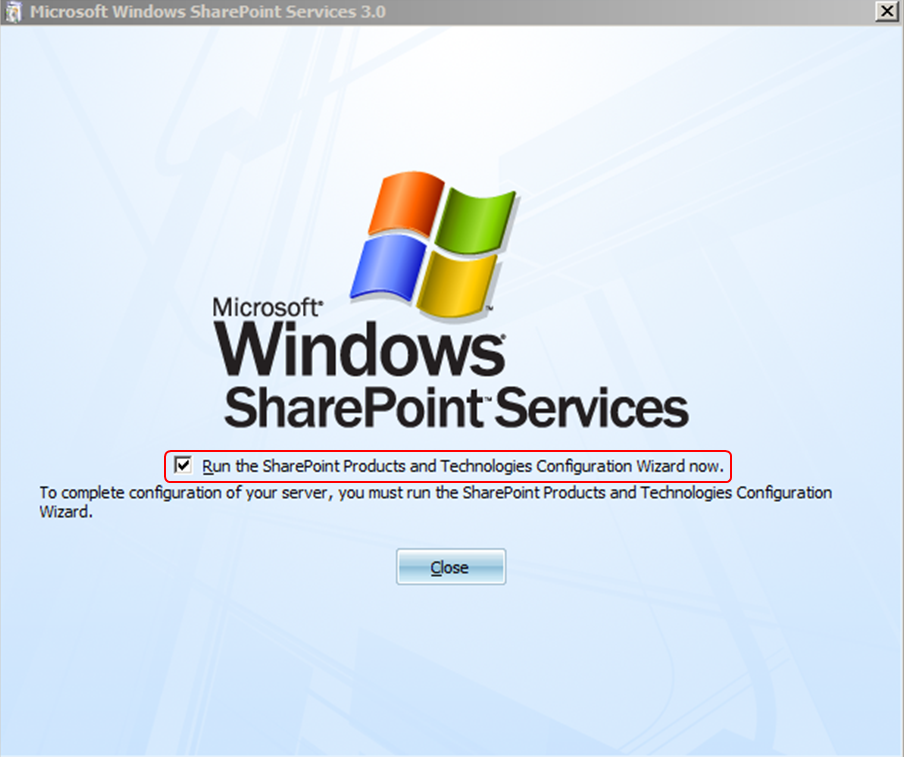
- Ensure the configuration checkbox is clicked, and click the Close button.
Configure Windows SharePoint Services
- On the Welcome screen, click Next.

- In the Warning screen, click Yes.

- On the Server Farm screen, select the option No, I want to create a new server farm, and click Next.

- On the Configuration Database screen, provide a Database server name and credentials, and click Next.

- On the Configure SharePoint Central Administration WEB Application screen, use the Default values, and click Next.

- On the Completing the SharePoint Products and Technologies Configuration Wizard screen, leave the default values and click Next.


- On the Configuration Successful screen, click Finish.

Extend the Default Web Site as a virtual server
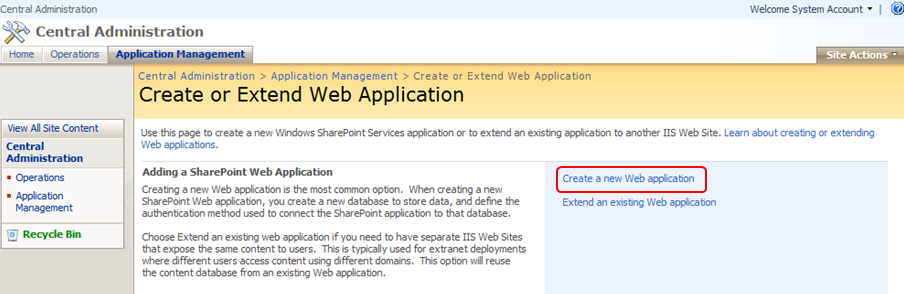
- Open SharePoint Central Administration, and click Application Management.

- On the Application Management tab, click on Create or extend Web application.

- At this point, normally, I extend an existing Web application. This time, I chose to follow Kent Weare suggestion and create a new one using port 90. For that, click on Create a new Web application.
- I have decided to create my Web Application in a new IIS Web site called SharePoint – 90. I have done this so that I don’t overwrite or break anything that may be living in my Default Web Site. I also have modified the port to be 90, which means any requests to my WSS Site will need to have “:90” in the URL. If you do this, then when you post or retrieve documents to/from SharePoint from BizTalk, you will need to include this port number in your Receive Location/Send Port configuration.
- On the IIS Web Site options, select Create a new IIS Web Site, set a description, and change the port to 90.
- On Security Configuration options, set the Authentication provider as NTLM.

- For Load Balanced URL options, check if the URL contains :90.
- On Application Pool options, create a new application pool Sharepoint – 90.

- On Database Name and Authentication options, appended 99 onto the Database Name that will be used for storing Content, and choose the Windows authentication option.
- Click Ok.
- You have now created the “shell” for this Web Application, but you still don’t have any content in this Web Application. Click on the Create Site Collection link. Remember to issue an iisreset /noforce command to complete the Web Application creation process.
- Open cmd and execute iisreset/noforce.
- Click Create Site Collection.

- On the Title and Description option, give your Site a Title, Description (if so desired), on the Web Site Address option, create a URL, and in the Template Selection option, select Team Site.
- Team Sites are generally a place where team members can collaborate by publishing documents, but other features exist, such as Team Calendars, surveys, links, etc.
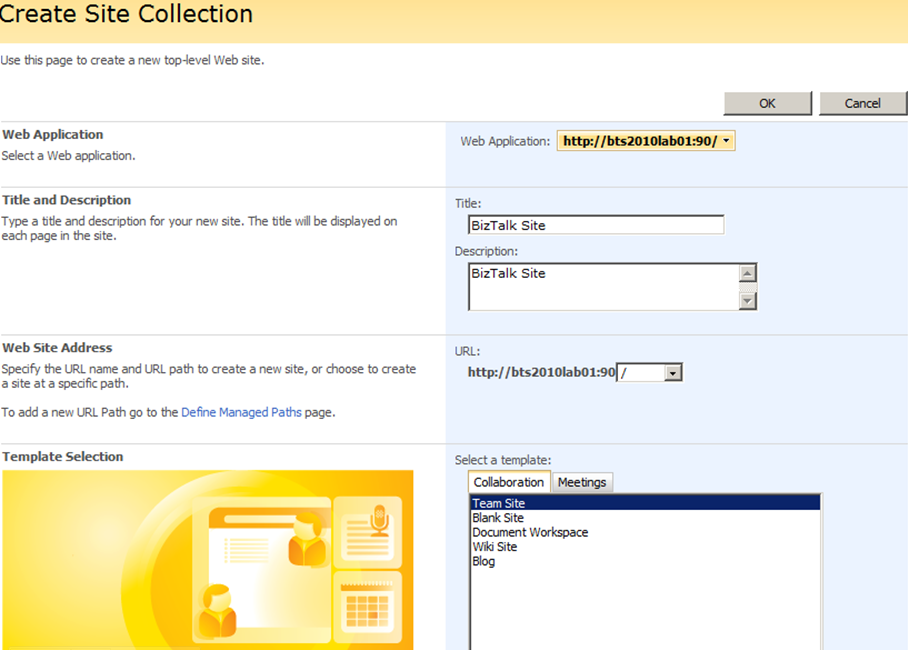
- On the Primary and Secondary Site Collection Administrator option, set a user. And click Ok to finish.

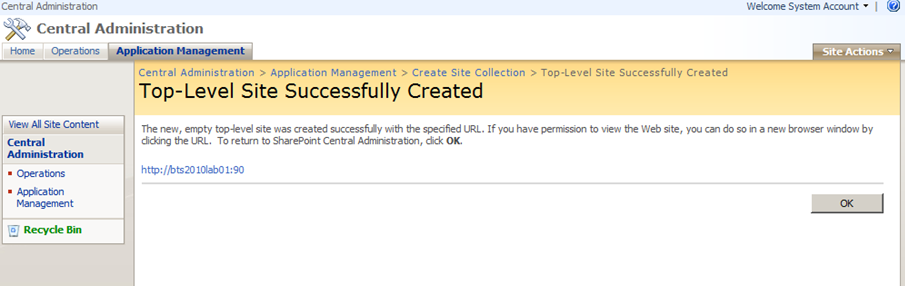
- The Team site has now been created.
Related links
- BizTalk 2010 Installation and Configuration – Enable Internet Information Services (Part 1)
- BizTalk 2010 Installation and Configuration – Install Microsoft Office Excel 2007 (Part 2)
- BizTalk 2010 Installation and Configuration – Install Visual Studio 2010 (Part 3)
- BizTalk 2010 Installation and Configuration – Install SQL Server 2008 R2 (Part 4)
- BizTalk 2010 Installation and Configuration – Install SQL Server 2005 Notification Services on top of SQL Server 2008 R2 (Part 5)
- BizTalk 2010 Installation and Configuration – Install and Configure SharePoint Foundation 2010 (Part 6.1)
- BizTalk 2010 Installation and Configuration – Disable the Shared Memory Protocol (Part 7)
- BizTalk 2010 Installation and Configuration – Installing and Configuring BizTalk Server (Part 8 )
- BizTalk 2010 Installation and Configuration – Installing BizTalk Adapter Pack 2010 and BizTalk AppFabric Connect feature (Part 10)
- BizTalk 2010 Installation and Configuration – Configure BizTalk Server SQL Jobs (Part 11)
- BizTalk 2010 Installation and Configuration – Enable TCP/IP, Named Pipes protocols and DTC on the Local Host Server (Part 12)
- BizTalk 2010 Installation and Configuration – Configure the Application Event Log (Part 13)


Sandro,
Great job in detailing the step by step instructions with screen shots.
For those who may be interested to know the decision factors of WSS 3.0 and SharePoint Foundation 2010, other than the considerations described in Installation Guide, my lesson-learned is to install SharePoint Foundation 2010 only if your environment has:
– enough of horse power(CPU/free Disk space/RAM)
– Domain user Account with certain privilege for configuring SharePoint Foundation 2010 service in Server Farm installation type.
This is especially true if you are building a standalone sandbox, like VPC or VM Player, without connection to any domain. Per BizTalk 2010 Installation Guide, you “must” install Windows SharePoint Services as Server Farm type in order to specified particular SQL Server database. I assume that requirement applies to SharePoint Foundation 2010, though no word about it was mentioned in the installation guide. Without Domain Account, SharePoint Foundation Configuration wizard will complain about it and will not let you continue the configuration. I have tried different local user accounts, even administrator of local box, without luck. If someone know how to work around this, please kindly post the right direction here.
– Michael
getting compatibility issue while installing windows share point services on biztalk 2013 r2 server . share point server is installed on different server. please help