
BizTalk 2010 Installation and Configuration, the last chapter!!!
In this section, you’ll install BizTalk Server, confirm that the installation succeeded, and then configure BizTalk Server.
When you installed SQL Server, setup granted your account Database Administrator rights. Since these rights are also required for installing BizTalk Server, you must do one of the following:
- Use the same account you used when you installed SQL Server.
- Make sure the account you’re using now also has Database Administrator rights.
📝 One-Minute Brief
After setting up all prerequisites, it’s time to install BizTalk Server 2010. This guide walks through the feature selection (Runtime, Administration, and SDK), the installation process, and the launch of the BizTalk Configuration Wizard. It highlights the importance of choosing “Custom Configuration” for production-ready environments to ensure proper service account mapping and database placement.
To install BizTalk Server 2010
- Close any programs you have open.
- Insert the BizTalk Server 2010 installation disk into the DVD-ROM drive.
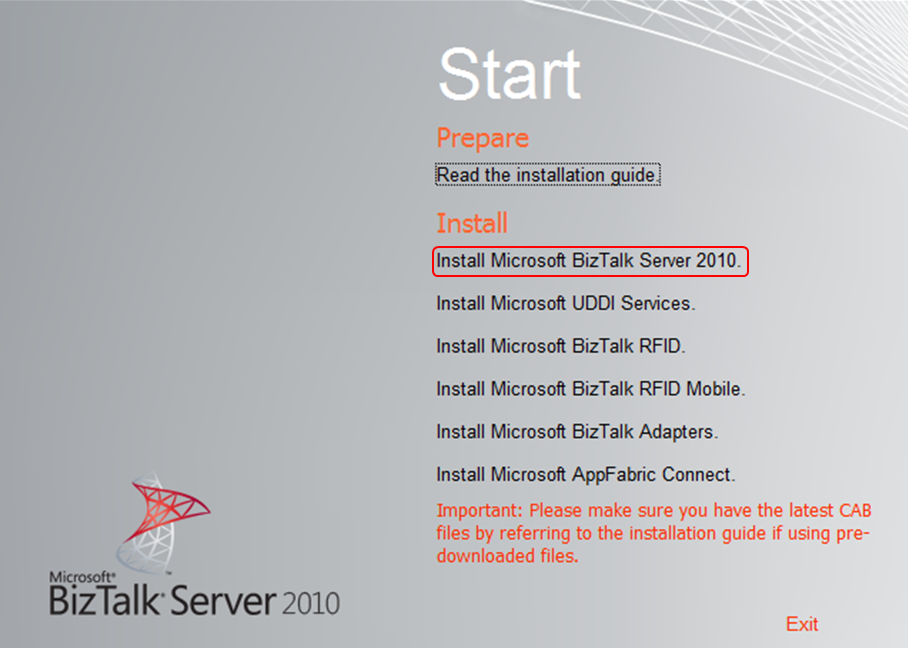
- On the Start screen, click Install Microsoft BizTalk Server 2010.
- On the Customer Information screen, type your user name and organization, enter your product key, and then click Next.

- On the License Agreement screen, click Yes, I accept the terms of the license agreement, and then click Next.

- Use the Customer Experience Improvement Program page of the BizTalk Server 2010 Installation Wizard to enable feature usage reporting functionality for BizTalk Server.

- On the Component Installation screen, review the available components and select the ones you want to install.


- Accept the default installation location or click Browse to move to the location where you want to install BizTalk Server 2010, and then click Next.
- If your computer is missing a prerequisite component such as ADOMD.NET, Setup can install the redistributable prerequisites. You can either:
- Select Automatically install the redistributable prerequisites from the web
- OR Select Automatically install the redistributable prerequisites from a CAB file if you have downloaded the CAB file. If you select this, you can then browse to the location of the CAB file and select it.

- On the Summary screen, verify that the components that you select to install are correct.
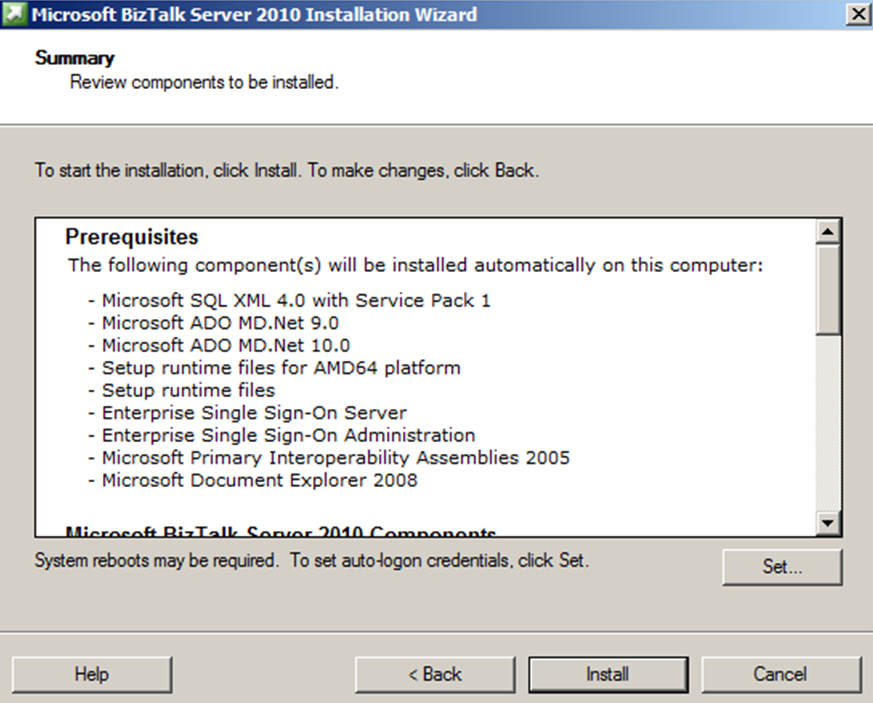
- To enable auto-logon after a system reboot, click Set… and provide your logon information. Auto-logon is enabled only for reboots during setup and is disabled when setup is complete.
- Click Install to start the installation process.
- On the Microsoft Update Setup page, click Use the Microsoft Update when I check for updates (recommended).
- On the Installation Completed screen, clear the Launch BizTalk Server Configuration check box, and then click Finish.

Verify Your Installation
You can check to see whether your installation was successful by using either Programs and Features or the Registry.
To verify installation using Programs and Features
- Click Start, click Control Panel (View by: Large/Small icons), and double-click Programs and Features.
- When the list is fully populated, look for BizTalk Server 2010. If it appears in the list, setup succeeded.
To verify the installation using the Registry
- Open a command prompt.
- Type regedit and then press Enter.
- When the Registry opens, browse to HKEY_LOCAL_MACHINE\SOFTWARE\Microsoft\BizTalk Server\3.0
- If files exist in the 3.0 folder, setup succeeded.
- Close the Registry, and then close the command prompt.
Configure BizTalk Server
Use the following procedure to complete a basic configuration of BizTalk Server. For information on customizing your configuration, see Custom Configuration in the BizTalk Server Help.
To configure BizTalk Server 2010 using Basic Configuration
- Click Start, click All Programs, click Microsoft BizTalk Server 2010, right-click BizTalk Server Configuration, and then click Run as Administrator.

- In the Database field, enter the name of the local computer.
- In the Service Credential field, type the “User name” and “Password” for the account that the BizTalk services will run under.

- Click Configure.
- Note: You may receive a warning if you enter a user name with administrative credentials on this computer. Click OK to continue.

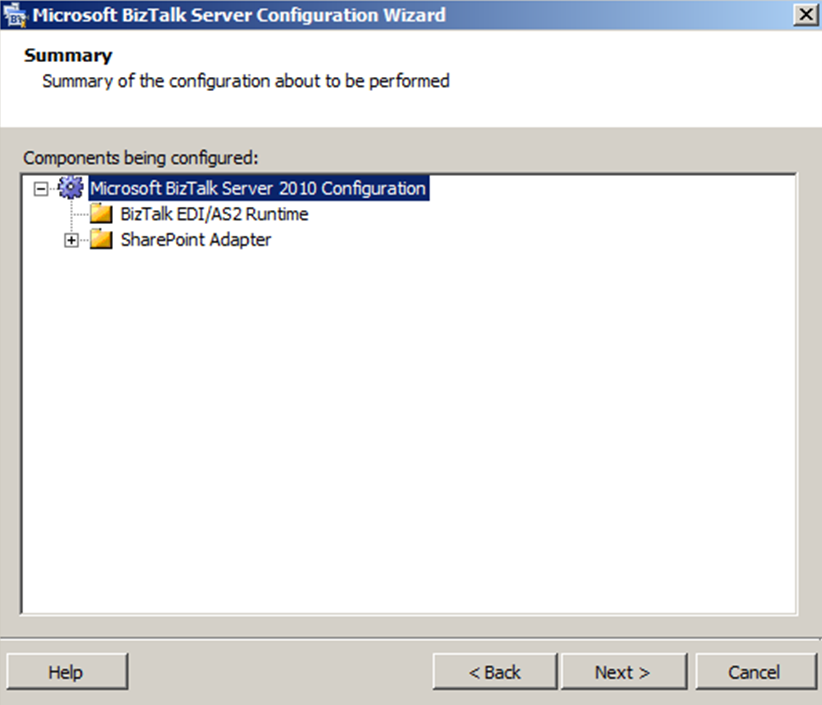
- On the Summary screen, review the configuration about to be performed, and then click Next.
- Don’t worry about the SharePoint Adapter, we’ll deal with this later!

- On the Completion screen, click Finish.

Note: Once again, don´t worry about the SharePoint Adapter- We deal with this later.
Setting up BizTalk – SharePoint Adapter
We now have the ability to configure the SharePoint Adapter. For that, you must:
- Run BizTalk Server Configuration

- On the Configuration Screen, select the SharePoint Adapter option, then use the drop-down list to select the WSS Site where you would like the adapter to be installed; in this case, SharePoint – 90.

- Assuming everything is aligned correctly, you should now be able to click the Apply Configuration button.
- On the Summary screen, click Next.
- On the Completion screen, click Finish.

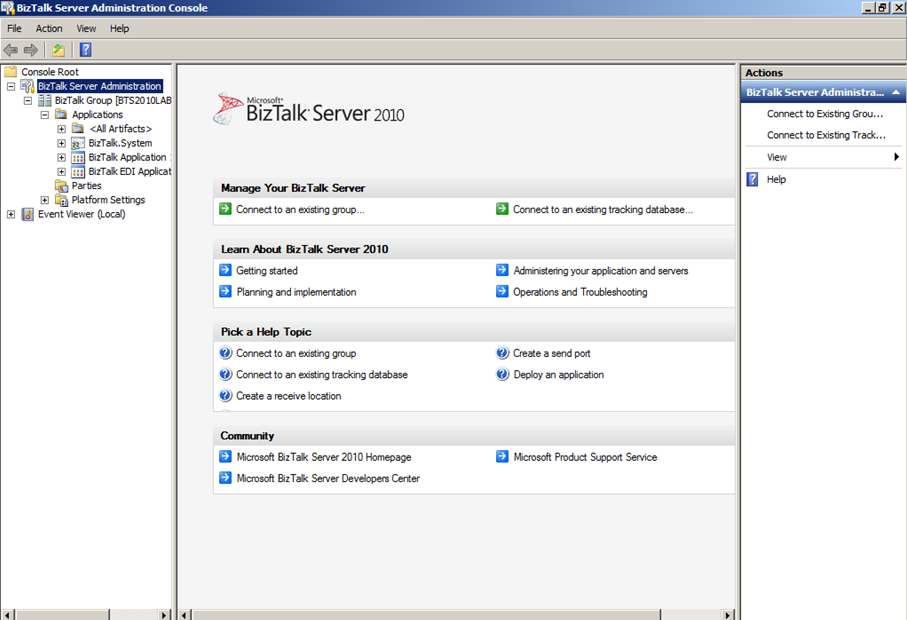
We now have BizTalk Server 2010 FULLY Installed and Configured!!!
Related links
- BizTalk 2010 Installation and Configuration – Enable Internet Information Services (Part 1)
- BizTalk 2010 Installation and Configuration – Install Microsoft Office Excel 2007 (Part 2)
- BizTalk 2010 Installation and Configuration – Install Visual Studio 2010 (Part 3)
- BizTalk 2010 Installation and Configuration – Install SQL Server 2008 R2 (Part 4)
- BizTalk 2010 Installation and Configuration – Install SQL Server 2005 Notification Services on top of SQL Server 2008 R2 (Part 5)
- BizTalk 2010 Installation and Configuration – Install and Configure Windows SharePoint Services (Part 6)
- BizTalk 2010 Installation and Configuration – Install and Configure SharePoint Foundation 2010 (Part 6.1)
- BizTalk 2010 Installation and Configuration – Disable the Shared Memory Protocol (Part 7)
- BizTalk 2010 Installation and Configuration – Installing and configuring local SMTP for Reporting Server (Part 9)
- BizTalk 2010 Installation and Configuration – Installing BizTalk Adapter Pack 2010 and BizTalk AppFabric Connect feature (Part 10)
- BizTalk 2010 Installation and Configuration – Configure BizTalk Server SQL Jobs (Part 11)
- BizTalk 2010 Installation and Configuration – Enable TCP/IP, Named Pipes protocols and DTC on the Local Host Server (Part 12)
- BizTalk 2010 Installation and Configuration – Configure the Application Event Log (Part 13)


1 thought on “BizTalk 2010 Installation and Configuration – Installing and Configuring BizTalk Server (Part 8)”