We finally reach the last part of this small blog season on monitoring the status of your Azure API Connections. We start by using a simple PowerShell script locally on our machine to progress to an automated way using Azure Function Apps and Logic Apps. I mentioned in my last post that this previous option had a considerable handicap associated with costs since we couldn’t use the Consumption plan, and instead, we had to use an App Service plan.
Today we will go to address the best solution in my personal opinion:
- Using a Schedule PowerShell Runbook on an Automation Account to check the Azure API Connection status
And once again, using a Logic App, this time with an HTTP- When a HTTP request is received trigger, to notify the internal support team if any findings (broken API Connections) were detected.
- Note: the Logic App will only be triggered if the Runbook detects/find any non-coherent situations.
Solution 3: Using Automation Account and Logic App
Create Automation Account
The first step, if you don’t have an Automation account yet, is to create one, and for that, you need:
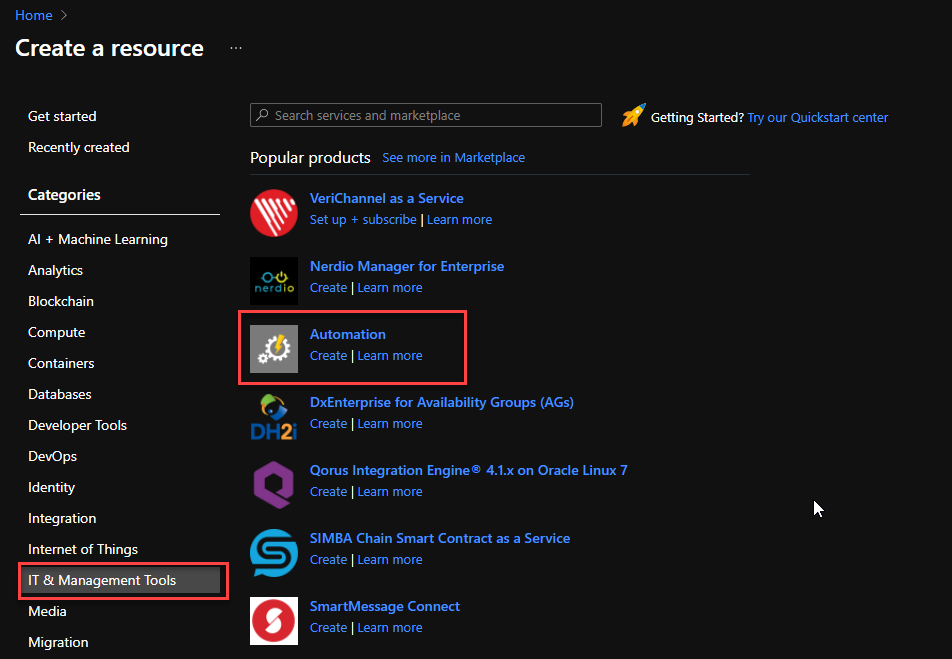
- From the Azure portal menu or the Home page, select Create a resource.
- In the Create a resource page, select IT & Management Tools > Automation.
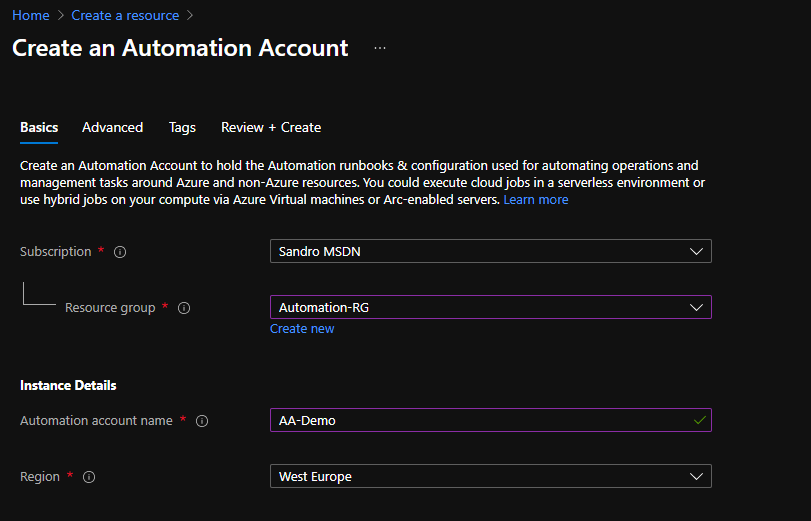
- On the Create an Automation Account Basics page, use the following settings:
- Subscription: Select the subscription under which this new Automation Account will be created.
- Resource Group: Select an existing Resource Group or create a new one in which your Automation Account will be created.
- Automation account name: Name that identifies your new Automation Account.
- Region: Choose a region near you or near other services your Automation Account access.
- You can customize the other option according to your intentions or leave the default values. For this demo, we will now select Review + create to review the app configuration selections.
- On the Review + create page, review your settings, and then select Create to provision and deploy the Automation Account.
Create Automation PowerShell runbook
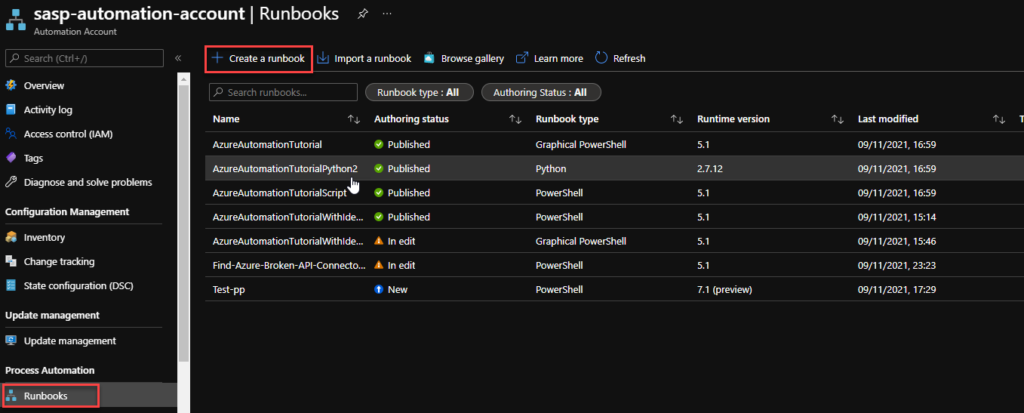
The next step is to create a PowerShell runbook. For that, you need to:
- From the left menu of the Automation Account window, select Runbooks, then select Create a runbook from the top menu.
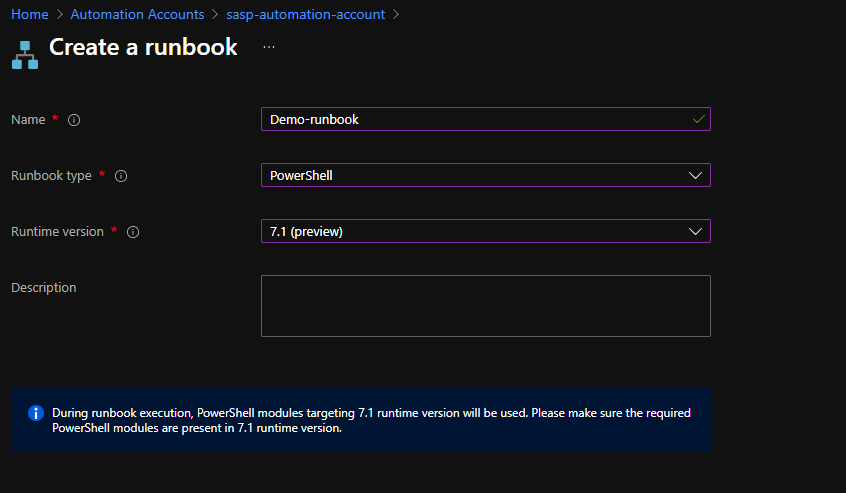
- From the Create a runbook window, use the following settings:
- Name: Name the runbook
- Runbook type: From the Runbook type drop-down menu, select PowerShell.
- Runtime version: From the Runtime time drop-down menu, select 7.1 (preview).
- Description: Provide a description for this runbook (not mandatory filed)
- In the runbook editor, paste the following code:
$resources | ForEach-Object {
    $logicAppUrl = $_.ResourceId + '?api-version=2018-07-01-preview'

    # Get Logic App Content
    $var = "https://management.azure.com" + $logicAppUrl
    $accsessToken = Get-AzAccessToken `
		-TenantId $connection.TenantID
    $auth = "Bearer " + $accsessToken.Token

    $resourceJson = Invoke-RestMethod -Uri $var -Headers @{ Authorization = $auth }

    $resourceName = $_.Name
    $resourceGroupName = $_.ResourceGroupName

    # Check Logic App Connectors
    $apiConnectionStatus = $resourceJson.properties.overallStatus
    if($apiConnectionStatus -eq 'Error')
    {
        $apiBrokenCount++;
        $apiBrokenDataNode += [pscustomobject]@{
                'ResourceGroupName' = $_.ResourceGroupName;
                'ResourceName' = $_.Name;
                'Status' = $resourceJson.properties.statuses.status;
                'APIName' = $resourceJson.properties.api.name;
                'APIDisplayName' = $resourceJson.properties.api.displayName;
                'ResourceType'= $resourceJson.type;
                'ResourceLocation'= $resourceJson.location;
                'ResourceId'= $resourceJson.id;
                'ErrorCode'= $resourceJson.properties.statuses.error.code
                'ErrorMessage'= $resourceJson.properties.statuses.error.message
            }
    }
}
Note: this is a small part of the code. Click on the button below to download all the source code.
- Select Save and then Test pane.
- Finally if everything works properly you can publish the runbook.
Now we need to schedule the runbook. For that, we need:
- From the left menu of the Automation Account window, select Schedules, then select Add a schedule from the top menu.
- From the New Schedule window, use the following settings:
- Name: Name of the Schedule
- Description: Provide a description for this schedule (not mandatory filed)
- Starts: Datetime to start the schedule
- Time zone: Time zone configured for this schedule, in my case Portugal – Western European Time
- Recurrence: Select whether the schedule runs once or on a reoccurring schedule by selecting Once or Recurring. We are going to use Recurring
- If you select Once, specify a start time and then select Create.
- If you select Recurring, specify a start time.
- Recur every: select how often you want the runbook to repeat. Select by hour, day, week, or month. In hour case, 1 per day
- Set expiration: Leave the default property, No.
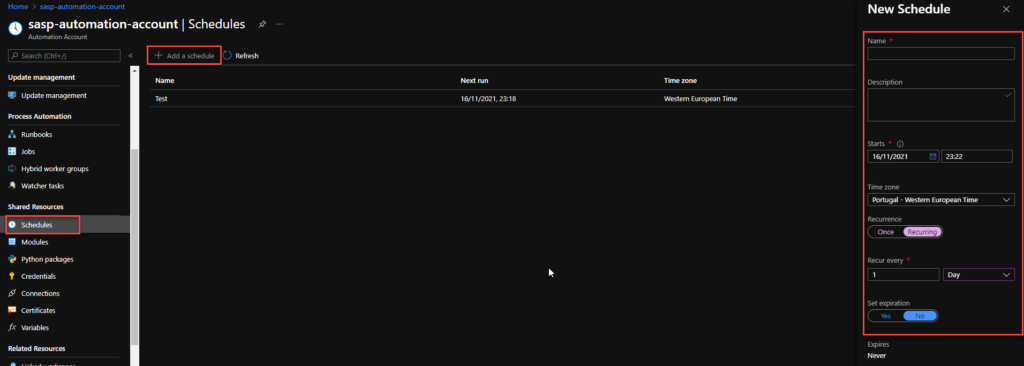
- When you’re finished, select Create.
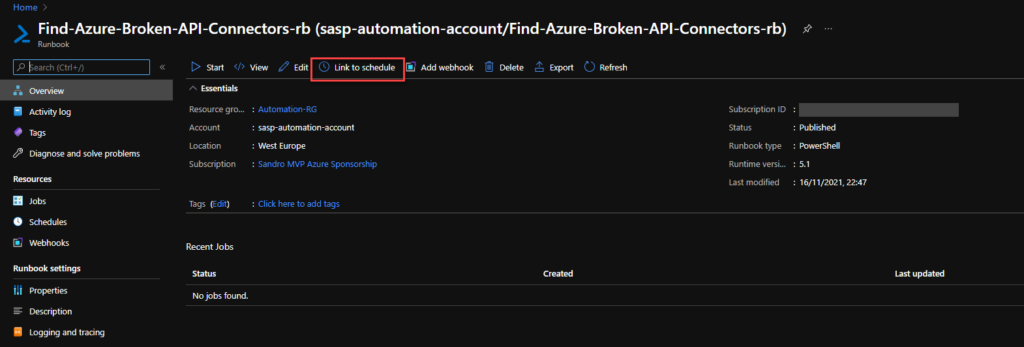
Now that we have our runbook and our schedule created, we need to bind these two, and for that, we need to:
- Access to the previous runbook the we create above, and on the runbook page select Link to schedule
- On the Schedule Runbook page, select Link a schedule to your runbook.
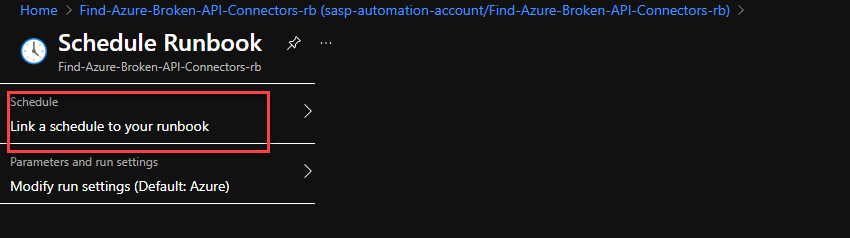
- On the Schedule page, select the schedule we create above from the schedule list
- And then select OK.
Create a Logic App
Finally, we need to create a Logic App with an HTTP- When a HTTP request is received trigger to notify if any API Connection is broken. To simplify the solution, we will be using the Azure Portal to create also the Logic App.
- Note: once again, the Logic App will only be triggered if the Runbook detects/finds any non-coherent situations..
To accomplish that, we need to:
- From the Azure portal menu or the Home page, select Create a resource.
- In the Create a resource page, select Integration > Logic App.
- On the Create Logic App Basics page, use the following Logic app settings:
- Subscription: Select the subscription under which this new Logic app is created.
- Resource Group: Select an existing Resource Group or create a new one in which your Logic app will be created.
- Type: The logic app resource type and billing model to use for your resource, in this case we will be using Consumption
- Consumption: This logic app resource type runs in global, multi-tenant Azure Logic Apps and uses the Consumption billing model.
- Standard: This logic app resource type runs in single-tenant Azure Logic Apps and uses the Standard billing model.
- Logic App name: Your logic app resource name, which must be unique across regions.
- Region: The Azure datacenter region where to store your app’s information. Choose a region near you or near other services your Logic app access.
- Enable log analytics: Change this option only when you want to enable diagnostic logging. The default value in No.
- When you’re ready, select Review + Create. On the validation page, confirm the details that you provided, and select Create.
- After Azure successfully deploys your app, select Go to resource. Or, find and select your logic app resource by typing the name in the Azure search box.
- Under Templates, select Blank Logic App. After you select the template, the designer now shows an empty workflow surface.
- In the workflow designer, under the search box, select Built-In. From the Triggers list, select the Request connector, and the When a HTTP request is received trigger.
- Use the following sample payload to generate the schema
{
    "Monitor": "API Connections",
    "Client": "Sandro Pereira",
    "Environment": "DEV",
    "APIBroken": [
        {
            "ResourceGroupName": "ResourceGroupName",
            "ResourceName": "ResourceName",
            "Status": "Status",
            "APIName": "APIName",
            "APIDisplayName": "APIDisplayName",
            "ResourceType": "ResourceType",
            "ResourceLocation": "ResourceLocation",
            "ResourceId": "ResourceId",
            "ErrorCode": "ErrorCode",
            "ErrorMessage": "ErrorMessage"
        },
        {
            "ResourceGroupName": "ResourceGroupName",
            "ResourceName": "ResourceName",
            "Status": "Status",
            "APIName": "APIName",
            "APIDisplayName": "APIDisplayName",
            "ResourceType": "ResourceType",
            "ResourceLocation": "ResourceLocation",
            "ResourceId": "ResourceId",
            "ErrorCode": "ErrorCode",
            "ErrorMessage": "ErrorMessage"
        }
    ]
}
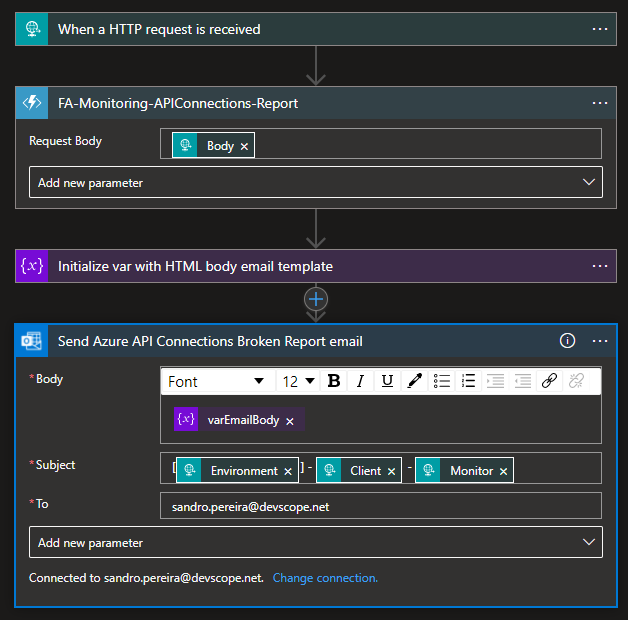
- Then we be using the following actions to notify the support team:
- Choose an Azure function: I’m calling and Azure Function to transform the list of broken API’s in a HTML table.
- Set variable: I’m setting the varEmailBody with my default HTML email body Template and add the HTML table that the Azure Function returned
- Send an email (v2) – Office 365 Outlook: To send the email to the support team
The result, once you try to execute the Logic App, will be a fancy HTML email:
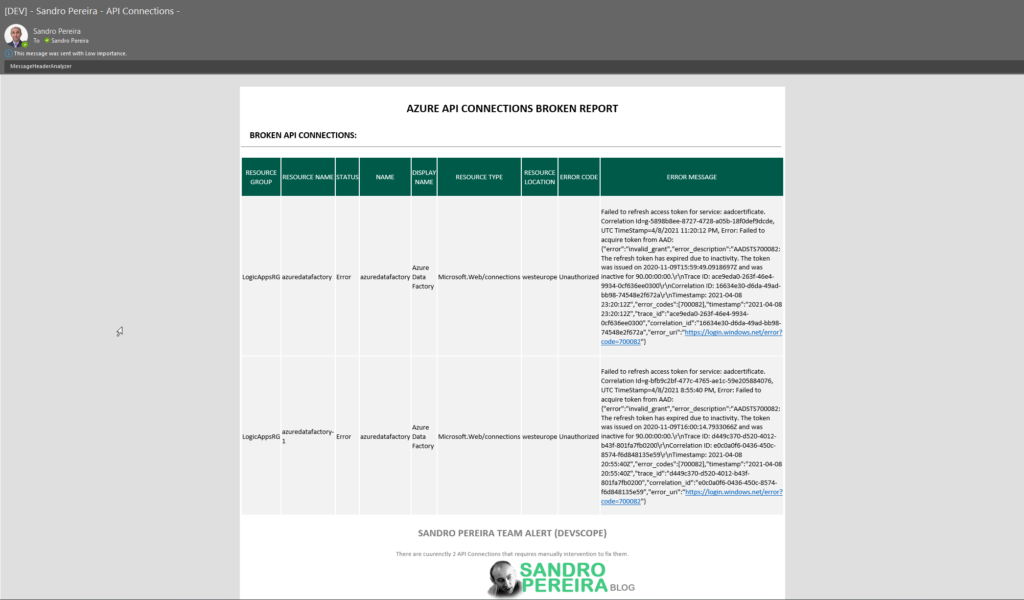
Although this approach required quick learning about Azure Automation, that was quite simple, and for me, this is the best approach in terms of cost and architecture design.
I hope you have enjoyed it!
Thanks for sharing. In creating logic app when you created the the Azure function.