
Last week, I wrote the first part of this small blog series on monitoring the status of your Azure API Connections. In the first part, I described how you could easily create a simple PowerShell script to have a simple report of the status of all your existing Azure API Connections. I knew since the beginning that that solution wasn’t the ideal one; it was good enough to run it from time to time manually on demand, but that is not the situation you want to be in. So, today we will go to address the first solution that came into my mind and, in fact, was also suggested by both Mike and Nino:
- Using an Azure Function App to check the Azure API Connections status
I endup also adding a schedule Logic App to trigger that Function App because I want to notify the internal support team if any findings (broken API Connections) were detected.
Solution 2: Using Function App and Logic App
The first question that appeared in this solution was: what kind of runtime stack to use on your Function App: .NET or PowerShell Core?
I decided to use PowerShell Core because I already have all the PowerShell working from the previous solution, so it made all sense to use this instead of having to recreate all this logic with .NET.
📝 One-Minute Brief
Manual checks are not enough to prevent Azure API Connections from silently expiring. This article presents a more automated approach by using an Azure Function App to validate API connection health and a scheduled Logic App to trigger checks and notify support teams when broken connections are detected.
Create Function App
If you don’t yet have a Function App with the PowerShell Core runtime stack created, the first step is to create one, and for that, you need to:
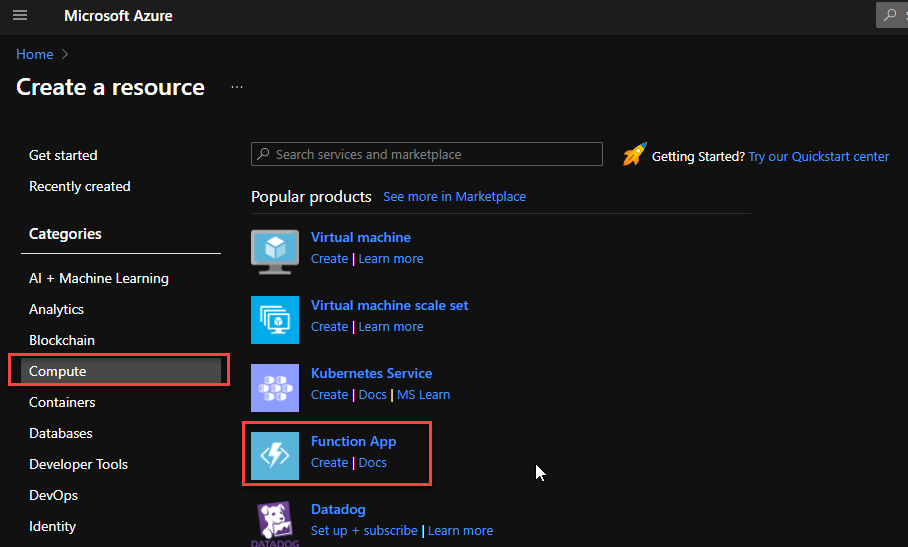
- From the Azure portal menu or the Home page, select Create a resource.
- In the Create a resource page, select Compute > Function App.
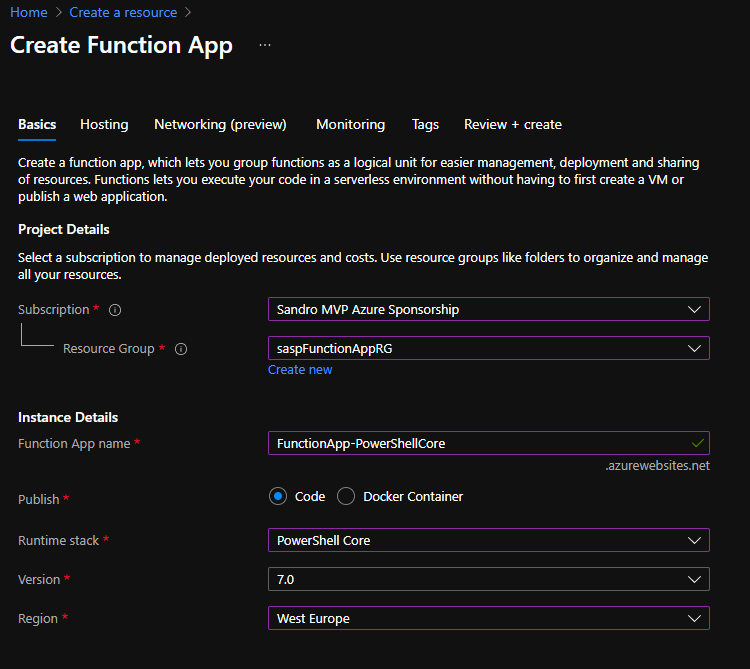
- On the Create Function App Basics page, use the following function app settings:
- Subscription: Select the subscription under which this new function app is created.
- Resource Group: Select an existing Resource Group or create a new one in which your function app will be created.
- Function App name: Name that identifies your new function app.
- Publish: Select Code.
- Runtime stack: Select the option PowerShell Core.
- Version: Choose the version of your installed runtime, in this case, 7.0.
- Region: Choose a region near you or near other services your functions access.
- Select Next : Hosting. On the Hosting page, enter the following settings:
- Storage Account: Create a storage account used by your function app or select an existing one.
- Operating system: I choose to use Windows since I’m feeling more comfortable with it.
- Plan: A hosting plan that defines how resources are allocated to your function app. In this case, you need to select the App Service plan.
- Note: I initially tried to use the Consumption plan, but I couldn’t import and use the Azure modules with the consumption plan. I think they are not supported in that type of plan.
- Windows Plan: Select an existing plan or create a new one.
- Sku and size: I use the Standard S1.
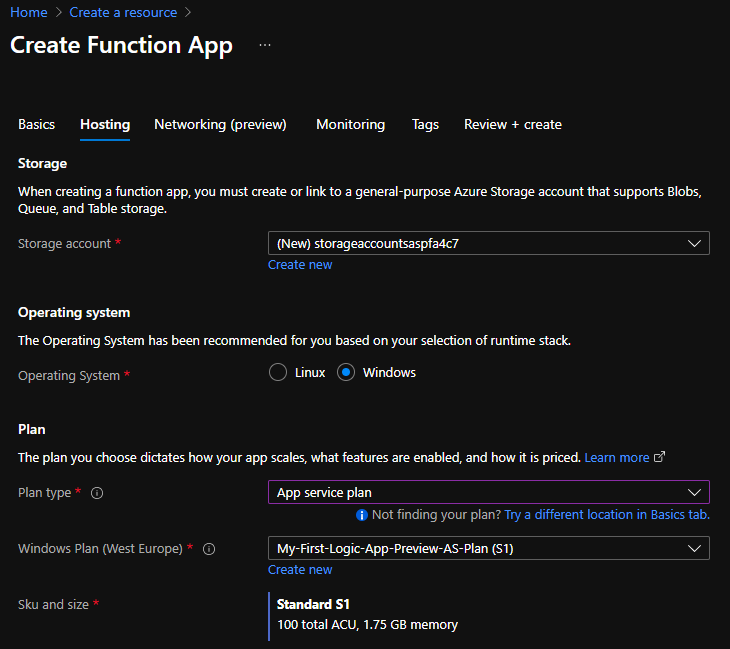
- You can customize the other option according to your intentions or leave the default values. For this demo, we will now select Review + create to review the app configuration selections.
- On the Review + create page, review your settings, and then select Create to provision and deploy the function app.
Create an HTTP trigger function
The next step is to create an HTTP trigger Function:
- From the left menu of the Function App window, select Functions, then select Create from the top menu.
- From the Create Function window, leave the Development environment property as Develop in portal and select the HTTP trigger template.
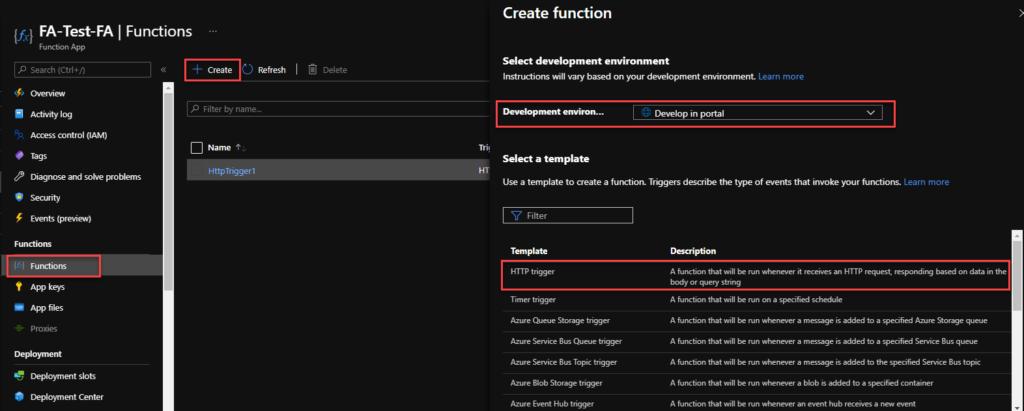
- Under Template details, use HttpTrigger1 (or provide a better name) for New Function, choose Function from the Authorization level drop-down list, and then select Create.
- On the HttpTrigger1 window, select Code + Test, then on the run.ps1 file add the following code:
$resources = Get-AzResource -ResourceType Microsoft.Web/connections
$resources | ForEach-Object {
    $logicAppUrl = $_.ResourceId + '?api-version=2018-07-01-preview'

    # Get Logic App Content
    #$resourceJsonResult = az rest --method get --uri $logicAppUrl
    $var = "https://management.azure.com" + $logicAppUrl
    $accsessToken = Get-AzAccessToken `
        -TenantId $connection.TenantID

    $auth = "Bearer " + $accsessToken.Token
    $resourceJson = Invoke-RestMethod -Uri $var -Headers @{ Authorization = $auth }

    $resourceName = $_.Name
    $resourceGroupName = $_.ResourceGroupName

    # Check Logic App Connectors
    $apiConnectionStatus = $resourceJson.properties.overallStatus
    if($apiConnectionStatus -eq 'Error')
    {
        $apiBrokenCount++;
        $apiBrokenDataNode += [pscustomobject]@{
                'ResourceGroupName' = $_.ResourceGroupName;
                'ResourceName' = $_.Name;
                'Status' = $resourceJson.properties.statuses.status;
                'APIName' = $resourceJson.properties.api.name;
                'APIDisplayName' = $resourceJson.properties.api.displayName;
                'ResourceType'= $resourceJson.type;
                'ResourceLocation'= $resourceJson.location;
                'ResourceId'= $resourceJson.id;
                'ErrorCode'= $resourceJson.properties.statuses.error.code
                'ErrorMessage'= $resourceJson.properties.statuses.error.message
            }
    }
}
Note: this is a small part of the code. Click on the button below to download all the source code.
- Once you finish, select Save.
Configure Function App permissions
Now that we have created our function, we need to provide permission for this function to access and read from your subscription or different resource groups. I choose to provide permissions at the resource level. And for that, you need to:
- From the left menu of the Function App window, select the Identity option, then select the System assigned tab from the top menu.
- On the Status, select On and click Save. This will create an Object (principal) ID.
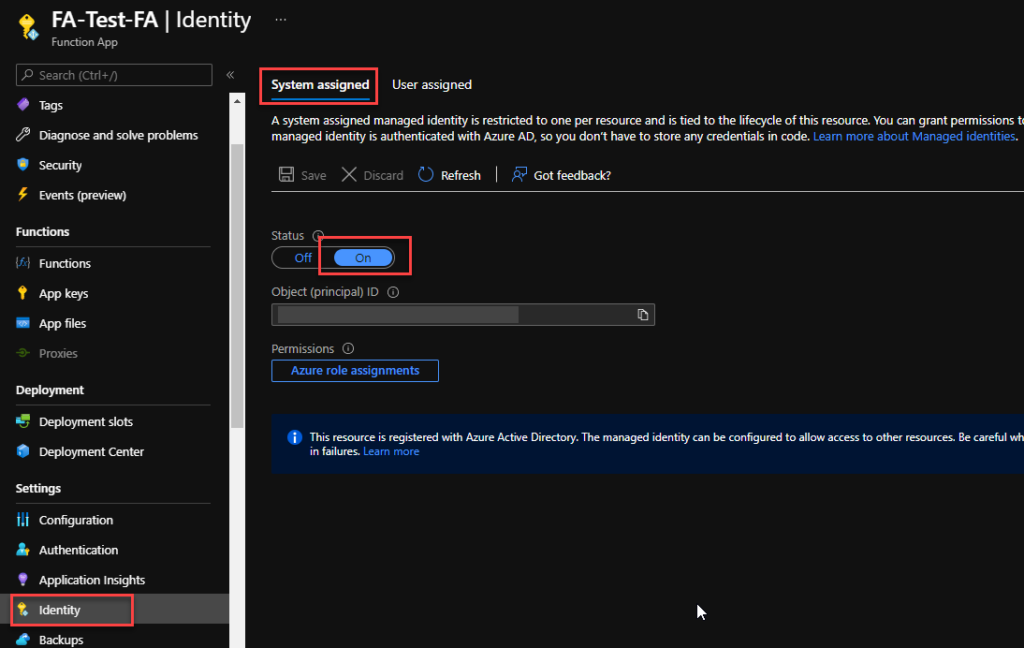
- Click on the Azure role assignments button, and in the Azure role assignments window, click Add role assignment (Preview).
- On the Add role assignment (Preview) page, set the following settings:
- Scope: Select the Resource Group from the combo box list.
- Subscription: Select the subscription under the resource group you want to monitor.
- Resource group: Select the resource group you want to monitor.
- Role: Select the Reader role.

- Click Save.
Repeat the same steps for all the resource groups you want to monitor.
Create a Logic App
Finally, we need to create a scheduling Logic App to trigger the monitoring Function and notify if any API Connection is broken. To simplify the solution, we will be using the Azure Portal to create the Logic App.
- From the Azure portal menu or the Home page, select Create a resource.
- In the Create a resource page, select Integration > Logic App.
- On the Create Logic App Basics page, use the following Logic app settings:
- Subscription: Select the subscription under which this new Logic app is created.Resource Group: Select an existing Resource Group or create a new one in which your Logic app will be created.Type: The logic app resource type and billing model to use for your resource. In this case, we will be using Consumption
- Consumption: This logic app resource type runs in global, multi-tenant Azure Logic Apps and uses the Consumption billing model.Standard: This logic app resource type runs in single-tenant Azure Logic Apps and uses the Standard billing model.
- Region: The Azure datacenter region where to store your app’s information. Choose a region near you or near other services to which your Logic app has access.
- Enable log analytics: Change this option only when you want to enable diagnostic logging. The default value in No.
- Subscription: Select the subscription under which this new Logic app is created.Resource Group: Select an existing Resource Group or create a new one in which your Logic app will be created.Type: The logic app resource type and billing model to use for your resource. In this case, we will be using Consumption
- When you’re ready, select Review + Create. On the validation page, confirm the details that you provided, and select Create.
- After Azure successfully deploys your app, select Go to resource. Or, find and select your logic app resource by typing the name in the Azure search box.
- Under Templates, select Blank Logic App. After you select the template, the designer now shows an empty workflow surface.
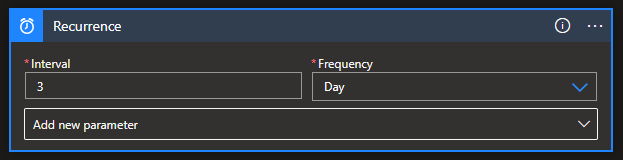
- In the workflow designer, under the search box, select Built-In. From the Triggers list, select the Schedule trigger, Recurrence.
- In the trigger details, provide the following information:
- Interval: 1
- Frequency: Day
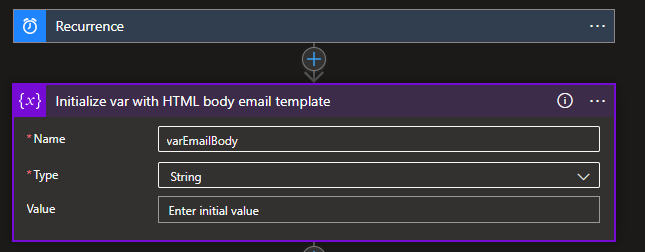
- Under the Recurrence trigger, select New step.
- In the search box, enter Variables, and from the result panel select the Variables, Initialize variable action, and provide the following information:
- Name: varEmailBody.
- Type: String.
- Value: leave it empty.
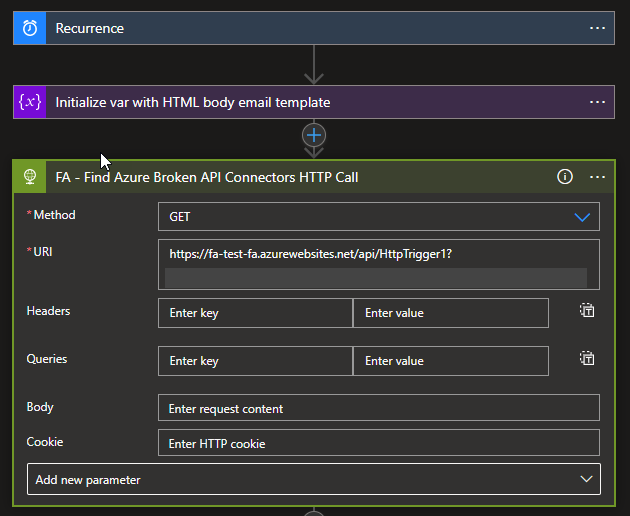
- Select New step. In the search box, enter HTTP, and from the result panel select the HTTP, HTTP action, and provide the following information:
- Method: GET
- URI: specify the endpoint of your Function that we created earlier in this blog post.
- Select New step. In the search box, enter Data Operations, and from the result panel select the Data Operations, Parse JSON action, and provide the following information:
- Method: body of the HTTP action.
- Use the following sample payload to generate the schema.
{
    "Monitor": "API Connections",
    "Client": "Sandro Pereira",
    "Environment": "DEV",
    "APIBroken": [
        {
            "ResourceGroupName": "ResourceGroupName",
            "ResourceName": "ResourceName",
            "Status": "Status",
            "APIName": "APIName",
            "APIDisplayName": "APIDisplayName",
            "ResourceType": "ResourceType",
            "ResourceLocation": "ResourceLocation",
            "ResourceId": "ResourceId",
            "ErrorCode": "ErrorCode",
            "ErrorMessage": "ErrorMessage"
        },
        {
            "ResourceGroupName": "ResourceGroupName",
            "ResourceName": "ResourceName",
            "Status": "Status",
            "APIName": "APIName",
            "APIDisplayName": "APIDisplayName",
            "ResourceType": "ResourceType",
            "ResourceLocation": "ResourceLocation",
            "ResourceId": "ResourceId",
            "ErrorCode": "ErrorCode",
            "ErrorMessage": "ErrorMessage"
        }
    ]
}
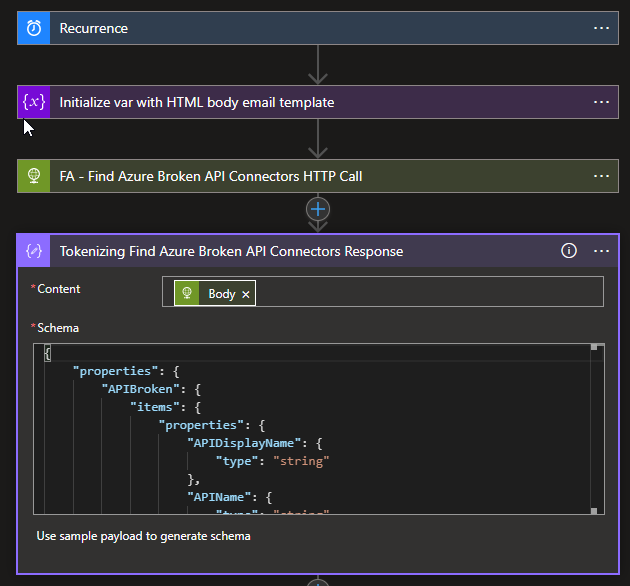
- Select New step. Under the search box, select Built-In. From the Triggers list, select the Control, Condition action, and provide the following condition:
- length(body(‘Tokenizing_Find_Azure_Broken_API_Connectors_Response’)?[‘APIBroken’]) is greater than 0
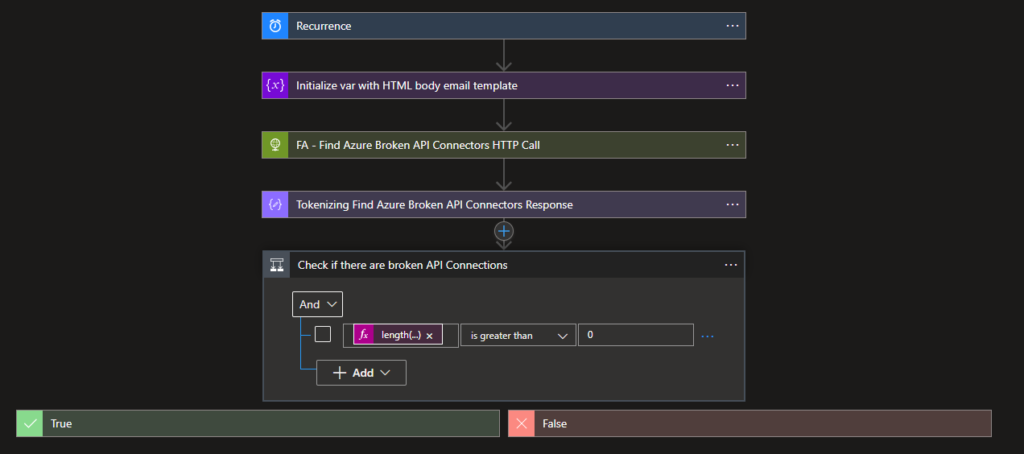
- Leave the False branch empty
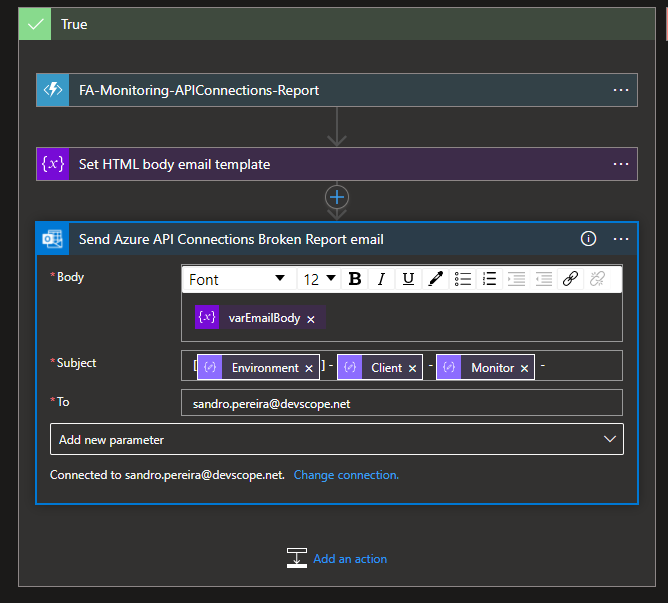
- On the True branch, I end up adding the following action to notify the support team:
- Choose an Azure function: I’m calling an Azure Function to transform the list of broken API’s in a HTML table.
- Set variable: I’m setting the varEmailBody with my default HTML email body Template and adding the HTML table that the Azure Function returned.
- Send an email (v2) – Office 365 Outlook: To send the email to the support team.
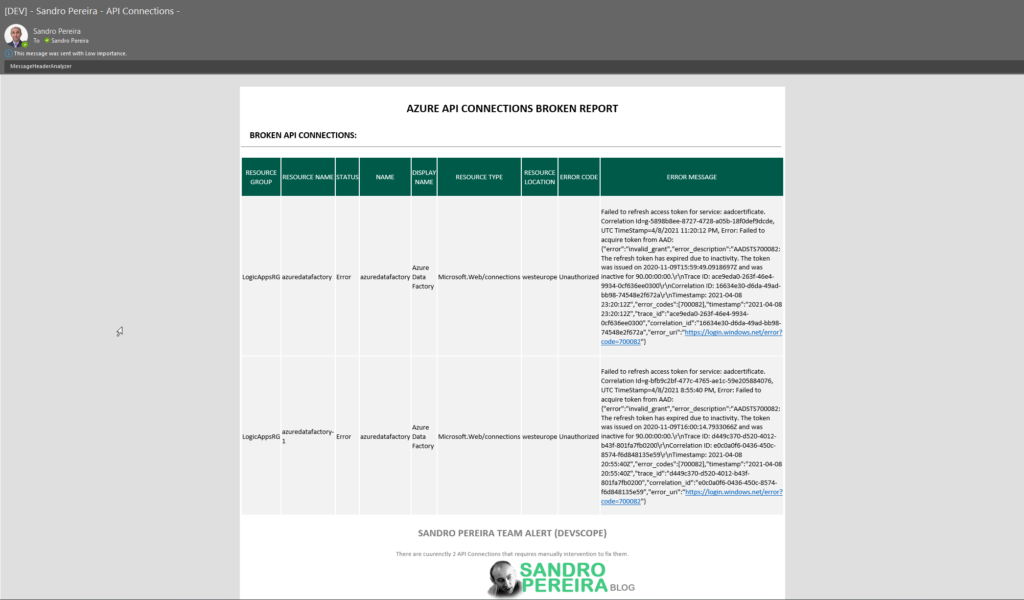
The result, once you try to execute the Logic App, will be a fancy HTML email:
This approach is an elegant solution and relatively easier to build; nevertheless, it has a significant disadvantage:
- Az modules are not supported on a Consumption plan. At least I couldn’t make it work. So that means I need to use an App Service plan, which means I will have an additional cost or more costs associated with this solution, more or less 36.94€/month.
- This could be almost, if not free, if we use a Consumption plan.
Hope you find this helpful! If you liked the content or found it useful and would like to support me in writing more, consider buying (or helping to buy) a Star Wars Lego set for my son.


But to send your email in your logic app, you need an api connection don’t you ? so how to ensure you logic app works indefinitly since at some point, Office will cut it ?
You have a point there but this also reminds me of the story about having a guard dog to control the guard dog :). It is easier to manually make sure that one connector is working than 100 but you also can implement other strategies.