Today, we’re looking at another real scenario from one of our Power BI Robots clients. For anyone unfamiliar with the product, Power BI Robots is part of DevScope’s Power BI suite and automatically captures high‑resolution screenshots of reports and dashboards. Moreover, it can deliver these images to an unlimited number of recipients—across any device—regardless of whether they belong to your organization or even have a Power BI account.
📝 One-Minute Brief
Learn how to deliver scheduled Power BI report screenshots to Microsoft Teams using PowerBI Robots and Azure Integration Services. This approach bypasses Teams’ message size limits and enables you to automate report image distribution through Blob Storage, Logic Apps, and Power Automate.
Challenge
The COVID‑19 pandemic accelerated the adoption of remote work, and one of our Power BI Robots clients soon asked for a way to receive high‑resolution screenshots of their reports and dashboards. In addition to displaying them on the client’s onsite devices (mainly TVs), they also wanted these screenshots to appear in a Microsoft Teams channel so every authorized user could view them easily. Although Power BI Robots already supported several sharing options for high‑resolution report images, it didn’t provide this capability out of the box. Therefore, we extended the solution by using Azure Integration Services to deliver the images directly to Teams.

This proof‑of‑concept demonstrates how to extend the product’s capabilities by leveraging Power BI Robots’ built‑in ability to send a JSON message to an HTTP endpoint. From there, you can use Azure Integration Services—such as Azure Blob Storage, Azure File Storage, and Logic Apps—to process and distribute the generated images. Additionally, Power Platform tools like Power Automate make it easy to share these reports or dashboard screenshots across platforms such as Microsoft Teams, SharePoint, or virtually any destination you need.
Create Blob Storage
In theory, we could send an image in base64 directly to Teams, but the problem is that messages on Teams have a size limit of approximately 28KB. This encompasses all HTML elements such as text, images, links, tables, mentions, and so on. If the message exceeds 28KB, the action will fail with an error stating: “Request Entity too large“.
To avoid and bypass this limitation, we have to use an additional Azure component to store the Power BI report images provided by Power BI Robots. And to do that, we can choose from among resources such as:
- Azure Blob Storage: Azure Blob storage is a feature of Microsoft Azure. It allows users to store large amounts of unstructured data on Microsoft’s data storage platform. In this case, Blob stands for Binary Large Object, which includes objects such as images and multimedia files.
- Azure File Storage: Azure Files is an Azure File Storage service you can use to create file-sharing in the cloud. It is based on the Server Message Block (SMB) protocol and enables you to access files remotely or on-premises via an API, using encrypted communications.
- Or even a SharePoint library, where you can store images and many other types of files.
We chose to use blob storage for its simplicity and low cost for this POC.
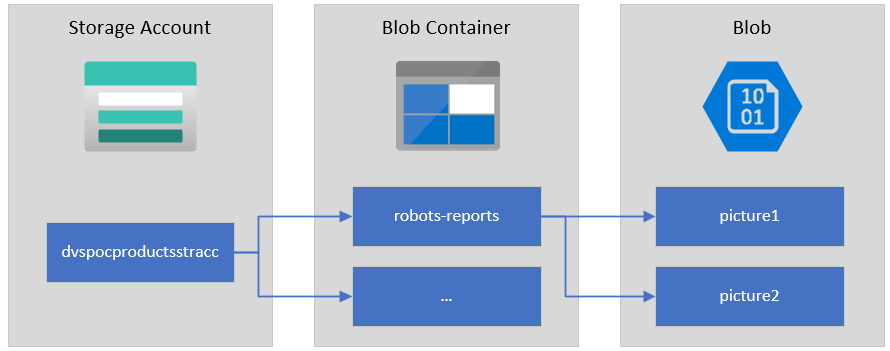
To start, let’s explain the structure of Azure Blob storage. It has three types of resources:
- The storage Account
- A container in the storage account
- A blob
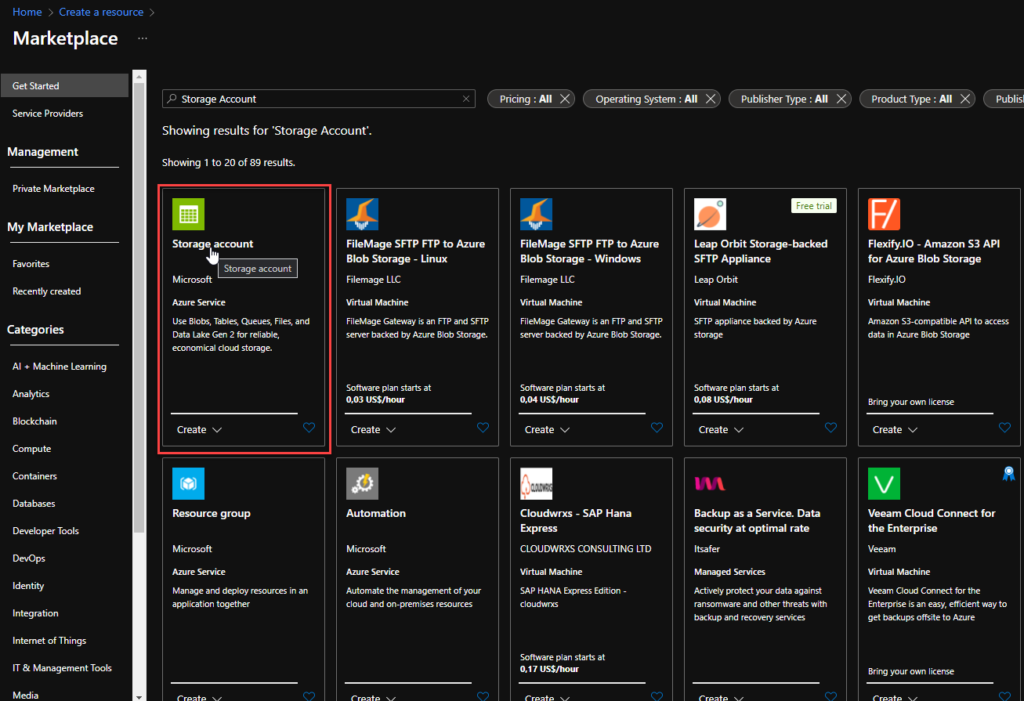
If you don’t have a Storage Account yet, the first step is to create one, and for that, you need to:
- From the Azure portal menu or the Home page, select Create a resource.
- On the Create a resource page, in the search type Storage account and from the list, select Storage account and click Create.
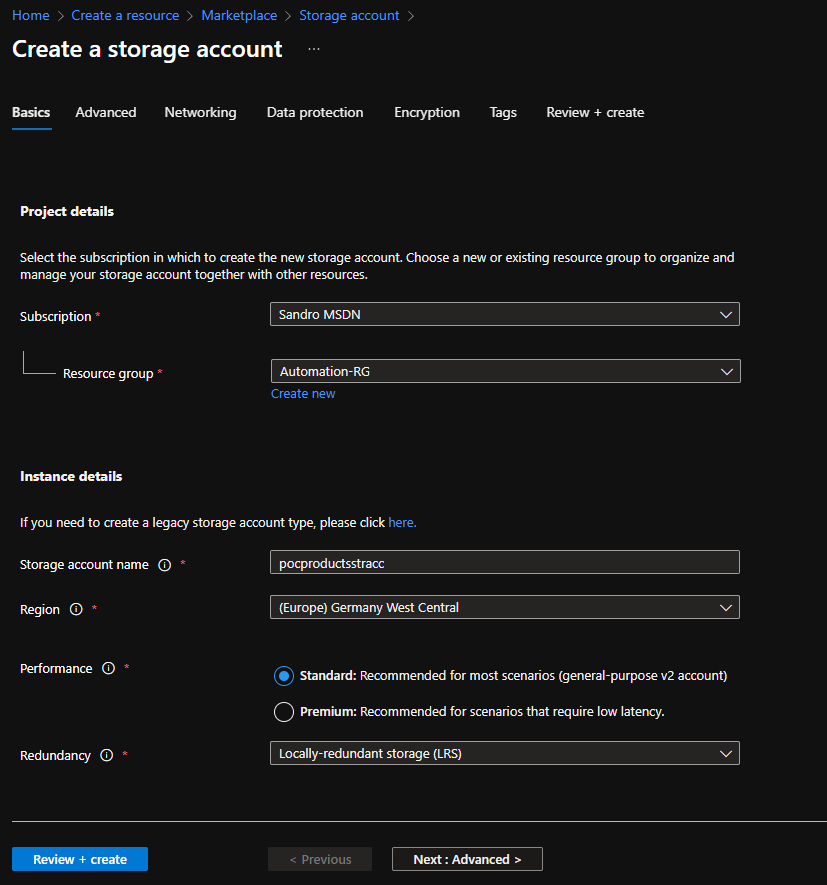
- On the Create a storage account Basics page, you should provide the essential information for your storage account. After you complete the Basics tab, you can choose to further customize your new storage account by setting options on the other tabs, or you can select Review + create to accept the default options and proceed to validate and create the account:
- Project details
- Subscription: Select the subscription under which this new function app is created.
- Resource Group: Select an existing Resource Group or create a new one in which your function app will be created.
- Instance details
- Storage account name: Choose a unique name for your storage account.
- Storage account names must be between 3 and 24 characters in length and may contain numbers and lowercase letters only.
- Region: Choose a region near you or near other services your functions access.
- Note: Not all regions are supported for all types of storage accounts or redundancy configurations
- Performance: Standard or Premium Select
- Standard performance for general-purpose v2 storage accounts (default). This type of account is recommended by Microsoft for most scenarios.
- Select Premium for scenarios requiring low latency.
- Redundancy: Select your desired redundancy configuration.
- Storage account name: Choose a unique name for your storage account.
- Project details
Now that we have the storage account created, we need to create our Blob Container. And for that we need:
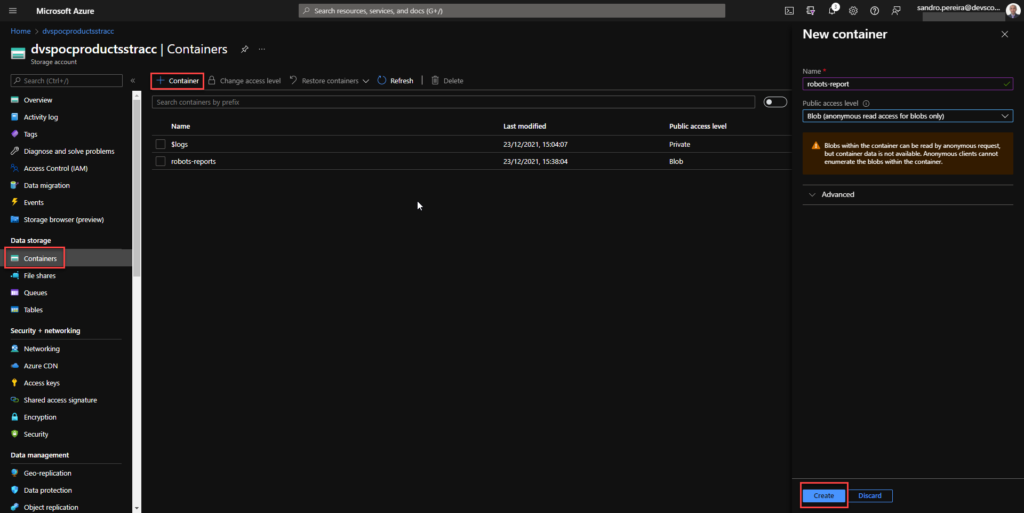
- In the left menu for the storage account, scroll to the Data storage section, then select Containers.
- On the Containers page, click on the + Container button.
- From the New Container window:
- Enter a name for your new container. You can use numbers, lowercase letters, and dash (-) characters.
- Select the public access level to Blob (anonymous read access for blobs only).
- Blobs within the container can be read by an anonymous request, but container data is not available. Anonymous clients cannot enumerate the blobs within the container.
- Click Create to create the container.
Create a Logic App
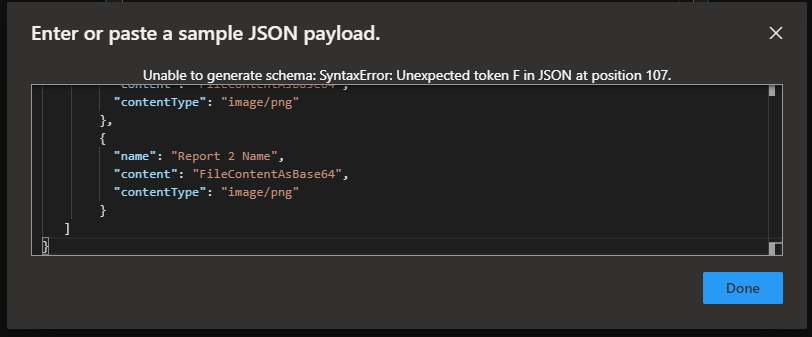
Power BI Robots is capable of sending a JSON request with all the information regarding a configured playlist:
{
   "playlistName": "Playlist Name",
   "reports": [
		{
		  "name": "Report 1 Name",
		  "content": "FileContentAsBase64",
		  "contentType": "image/png"
		},
		{
		  "name": "Report 2 Name",
		  "content": "FileContentAsBase64",
		  "contentType": "image/png"
		}
   ]
}
To receive and process requests from Power BI Robots, we decided to use and create a Logic App, which is a cloud-based platform for creating and running automated workflows that integrate your apps, data, services, and systems. To simplify the solution, we will also use the Azure Portal to create the Logic App.
- From the Azure portal menu or the Home page, select Create a resource.
- In the Create a resource page, select Integration > Logic App.
- On the Create Logic App Basics page, use the following Logic App settings:
- Subscription: Select the subscription under which this new Logic App is created.
- Resource Group: Select an existing Resource Group or create a new one in which your Logic app will be created.
- Type: The logic app resource type and billing model for your resource. In this case, we will be using Consumption.
- Consumption: This logic app resource type runs in global, multi-tenant Azure Logic Apps and uses the Consumption billing model.
- Standard: This logic app resource type runs in single-tenant Azure Logic Apps and uses the Standard billing model.
- Logic App name: Your Logic App resource name. The name must be unique across regions.
- Region: The Azure datacenter region where to store your app’s information. Choose a region near you or near other services to which your Logic app has access.
- Enable log analytics: Change this option only when you want to enable diagnostic logging. The default value in No.
- When you’re ready, select Review + Create. Then, on the validation page, confirm the details you provided, and select Create.
- After Azure successfully deploys your app, select Go to resource. Or, find and choose your Logic App resource by typing the name in the Azure search box.
- Under Templates, select Blank Logic App. After selecting the template, the designer now shows an empty workflow surface.
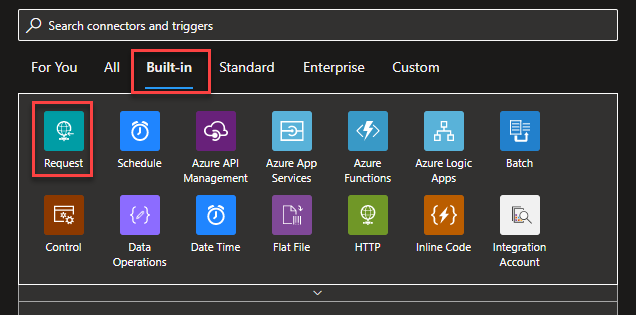
- In the workflow designer, under the search box, select Built-In. Then, from the Triggers list, select the Request trigger, When a HTTP request is received.
- For us to tokenize the values of the message we are receiving from the Power BI Robots, we can, on the Request trigger, click on Use sample payload to generate schema

- Copy the JSON message provided earlier to the Enter or paste a sample JSON payload window and then click Done.
- Under the Request trigger, select New step.
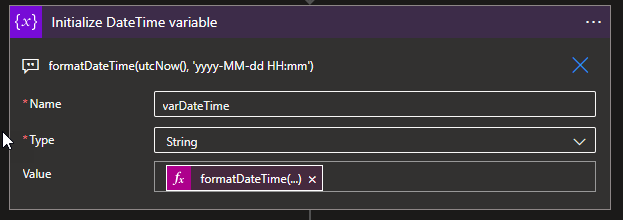
- Select New step. In the search box, enter Variables, and from the result panel select the Variables, choose the Initialize variable action, and provide the following information:
- Name: varDateTime.
- Type: String.
- Value: Select Expression and add the following expression formatDateTime(utcNow(), ‘yyyy-MM-dd HH:mm’).
Note: this variable will be used later in the business process to provide the data in a clear format on the message to be sent to the Teams channel.
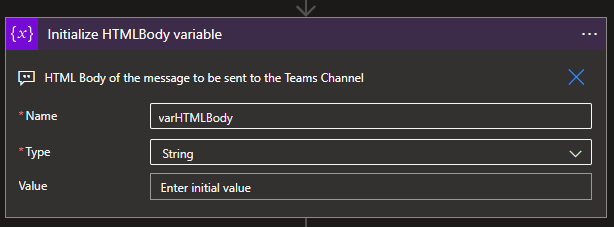
- Under the Request trigger, select New step.
- Select New step. In the search box, enter Variables, and from the result panel select the Variables, choose the Initialize variable action, and provide the following information:
- Name: varHTMLBody
- Type: String
- Value: (Empty)
Note: this variable will be used later in the business process to dynamically generate the message to be sent to the Teams channel in an HTML format.
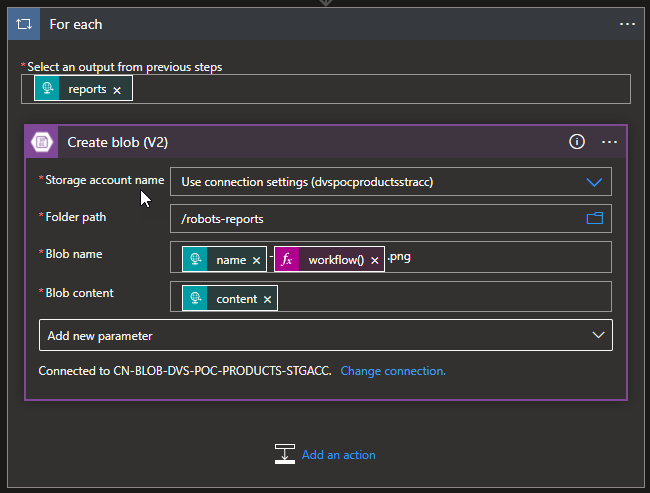
- Select New step. In the search box, enter Blob, and from the result panel select the Azure Blob Storage and choose the Create blob (v2) action.
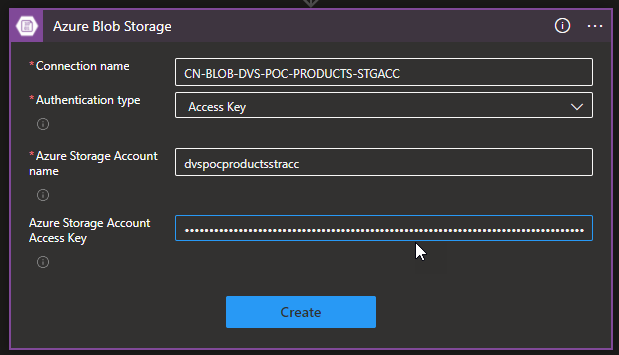
- If you don’t have a connection yet, you first need to create the connection by setting the following configurations and then clicking Create:
- Connection name: Display connection name
- Authentication type: The connector supports a variety of authentication types. In this POC, we will be using an Access Key.
- Azure Storage Account name: Name of the storage account that the connector we created above. We will be using dvspocproductsstracc.
- Azure Storage Account Access Key: Specify a valid primary/secondary storage account access key. You can get these values on the Access keys option under the Security + networking section of your storage account.
- Then provide the following information:
- Storage account name: Select from the dropdown list the storage account. The default should be Use connection settings (dvspocproductsrracc)
- Folder path: navigate to the folder /robots-reports
- Blob name: Dynamic set the name of the file to be created. To avoid overlap we decide to use the unique workflow id of the message as part of the name of the report we receive on the source message:
- @{items(‘For_each’)?[‘name’]}-@{workflow()[‘run’][‘name’]}.png
- Blob content: the Base64 content we receive on the source message.
Note: By setting the name or the content on the Create blob action, this will automatically add a For Each loop statement on our business flow since these fields can occur multiple times inside the source message. And this is correct and what we want.
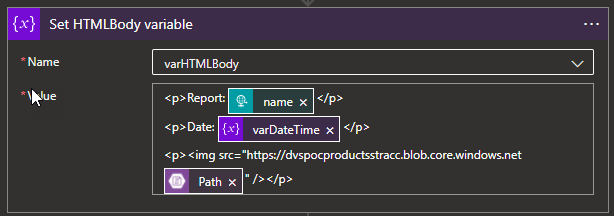
- Select New step. In the search box, enter Variables, and from the result panel select the Variables, choose the Set variable action, and provide the following information:
- Name: varHTMLBody.
- Value:
<p>Report: @{items('For_each')?['name']}</p>
<p>Date: @{variables('varDateTime')}</p>
<p><img src="https://dvspocproductsstracc.blob.core.windows.net@{body('Create_blob_(V2)')?['Path']}" /></p>
- And finally, select New step. In the search box, enter Teams, and choose Microsoft Teams from the result panel. Choose the Post message in a chat or channel action and provide the following information:
- Post as: Select User.
- Post in: Select Channel.
- Team: Select the Team, in our case PowerBI Robots Webhooks.
- Channel: Select the Team channel, in our case, General.
- Message: place the message we create above by using the varHTMLBody.
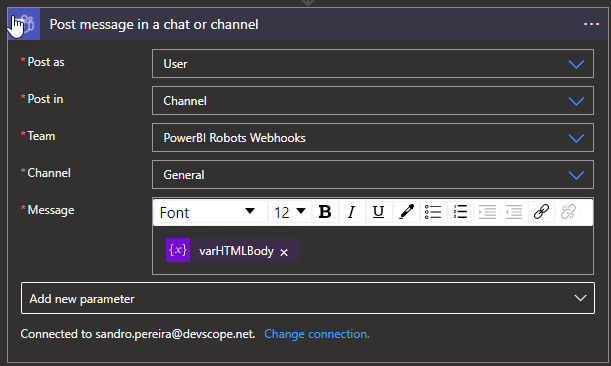
Note: if you haven’t yet created a Teams Connector, you need to sign in using the account that will be making these notifications.
As a result, once we receive a new request from the Power BI Robots, there will be a fancy message on Teams with a thumbnail of the report:
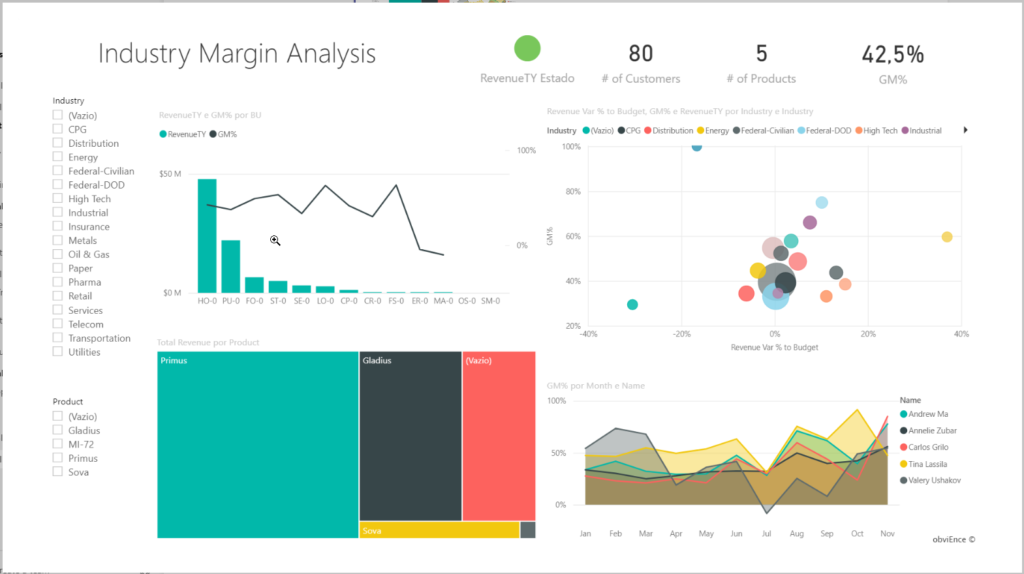
You can click on it and see it in full size:
More About Power BI Robots?
Power BI Robots automatically takes screenshots of your Microsoft Power BI dashboards and reports and sends them anywhere, to an unlimited number of recipients. Simply tell Power BI when and where you want your BI data, and it will take care of delivering it on time.
Hope you find this helpful! If you liked the content or found it useful and would like to support me in writing more, consider buying (or helping to buy) a Star Wars Lego set for my son.


You can now use PowerBI Robots conector if you didnt know 😉