From Azure Portal to Visual Studio
Most developers start building Logic Apps in the Azure Portal because it’s fast and straightforward. You open the portal, create a resource, and start working immediately. While this approach works well at first, it comes with trade‑offs. In particular, the Azure Portal introduces several limitations, especially when you need proper CI/CD (Continuous Integration and Continuous Delivery).
Choosing the right tool
Making this transition requires the right tooling, and several options exist. In this post, I focus on a solid and proven solution and explain how to use it step by step.
The tool is a collection of PowerShell scripts that downloads your Logic App Consumption definition to a file. In addition, it can generate a parameters file, which is essential for CI/CD and multi‑environment deployments.
LogicAppTemplateCreator
Jeff Hollan, PM Lead at Microsoft, created this tool. You can explore his work on GitHub:
https://github.com/jeffhollan.
The project we’ll use is LogicAppTemplateCreator. It’s a C# project that builds a DLL, which we then import and use from PowerShell:
📝 One-Minute Brief
Explains how to move Azure Logic Apps Consumption from the Azure Portal to Visual Studio to overcome portal limitations and enable better CI/CD, source control, and team collaboration using ARM templates.
How to move Logic Apps Consumption from the Azure Portal into Visual Studio Solutions
Let’s begin our process. After cloning the solution and rebuilding it, the DLL will be in the usual folder ($sourcefolder/bin/debug/).
After the solution is built, open PowerShell and import this DLL, using the following command:
Import-Module C:\{pathToSolution}\LogicAppTemplateCreator\LogicAppTemplate\bin\Debug\LogicAppTemplate.dll

I dropped into a Shared folder because I’ve referenced it in a Repo for others to use in our projects, but this isn’t necessary; I recommend it to make it easier for future developers in your company.
After executing this, you’ll be ready to download your ARM template. So, get your Resource Group ID, your Subscription ID, and prepare an output folder. You will also need to enter your credentials to log in via PowerShell.
The script should be updated to match your IDs. Do note that it should not be case sensitive. If you don’t set the Out-File, the output will be set in the PowerShell console; you’ll still be able to copy it and paste it into a file, but it’s an unnecessary step.
armclient token {subscription ID} | Get-LogicAppTemplate -LogicApp {LogicAppName} -ResourceGroup {ResourceGroup} -SubscriptionId {subcriptionID} | Out-File {ARMTemplateOutput}
After the ARM template is created, a parameter template file can be generated by running the following script.
get-ParameterTemplate -GenerateExpression True -TemplateFile {ARMTemplateOutput} | Out-File {ParameterTemplateOutput}
You will now have both files you need to manage your Logic App, so just copy them to your VS Azure Resource Group project, with the Logic Apps Template, and you’re almost ready to go.
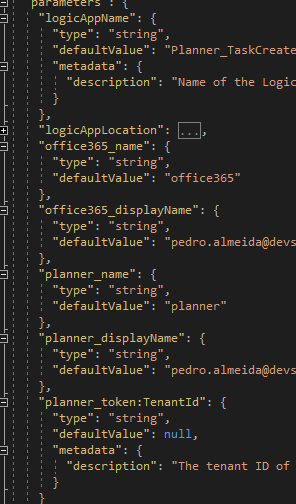
You will need to address the path links in the JSON code to make it CI/CD-able and fix the parameters in some connectors, but there’s not much work to do.
As you can see, the ARM template already provides all connection parameters and connection variables. I recommend you change them to a more appropriate naming convention, such as arm_O365, arm_SQL, or arm_ServiceBus. This way, you will know what it’s referring to with a very understandable pattern.
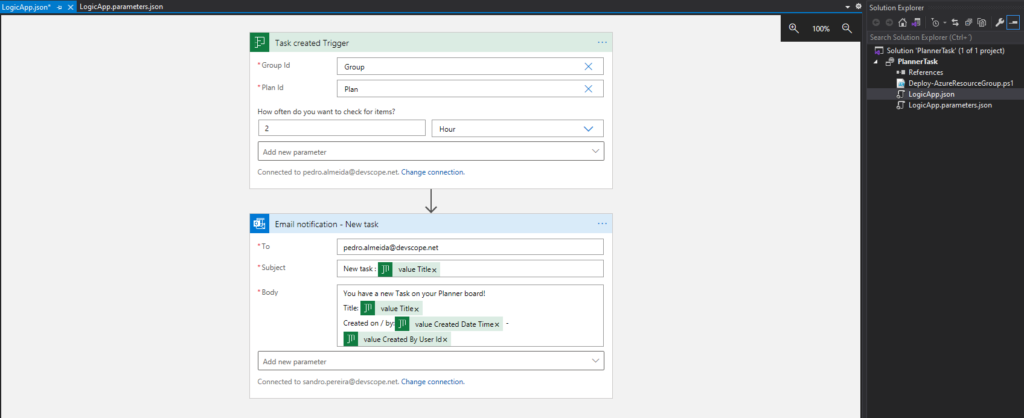
At the end of the day, Logic App monitoring should be ready for deployment in your subscriptions and look something like this:
Happy coding!
Hope you find this helpful! If you liked the content or found it useful and would like to support me in writing more, consider buying (or helping to buy) a Star Wars Lego set for my son.


4 thoughts on “Logic Apps Consumption: Moving from Azure Portal to Visual Studio”