Welcome again to another BizTalk Server to Azure Integration Services blog post. In my previous blog post. Today, we will address a common scenario and requirement in Enterprise Integration solutions that are quite simple to accomplish with BizTalk Server solutions: How do we validate XML messages before executing the business logic or processing them?
For simplicity, let’s assume that the BizTalk Server internally processes only XML messages, which is not completely true. That means that when we receive a message through an adapter specified in a specific receiving location, the first thing we need to do is normalize data from various formats to XML. For that, we will need to use a BizTalk Server artifact called Pipeline.
Pipelines are software components that can process messages, either as the messages are received or just before they are sent out through a send port. A pipeline divides processing into categories of work called processing stages and specifies the sequence in which each stage of work is performed. Each stage of a pipeline contains one or more pipeline components (Microsoft .NET objects or COM objects) that can be configured to work with the specific requirements of the messaging solution or orchestrated business process.
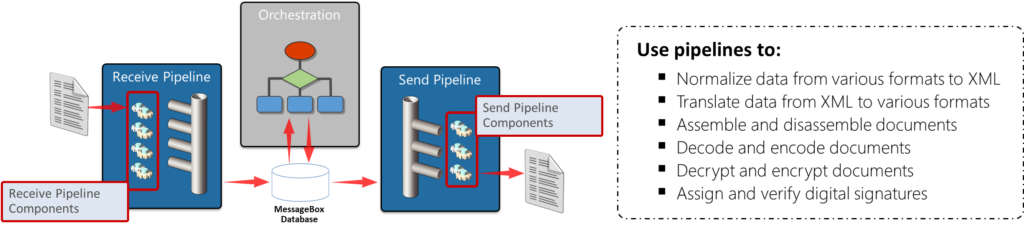
In this particular case, we are interested in using a Receive Pipeline to validate messages against known schema(s). The Receive Pipeline is composed of four stages. Each of the four stages in a receive pipeline performs a specific function and can contain only components specified for use in that stage. Each receive pipeline stage can contain up to 255 components, which will all be executed in order, with the exception of the disassemble stage, in which only one component will execute. The four stages are as follows:
- Decode: This stage is used for components that decode or decrypt messages. For example, there is a built-in MIME/SMIME decoder pipeline component that can be used to decode MIME-encoded messages. Custom components for this stage could include a component to decode a compressed (zipped) file before further processing.
- Disassemble: Use this stage if you need to parse or disassemble the inbound message. The components within this stage probe the message to see if the message format is recognized, and then, if the message format is recognized, one of the components disassembles the message. Tasks performed in this stage include conversions of flat-file messages to XML format and splitting of messages. In order for property promotion to occur, an appropriate (flat-file or XML) disassembler must be specified at this stage.
- Validate: In this stage, messages are validated against a collection of schemas. Pipelines process only messages that conform to the schemas specified in this component, if present. If a message whose schema is not associated with any component in the pipeline is received by the pipeline, the message is not processed. Depending on the adapter, the message is either suspended or an error is issued to the sender. This stage runs once per message created by the Disassemble stage. The built-in validate component can be used in this stage as well as in other stages.
- Resolve Party: In this stage, the certificate associated with the sender’s security identifier (SID) is mapped to the corresponding configured BizTalk Server party. If the message was digitally signed, the component uses the signature to look up a Microsoft Windows® identity in the BizTalk Server 2010 Configuration database. If the message carries the authenticated SID of a Windows user, this identity is used. If neither mechanism succeeds, the sender is assigned a default anonymous identity. Party resolution is an important feature for managing trading partner relationships. Not all adapters support party resolution.
In simpler terms, BizTalk Pipelines are the helpful assistants that take care of the stuff coming into BizTalk, tidy it up, and hand it over to other parts of the system so everything runs smoothly. They’re like the backstage crew making sure the show (or data flow) goes on without a hitch.
BizTalk Server solution: Create a custom receive pipeline to validate messages against known schema(s)
Of course, as always, there are multiple ways to accomplish this solution. But one of the most simple and elegant solutions to achieve this is by:
- Create a custom receive pipeline that contains at least these two out-of-the-box components:
- The XML Disassembler pipeline component in the Disassemble stage. In this scenario, its primary function will be to promote the content properties from individual document levels to the message context.
- Then, the XML Validator pipeline component in the Validate stage. This component validates the message against the specified schema or schemas, and if the message does not conform to these schemas, the component raises an error, and Messaging Engine places the message in the suspended queue.
Assuming that we already have created our BizTalk Server project and our schema representing this simple message:
<ns0:PersonOrigin xmlns:ns0="http://POC.ValidateInboundXMLMessages.Person">
 <FirstName>Sandro</FirstName>
 <LastName>Pereira</LastName>
 <DateOfBirth>1978-04-04</DateOfBirth>
 <Address>Portugal</Address>
 <ZipCode>4415</ZipCode>
</ns0:PersonOrigin>
Where all fields are mandatory, with the exception of ZipCode, which is optional. Also, DateOfBirth is a xs:date. The rest are simple strings.
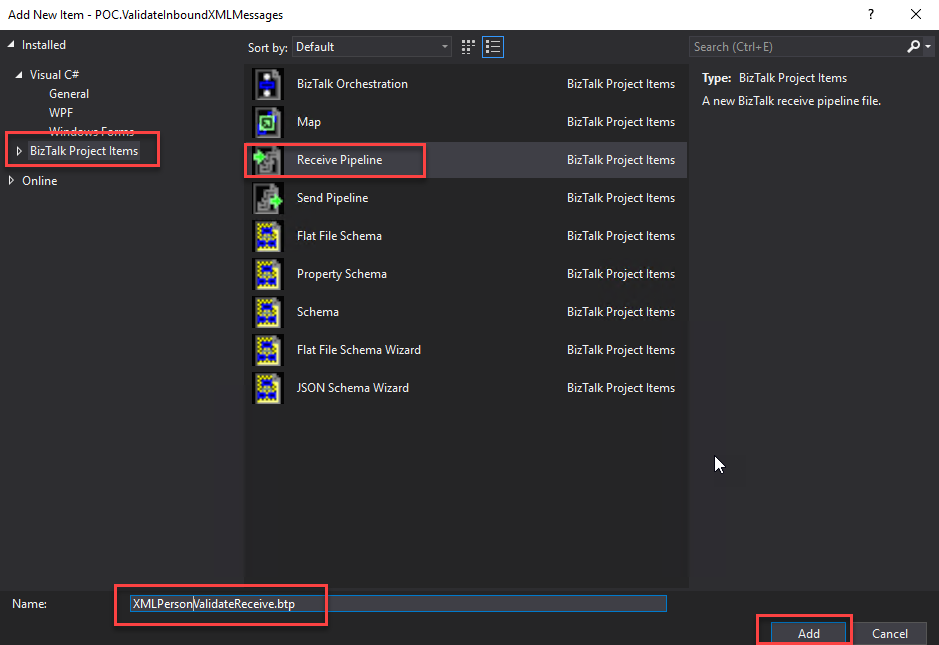
In order to accomplish our requirements inside the BizTalk Server, we just need in our solution to create a custom receive pipeline. To do so, we need to:
- Right-click on the project name and select the option Add > New Item…
- On the Add New Item window, on the left tree, select BizTalk Project Items and then select Receive Pipeline. Give it a proper name and click Add.
- From the Toolbox, drag and drop the XML Disassembler pipeline component in the Disassemble stage and the XML Validator pipeline component in the Validate stage.
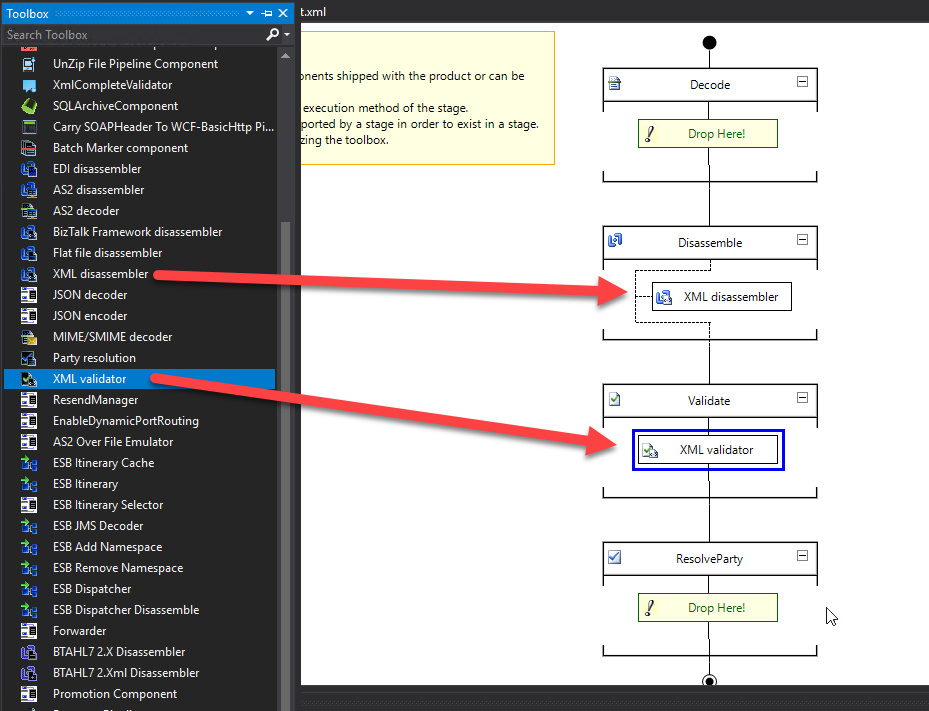
- In this scenario, we will leave the default configuration of the XML Disassembler pipeline component.
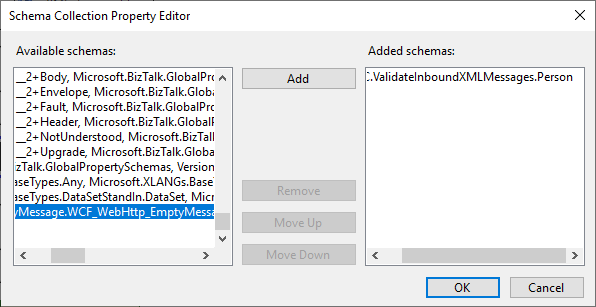
- Now, select the XML Validator pipeline component, and in the Properties windows (normally present on the right side of the Visual Studio Editor), click on the three dots (…) of the Document schemas property.

- On the Shema Collection Property Editor window, on the Available schemas panel, select your schema, in this case, Person, and then click Add. Click OK.
- Save your pipeline. Build your project and deploy it. That’s it!
Now, when you deploy the solution into your BizTalk Server environment and configure a physical receive port and location associating this receive pipeline you have created, what happens is that:
- If the port receives a Person XML, it will deeply validate the instance of that message against the schema, and if the message does not conform to these schemas, the component will raise an error.
- If we receive any other type of XML message, the port will consume them without deeply validating the instance against the schema since it is not a Person.
The challenge
This is a common request that we will find in many solutions, and it is fully supported inside Logic Apps. It is not in the same way as BizTalk Serve since we do not have a concept of Receive Ports and Receive Location in Logic App or any other service in Azure, but it is still fairly easy to accomplish.
The main challenge here is that depending on which type of Logic App you will use, we will have different approaches:
- If we use Consumption to have XML “premium” capabilities, we need to have an Integration Account to store the schemas and perform validation (and many other features). However, this will have an additional cost.
- If we use Standard, we already have built-in XML capabilities, and for these requirements, we will not need an Integration Account.
The good news is that BizTalk Server Schemas are fully supported in Logic Apps, both Consumption and Standard, so we don’t need to worry about generating or recreating them. We can just copy them from our BizTalk Server solution and use them in our Azure Integration Service (AIS) solution.
Building the Logic App Consumption Solution
In this Proof-of-Concept (POC), first, we need to copy our schema to our Integration Account. If you don’t have one, you can create it by:
- In the Azure portal search box, enter Integration accounts, and select Integration accounts.
- Under Integration accounts, select Create.
- On the Create an integration account pane, provide the following information about your integration account like, Subscription, Resource Group, Integration Account Name, Pricing Tier, Storage account, and so on.
- When you’re done, select Review + create.
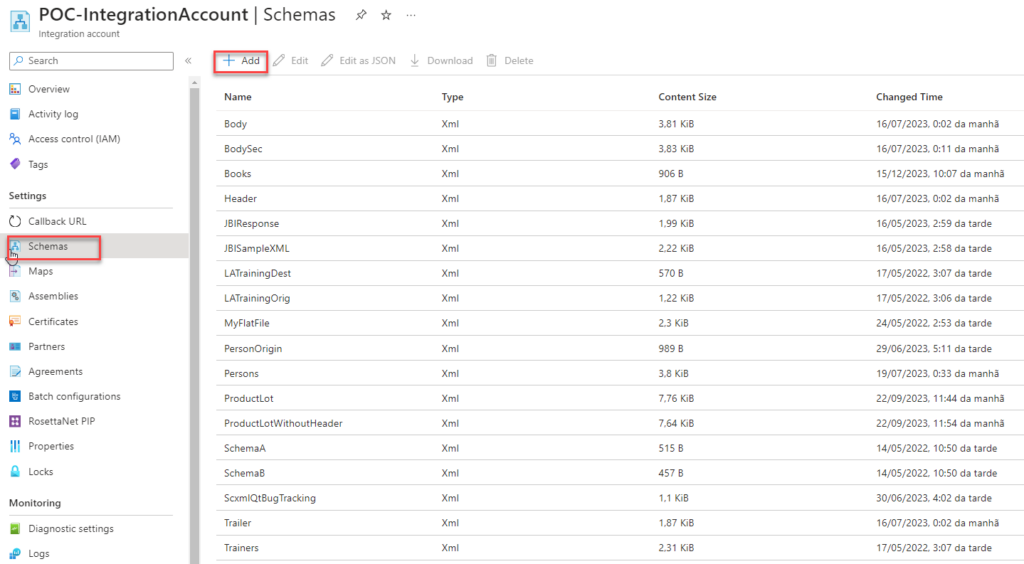
To import the schema into our Integration Account, we need to:
- Access the integration account, and under the Settings section, select Schemas and then click + Add.
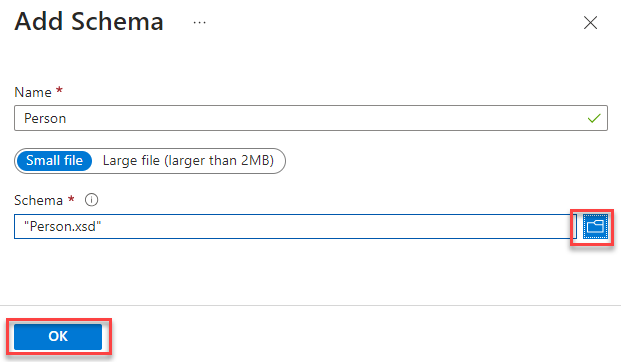
- On the Add Schema panel, browse for our XML Schema, leave the default settings, and click OK.
Now that we have our schema, the next thing we need to do is create our Logic App that will act as our BizTalk Server Receive Pipeline. To accomplish that, you need to:
- On the Azure Portal, create a new Logic App Consumption and give it a proper name, in our case: LA-SA-XMLValidation-POC.
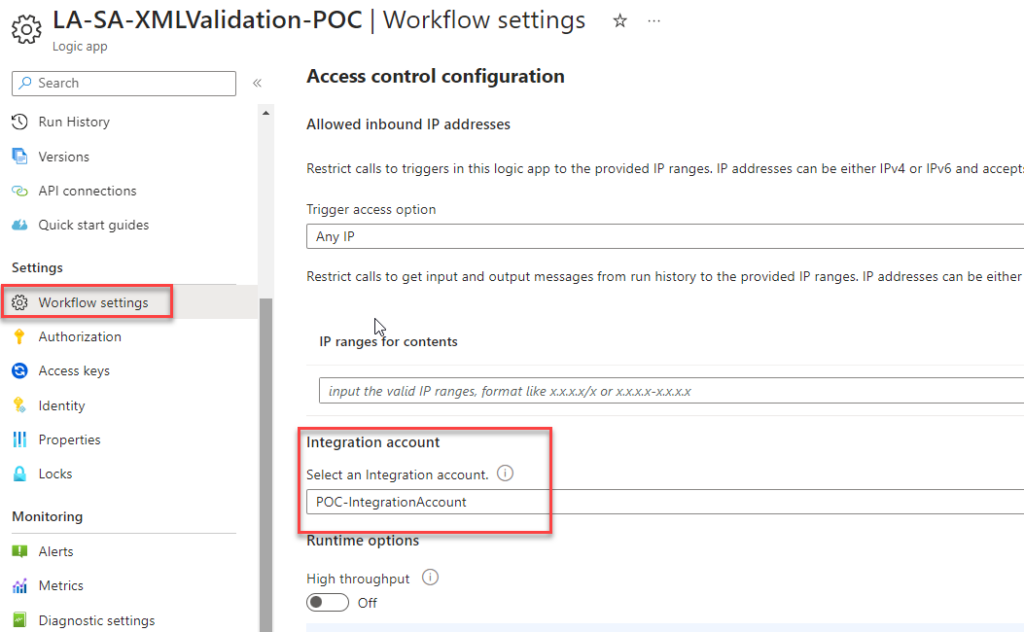
- Before we start to create our logic, we first need to associate the Integration account with this Logic App by selecting Workflow settings under the Settings section. In the Integration account property, select your Integration account.
- Click Save.
- Now, click on the Logic App designer under the Development Tools section. From the Templates, select Blank Logic App.
Note: We could use any connector as input, like File or OneDrive, but for simplicity of this POC, we will use the Request.
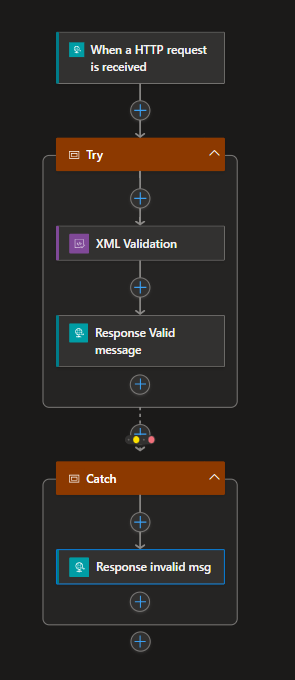
- For the trigger, select Request > When a HTTP request is received trigger and leave it as default.
- Next, click on + New step, select the XML connector, and then the XML Validation action.
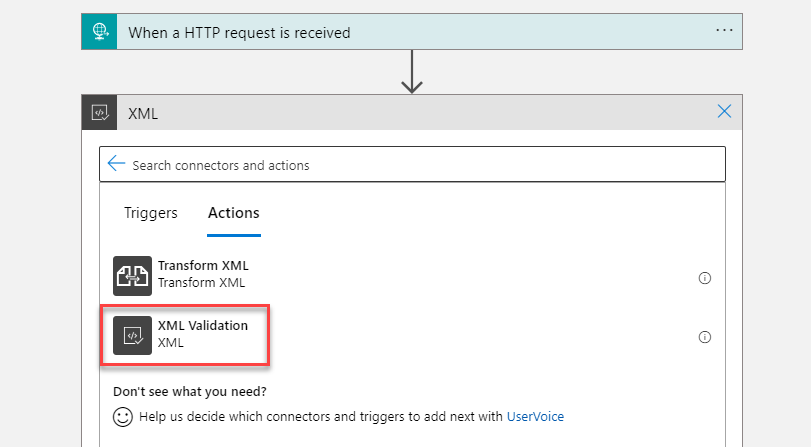
- On the XML validation action, perform the following configurations:
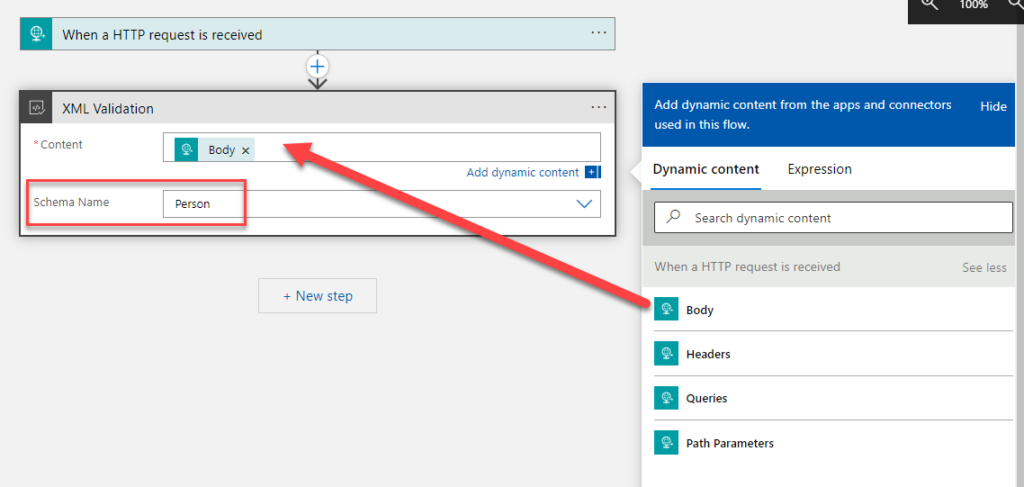
- On the Content property, set it to be the body of the When a HTTP request is received trigger.
- On the Schema name property, select the correct schema from your integration account. In our case, Person.
- And, of course, now you need to implement your business logic or call a child Logic App.
- I endup creating a try-catch statement just to prove this functionality.
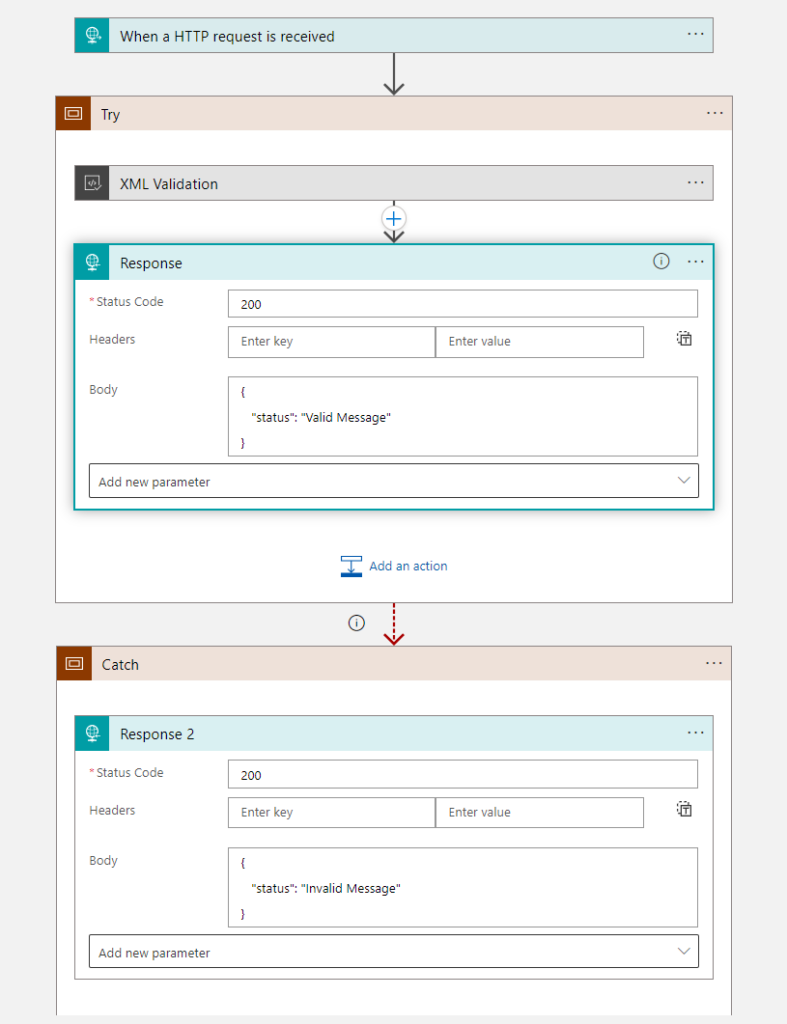
- Now, you just need to test your solution.
Building the Logic App Standard Solution
Making the same solution in Standard will be easier since Logic App Standard already has out-of-the-box support for XML Schemas and maps. We just need to add them to our logic app resource. Once again, the BizTalk Server XML Schemas will be fully supported, so we just need to copy them from our BizTalk Server solution.
Let’s create our Logic App Standard Solution. To do that, you need the following:
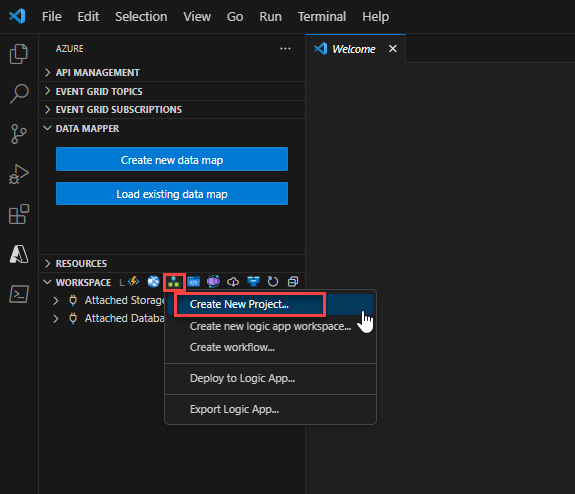
- In Visual Studio Code, close all open folders.
- In the Azure window, on the Workspace section toolbar, from the Azure Logic Apps menu, select Create New Project.
- Define the folder of the project or browse to the location where you created your project folder, select that folder, and continue.
- From the templates list that appears, select either Stateful Workflow or Stateless Workflow. This example selects Stateful Workflow.

- Provide a name for your workflow and press Enter. This example uses LA-XMLValidation-POC as the name.
- From the Visual Studio Activity Bar, open the Explorer pane if it is not already open.
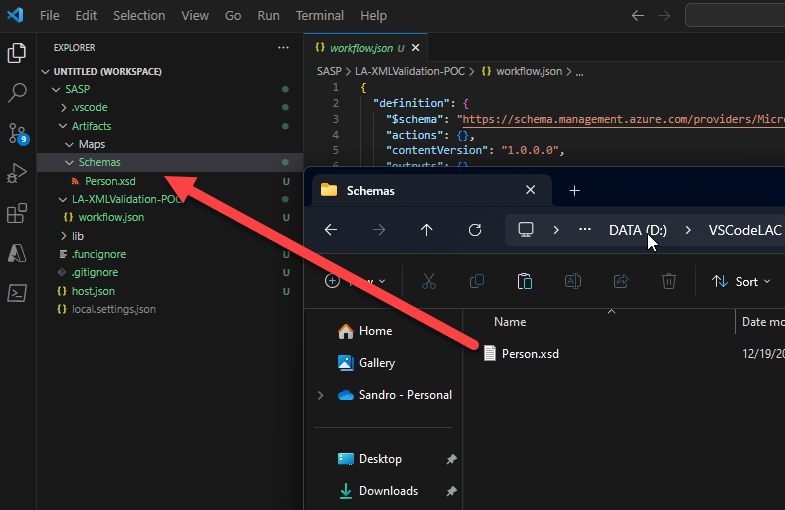
Now, the first thing we will do is add our Schema to our project. To do that, you need to:
- Access the project folder using File Explorer, enter the Artifacts > Schemas folder, and copy the schema into this folder. And you will automatically see it on the Visual Studio Code Explorer.
Now, we need to create the business logic of our Logic App.
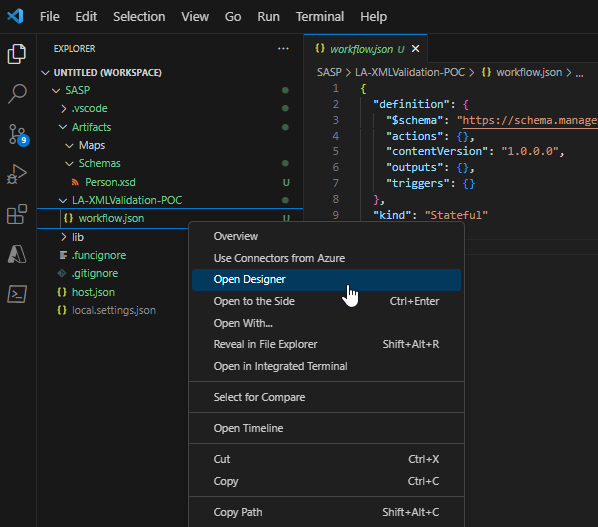
- Right-click on our LA-XMLValidation-POC workflow.json file and select Open Designer.
- And we are going to implement the same business logic we did with Consumption.
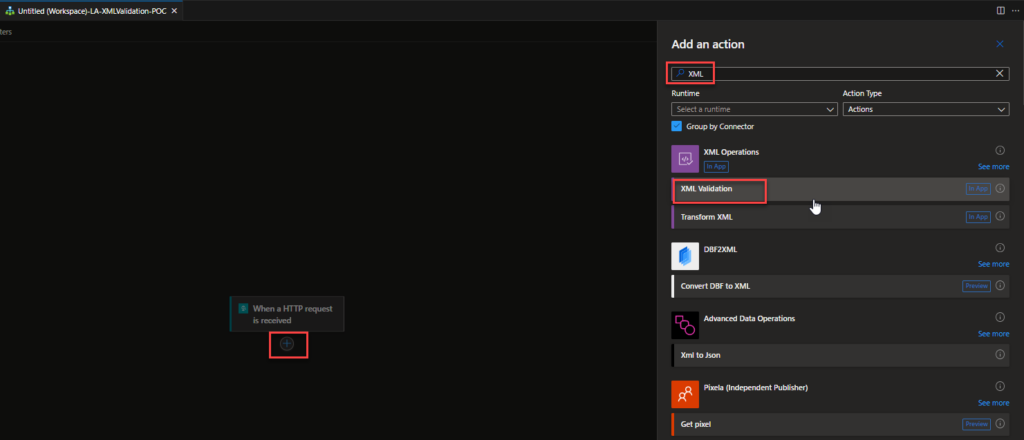
- Start adding a Request > When a HTTP request is received trigger and leave it as default.
- Next, click on + Add an action, select the XML connector, and then the XML Validation action.
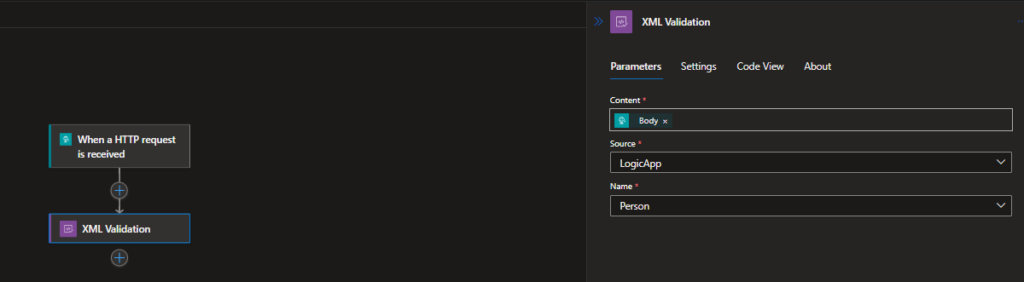
- On the XML validation action, perform the following configurations:
- On the Content property, set it to be the body of the When a HTTP request is received trigger.
- On the Source property, leave LogicApp.
- On the Schema name property, select the correct schema from your project. In our case, Person.
- And, of course, now you need to implement your business logic or call a child Logic App.
- I endup creating a try-catch statement just to prove this functionality.
- Now, you just need to test your solution.
I hope you find these architecture samples useful, and stay tuned for more BizTalk Server to Azure Integration Services.
So, if you liked the content or found it useful and want to help me write more, you can buy (or help me buy) my son a Star Wars Lego!