Welcome once again to another Power Automate Best practices, Tips, and Tricks. In my previous blog posts, I talked about some of the most essential best practices you should have while working with the Power Automate:
And some tips and tricks:
Of course, the most recurring task is adding notes to our triggers and actions, but it is always good to know you to delete them. Some of you may be thinking that is a trivial task, simple as adding a note. But, unfortunately, I have to say that nothing is that trivial in Power Automate (PA), even this fundamental task.
# Delete notes
As I mentioned in the #3 Add notes (previously comments), is it essential to add notes to all our actions, or at least in the most important ones. And the reasons for that are:
Notes improve readability
By setting notes in your actions, you can quickly identify what action is intended for and what is doing, without the need to read all the settings inside the action to try to figure it out. And sometimes, that may not be enough, and you still need to go to some documentation (API Documentations, project documentation, and so on) to understand.
By implementing this best practice you will be providing readability and you will save time (not spending a considerable amount of time looking at the details and configurations inside your actions) and frustrations. You may think that this is not important. You have created the Power Automate flow. You know the business logic inside and what shapes represent or are used for, but, once again, trust me, you will completely forget it after 3 months or a week!
Notes also help transfer knowledge between your team or organization
Sometimes Power Automate flows are shared by a team, or you are a consultant creating these resources for your client. They also need to be aware of them. They also need to understand them. You may leave the project or the company in the future, and they will need to continue the work or make future changes. Having a good note policy in place in the actions is also a way to auto-document your processes.
But sometimes, we may find some of them unnecessary or repeating something already mentioned above, and we want to delete them. So, the main question we want to address on this tip is: How can we delete an existing note?

So let’s assume that we have an existing note on one of our actions like the one we see in the picture below:

The first reaction we can have to eliminate the note is to press the X button, as you may see in the video below:
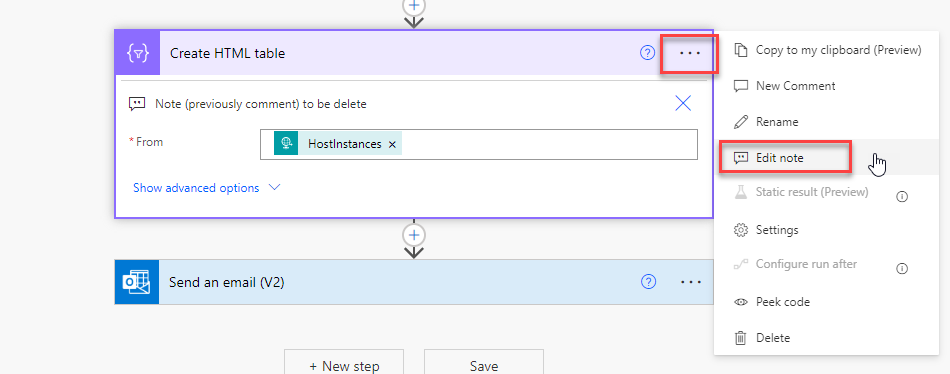
And at the first glint, it seems the X button deletes the note, but in reality, it doesn’t! So if you close the designer and open it again, you will see the note is still there. Or if you click in the … (3 dots) and select Edit note, you will see the note is, once again, still there – note that it doesn’t present the option to add a note only edit.
In reality, the X button is just a way to hide the note – probably Microsoft icon choice was not the best. Instead of an X, they could put a collapse or hidden icon, but that is another story.
How to delete notes?
To delete an existing note on one of our actions or triggers is quite simple. However, the delete process seems a bit of a ridiculous process.
To do that, we need to:
- On our action or trigger, select the … (3 dots), and from the menu, select the Edit note option.

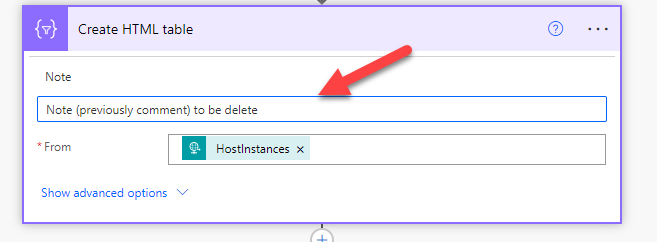
- After selecting that option, you will see the note in edit mode.
- Note: if the note is not visible, the note will appear on the shape in edit mode.

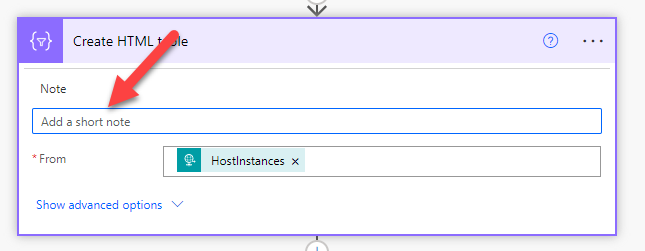
- To delete the note, select and delete all text inside the note textbox – you will see then the label Add a short note – press Enter or click outside the note textbox to remove the existing note.
- Note that spaces are valid characters in notes.

Do not forget to save the changes, but after that, the note no longer exists on your Power Automate flow.

Stay tuned for the following Power Automate Best practices, Tips, and Tricks.

