


Are you surprised? Are you under where are the first five tips?
I start this series of blog posts on the Serveless360 blog, and you can see and read the previous Best practices, Tips, and Tricks while working with Power Automate here:
- #1 Flow Naming Convention
- #2 Actions Naming Convention
- #3 Add comments
- #4 Copy to my clipboard
- #5 Using Scopes
Today I’m going to speak about another critical Best practice, Tip, and Trick: implementing Error handling in Power Automate.
📝 One-Minute Brief
Learn how to use Power Automate’s Configure run after settings to build more resilient flows. This best practice allows you to control execution behavior when previous actions fail, timeout, or are skipped, enabling robust error‑handling patterns without adding unnecessary branching or complexity.
#6 Error handling… configure run after settings
When designing a business process, you must always consider what happens when something goes wrong. Power Automate provides built‑in error handling through the Configure run after settings on each action. This behavior mirrors that of common programming languages like C#, where control flows based on the success or failure of previous steps.
- Line 5 will only be executed if line 4 executes with success.
- Line 7 will only be executed if line 5 executes with success.
- and so on
- If an error happens on one of these lines, the function or program will be interrupted there.
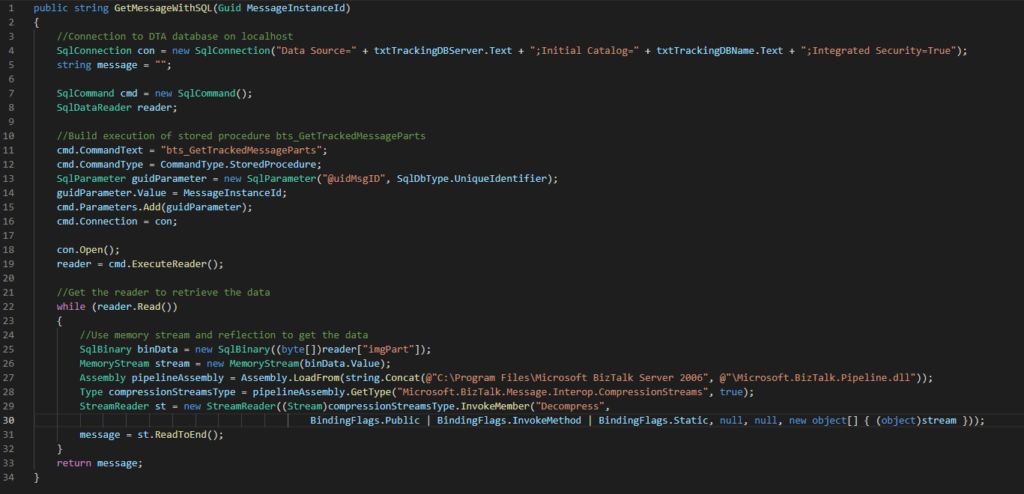
The same default behavior happens on Power Automate. An upcoming action will run if the current one completes successfully. However, in Power Automate, we have the possibility to easily change this behavior and, kind of, implement a try-catch per action level.
Changing the default actions run after settings
As you see in the picture below, by default, the upcoming action will run if the previous one is successfully finished with success:
- The Parse JSON action will run if the HTTP action completes successfully.
- Create file action that will run if the Parse JSON action is successfully finished.
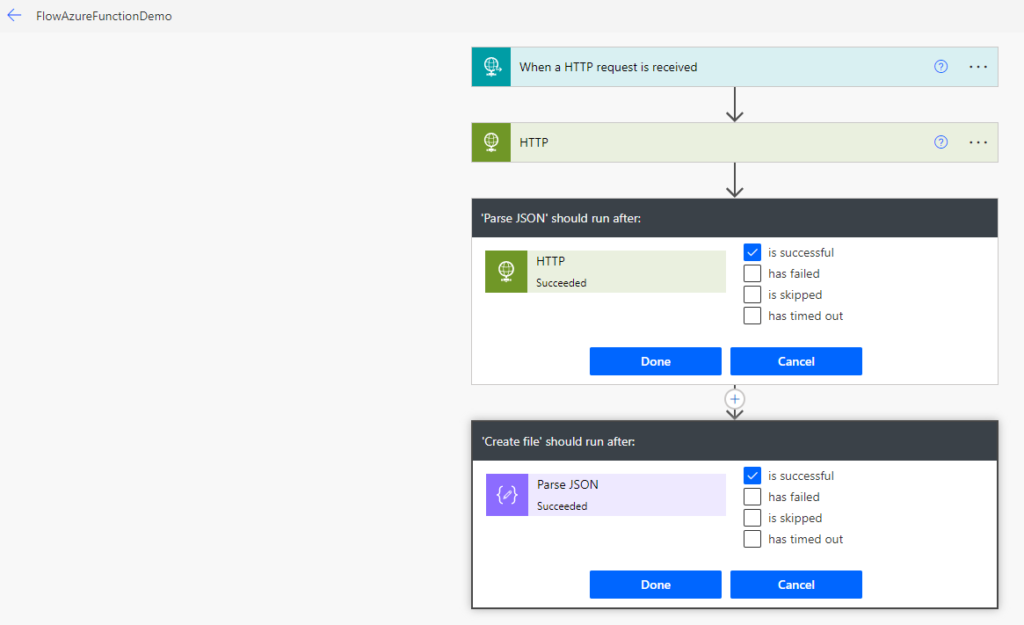
And this behavior makes all sense.
Note that you cannot configure the run after settings for the first action, in this case, the HTTP action, because that depends on the trigger execution. And that also makes sense.
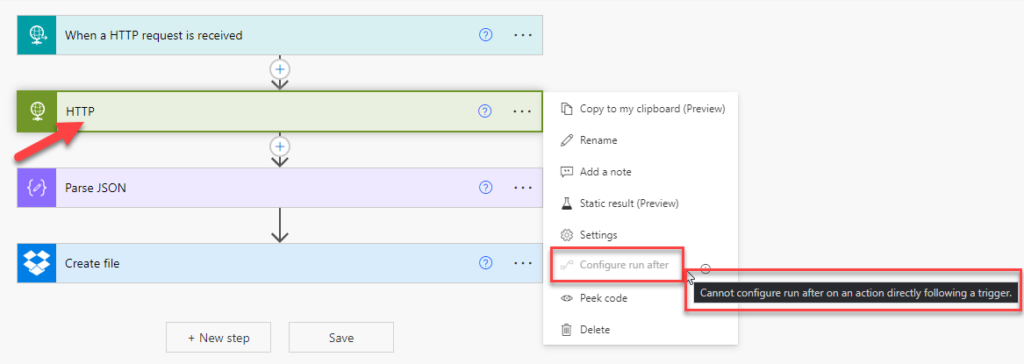
Now, let’s assume that we add a Logging shape to track some information – there are better ways to do this! This is just a POC sample.
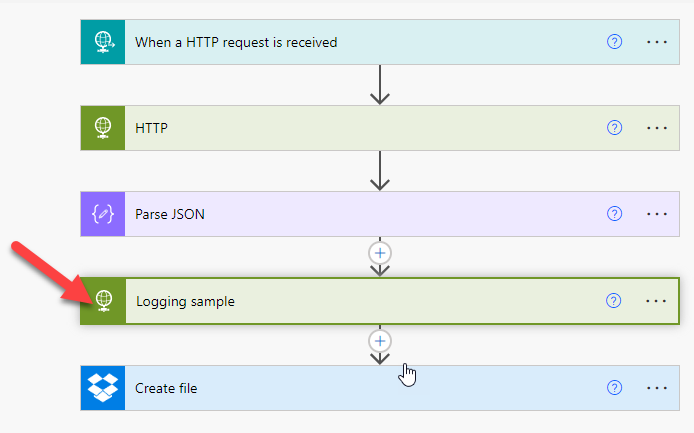
Tracking actions shouldn’t break your business workflow if something goes wrong—for example, if the logging service is offline. You should never miss an invoice just because tracing or logging failed.
To avoid that, you can change the behavior of the next action. In our example, the Create file action modifies the default Run After settings. To configure this, you should:
- On the Create file action, click on the … (3 dots) and select the Configure run after option.
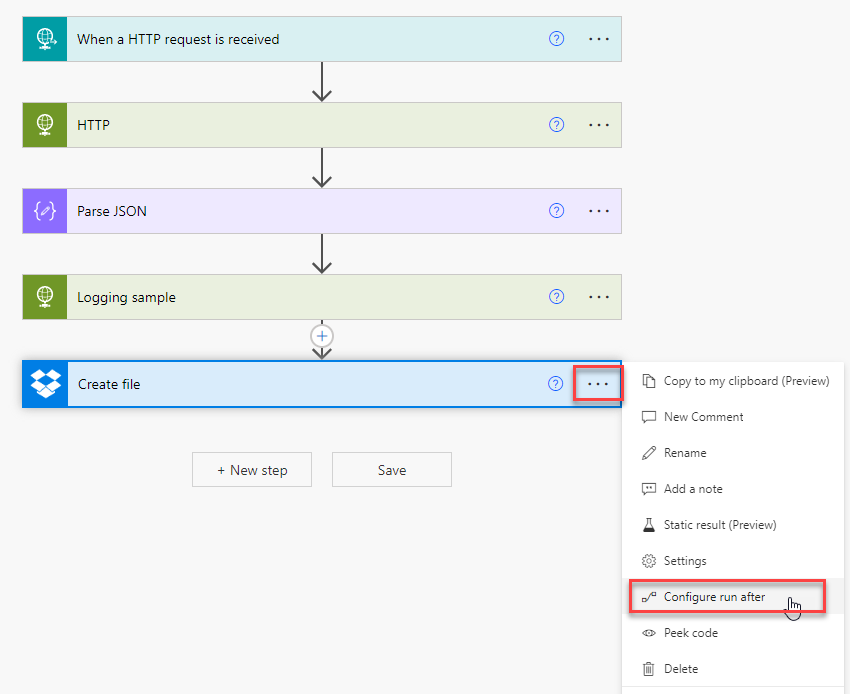
- On the ‘Create file‘ should run after the panel, you will see that the Logging sample is selected, and now you just need to select the following options:
- is successful (by default already selected)
- has timed out
- has failed
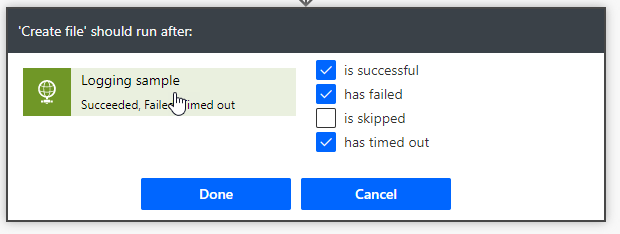
- Click Done.
Now the Create file action runs even if the Logging sample action fails, times out, or succeeds—exactly as we want. Most importantly, this behavior ensures that logging issues never affect the critical logic of your business workflow.
You can apply this strategy to any action. Just use it carefully and always align it with your business requirements.
This approach works well for simple workflows. However, in more complex or enterprise scenarios, you may need to handle errors from several actions in a single place and run specific tasks whenever a failure occurs.
Implementing advanced Error handling
As I mentioned in #5 Using Scopes, most users tend to think that Scopes is a strange action that is not there to do anything other than to help you organize the business logic a little better inside your Power Automate Flow, but that is not true. The reality is that scopes have many functionalities:
- Region statement: the capability to organize your business logic and have specific areas that you can collapse and expand whenever you need them.
- Try-Catch-Finally statement: advance error handling capabilities
And it is this second capability that allows us to implement advanced error handling capabilities by:
- Creating a try-catch statement consisting of a try block followed by one catch clause to handle different exceptions that can occur in the try block.
- Or creating a try-catch-finally statement.
Once again, this is quite normal in traditional programming languages like C#, where we use try-catch or try-catch-finally statements:
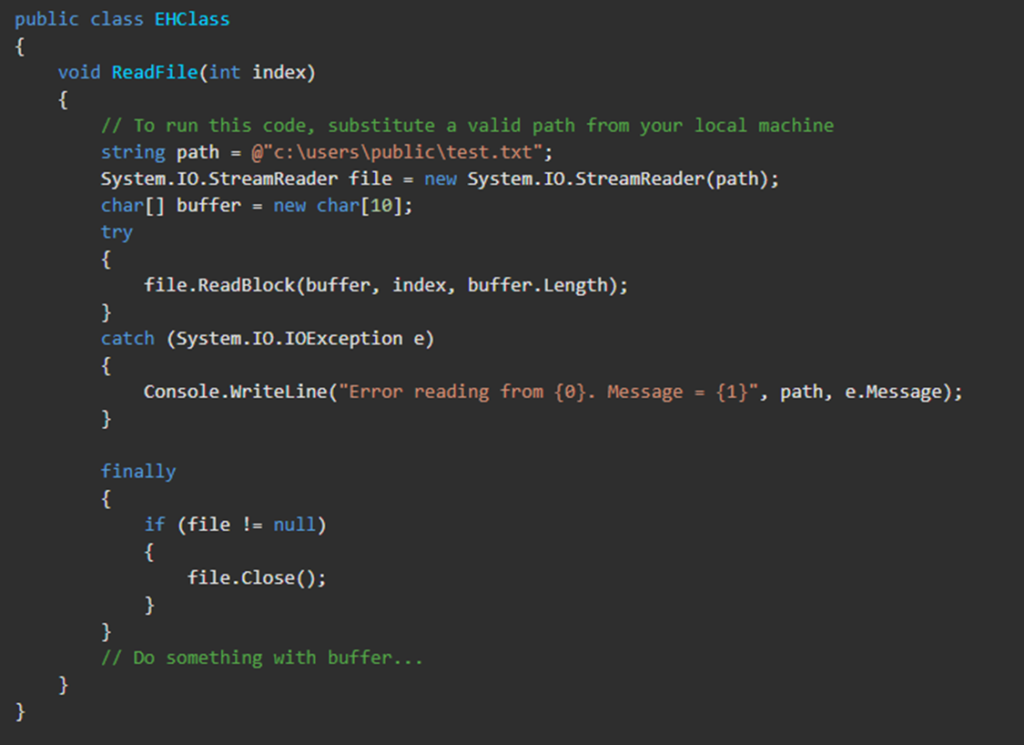
The try-catch-finally statement handles some or all of the errors that may occur in a block of code. Errors can be coding errors made by the programmer, errors caused to incorrect input, and other unforeseeable factors.
- The try statement allows you to define a block of code to be tested for errors while it is executed –> this is your Actions in Power Automate that describe the logic of your business process.
- The catch statement allows you to define a block of code to be executed if an error occurs in the try block –> this is your Actions in Power Automate that you want to run if a failure occurs in the standard actions of your business process.
- The finally statement lets you execute code after try and catch statements, regardless of the result (if there was a failure inside the try statement or if everything was completed successfully).
Note: The catch and finally statements are optional, but you need to use one of them (if not both) while using the try statement.
To implement a try-catch or try-catch-finally statements we need to:
- Add a Scope, we can call it Try-Scope, and add all the actions that you want to control errors inside this scope.
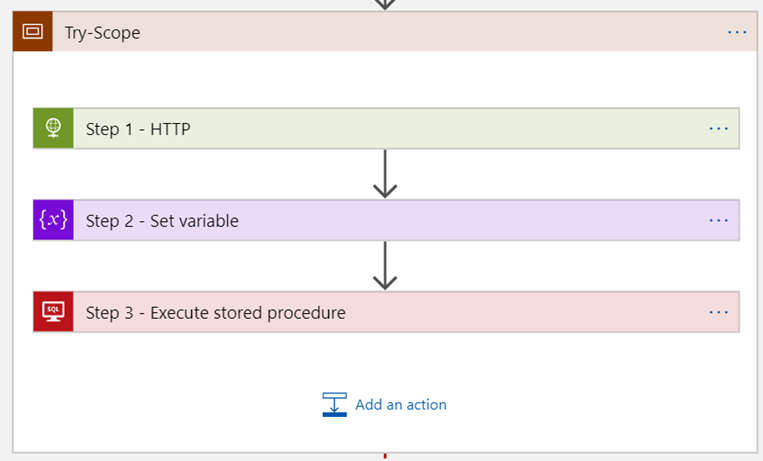
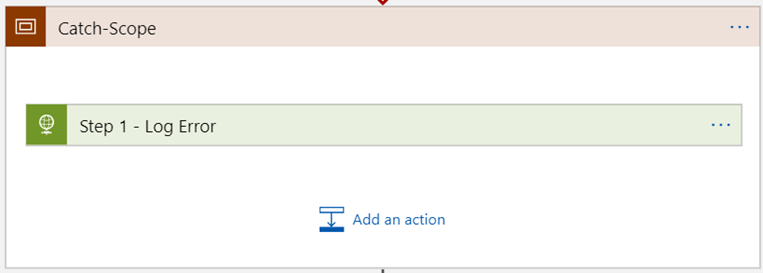
- Just immediately after the Try-Scope action, add a new Scope, we can call it Catch-Scope, and add all the actions necessary to perform in case of errors, like rollback actions or logging actions.
- Now, on the Catch-Scope action, click on the … (3 dots) and select Configure run after option
- Click on the Try-Scope to present the run after options and select:
- has failed.
- has timed out.
- Note: unselect the is successful option.
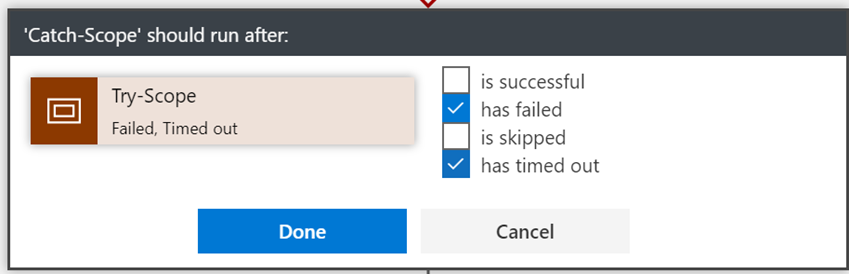
- and click Done.
With this, we have implemented a try-catch statement. Now, if we want to implement a try-catch-finally statement, we just need to:
- Immediately after the Catch-Scope action, add a new Scope, which we can call Finally-Scope, and add all the actions that will be executed, no matter whether the Try-Scope is executed successfully or if the Catch-Scope is executed.
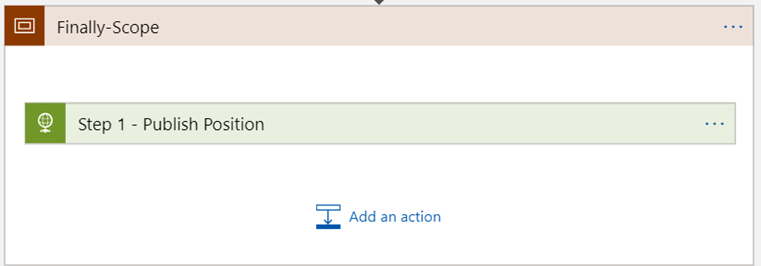
- Now, on the Finally-Scope action, click on the … (3 dots) and select Configure run after option
- Click on the Catch-Scope to present the run after options and select all options:
- is successful.
- has timed out.
- is skipped.
- has failed.
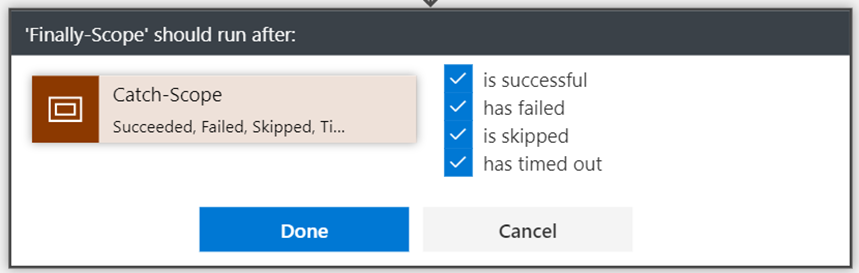
- and click Done.
And there you go, we have a try-catch-finally statement implemented.
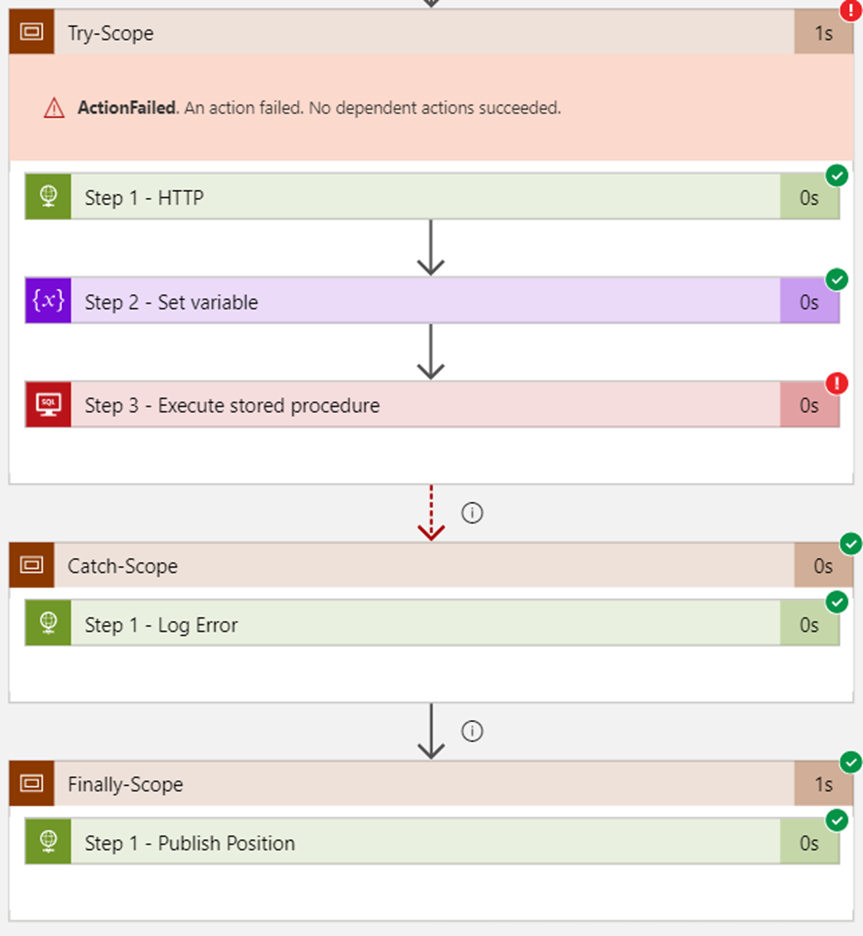
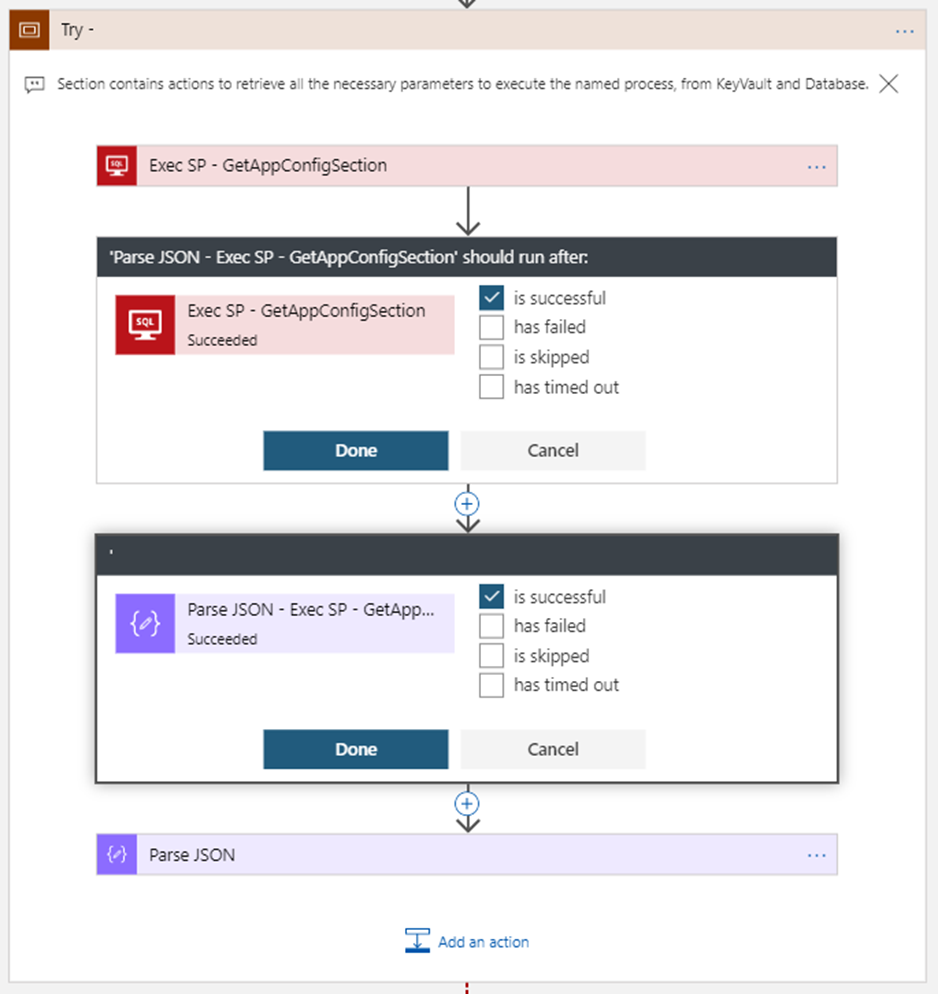
Important note: Even inside a Scope, we can implement a kind of try-catch per action level that we explained at the beginning of this post.
Stay tuned for the following Power Automate Best practices, Tips, and Tricks.
Hope you find this helpful! If you liked the content or found it useful and would like to support me in writing more, consider buying (or helping to buy) a Star Wars Lego set for my son.



Thanks for this. I was wondering how to do simple error handling in Power Automate and you have explained this nicely. It is not obvious on first glance and I sort of thought Power Automate was meant to be low code (intuitive) but in reality we are forced to to recreate code like structures without typing.
It will take me longer to do all the drag and drops than to write in code 😉
Thanks again.