
Final chapter of the series
This post is the final chapter of the blog post series, where we covered the following topics:
- Part I: What you need to install to start developing stateful and stateless workflows using Azure Logic Apps (Preview)
- Part II: A first approach to create a Logic App (Preview) resource and build stateful or stateless workflows using Visual Studio Code
A more powerful development approach
In this last part, I explain a different and more powerful approach to creating Logic Apps (Preview) projects and workflows. For this approach, you must have all prerequisites already installed. Otherwise, some features—such as the Logic App Designer, debugging, or inline code—will not work correctly.
Working with Visual Studio Code
If you are like me and usually work with Visual Studio as your primary development tool, you may need a small learning curve to start developing with VS Code. It is a different way to build solutions, but it offers greater flexibility and control for developing Logic Apps (Preview).
📝 One-Minute Brief
Explains a more advanced approach to develop Azure Logic Apps (Preview) by creating local projects in Visual Studio Code, allowing better control over workflow structure, development, and deployment for stateful and stateless workflows.
Create a local project
Before you create your logic app, you first need to create a local project. This project allows you to manage and deploy your Logic App (Preview) directly from Visual Studio Code.
To get started, follow these steps.
Create a local folder
In your development environment, create an empty local folder. For example:
C:\VSCODE\My-First-Logic-App-Preview
You will later associate this folder with your Logic App (Preview) project in Visual Studio Code.
Available options in Visual Studio Code
When working with VS Code, you can choose different approaches depending on your workflow:
- Create the local project: You can do this at the Subscription level or at the Logic App (Preview) resource level using the Logic Apps (Preview) extension.
- Create the Logic App (Preview) resource in Azure: You can create it directly from the Subscription level or during the local project deployment.
- Deploy your solution: You can deploy either from the Logic App (Preview) resource level or directly from the local project.
I will approach and explain the way I prefer better, and which I think is the most ideal.
- I am assuming that you have already created the Logic App (Preview) resource in Azure. If not, check to Create a new Logic App (Preview) resource in PART II.
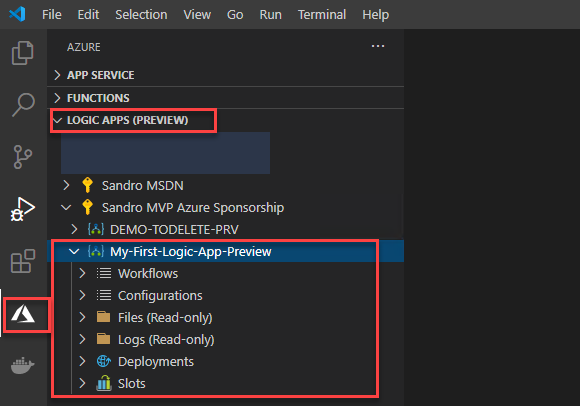
- In the Azure pane, from the Logic Apps (Preview) extension, expand your Subscription, select the Logic App (Preview) resource, and click on Create New Project.
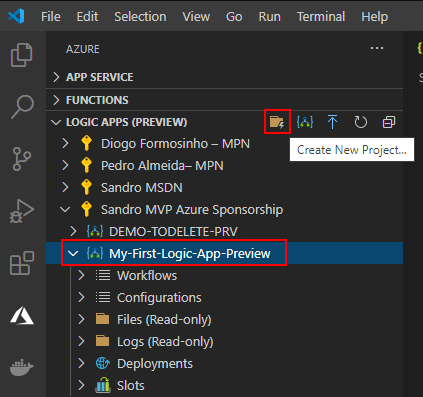
- This will open the Browse Explorer, select the folder we have created.
- C:\VSCODE\My-First-Logic-App-Preview
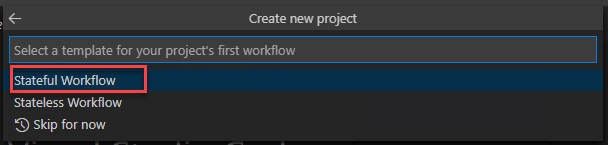
- Centered at the top of the VS Code editor window, a wizard will appear asking to select a template for your project’s first workflow. Select either Stateful Workflow or Stateless Workflow. We will be using Stateful Workflow.
- Provide a workflow name for the workflow you are creating, or leave the default nameType Stateful-workflow-example, and press Enter

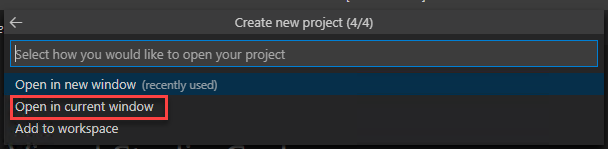
- Next, the wizard will ask you if you would like to open your project in a new window or the current one; select Open in current window.
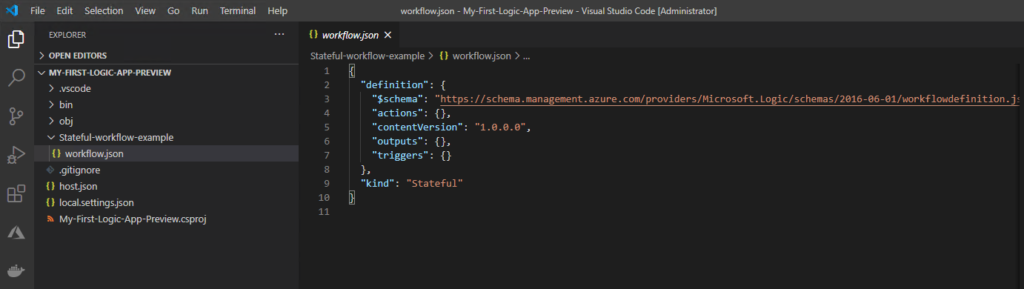
Visual Studio Code reloads and will switch to the Explorer pane, showing you the workflow definition and your new Logic App (Preview) local project, which will include several automatically generated project files. For example:
- The project will have a folder with the name that you specify for your workflow – Stateful-workflow-example. Inside this folder, the workflow.json file contains your logic app workflow’s underlying JSON definition.
- Also, host.json and local.settings.json files.
- and so on.
Developing your Logic Apps in VS Code
Now that we have everything we need already created, we can start developing our logic apps locally on VS Code.
To do that, you need to:
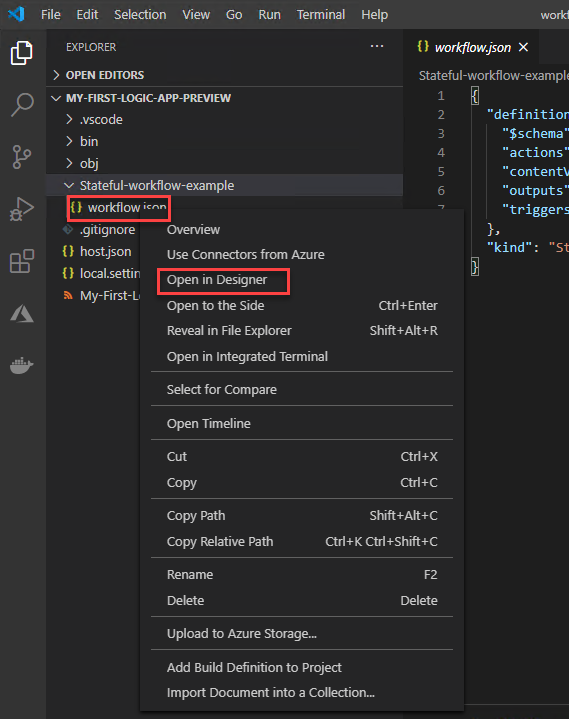
- Expand the project folder, in my case MY-FIRST-LOGIC-APP-PREVIEW, and then expand your workflow folder, Stateful-workflow-example. Righ-click workflow.json file and select Open in Designer.
- From the Enable connectors in Azure list, select Use connectors from Azure, which applies to all managed connectors that are available and deployed in Azure, not just connectors for Azure services.

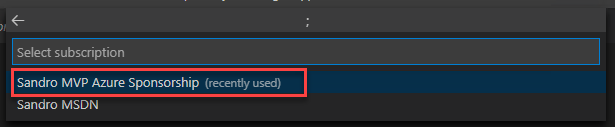
- From the Select subscription list, select your subscription. This will be where the connectors will be created.
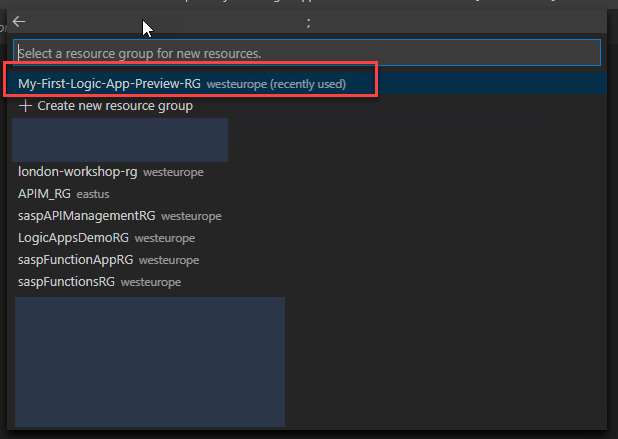
- And finally, from the Select a resource group for new resources list, select the resource that you created for this project.
- After that, the Logic App Designer appears, and the Choose an operation prompt appears on the designer and is selected by default, which shows the Add a trigger pane.

Note: If you have .NET Core SDK 5.x, this version might prevent you from opening the logic app’s underlying workflow definition in the designer. Rather than uninstall this version, in your project’s root location, create a global.json file that references the .NET Core runtime 3.x version that you have that’s later than 3.1.201, for example:
{
   "sdk": {
      "version": "3.1.101",
      "rollForward": "disable"
   }
}
- Make sure that you explicitly add that global.json file to your project at the root location from inside Visual Studio Code. Otherwise, the designer won’t open.
- To check the versions that are installed on your computer, run the following command:
..\Users\{yourUserName}\dotnet --list-sdks
And the rest is basically the same as what we are already used to doing in our “original” Logic Apps, or using the Azure Portal or inside Visual Studio. We need to add a trigger and actions.
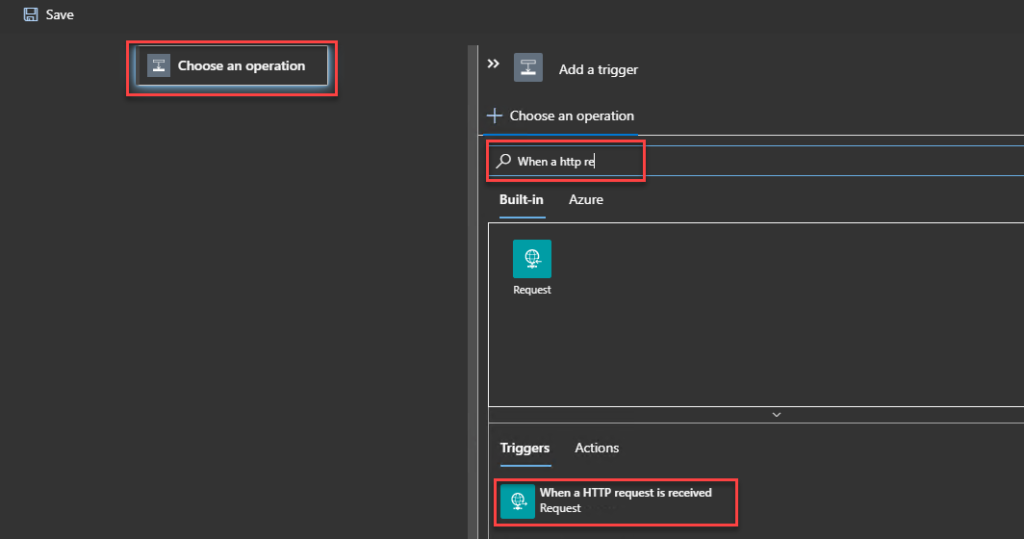
- On the designer, select the Choose an operation and in the Add a trigger pane, under the Choose an operation search box, make sure that Built-in is selected so that you can select a trigger that runs natively.
- In the Choose an operation search box, enter
when a http requestand select the built-in Request trigger that’s named When a HTTP request is received.
- When the trigger appears on the designer, the trigger’s details pane opens to show the trigger’s properties, settings, and other actions.
- This means that you can now define the JSON Schema, method, and all the other properties of this trigger.
- Let’s leave the default for now.
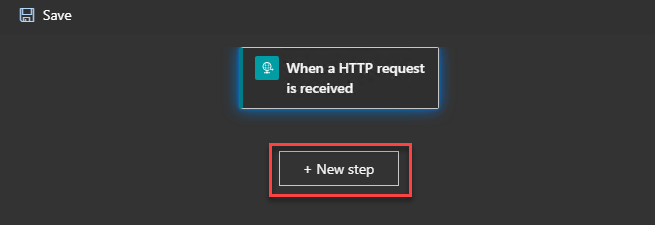
- Because this is a simple sample, let’s add an HTTP Response to our logic. On the designer, under the trigger that you added, select New step.
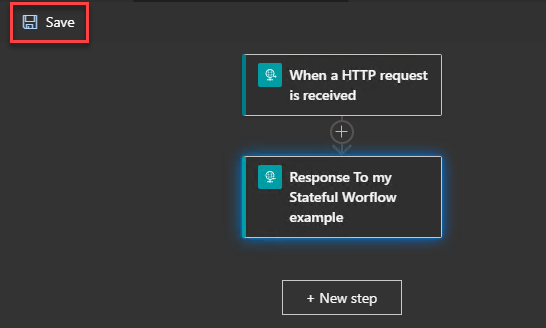
- On the Add an action pane, under the Choose an operation search box, enter
Response, and select the built-in Request action that’s named Response.

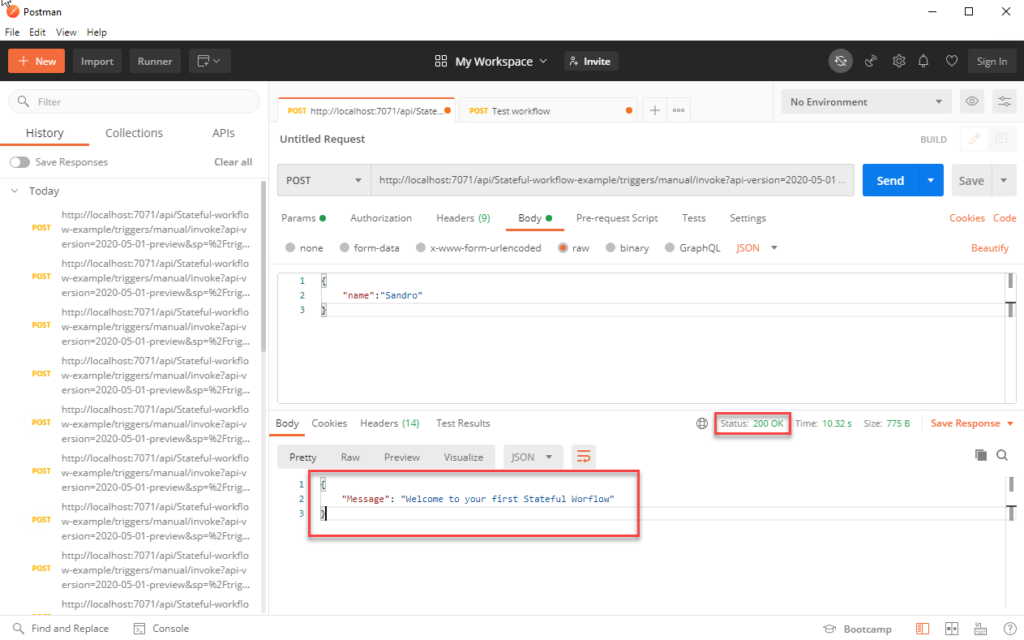
- To have a more friendly response, set the body property of the Response action to be:
{
     "Message": "Welcome to your first Stateful Workflow"
}
- Finally, on the designer, select Save.
Before deploying this, we need to run and test the workflow locally.
Testing our Logic Apps locally
After creating the Logic App (Preview) resource, we can test our workflows locally.
To start debugging, follow these steps:
- In Visual Studio Code, open the Run menu.
- Select Start Debugging or press F5.
Visual Studio Code then opens a Terminal window, where you can monitor the debugging session.
Finding the callback URL
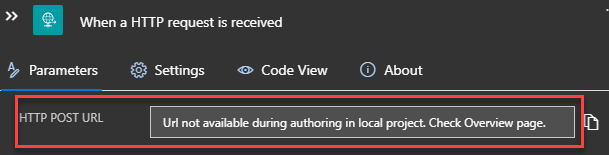
Because this workflow uses an HTTP trigger, we need the callback URL from the Request trigger.
In Azure, we usually open the When a HTTP request is received trigger. After saving the Logic App, we find the callback URL in the HTTP POST URL field.
However, when working locally, this URL is not available. Instead, Visual Studio Code displays the message: URL not available during authoring in local project. Check the Overview page.
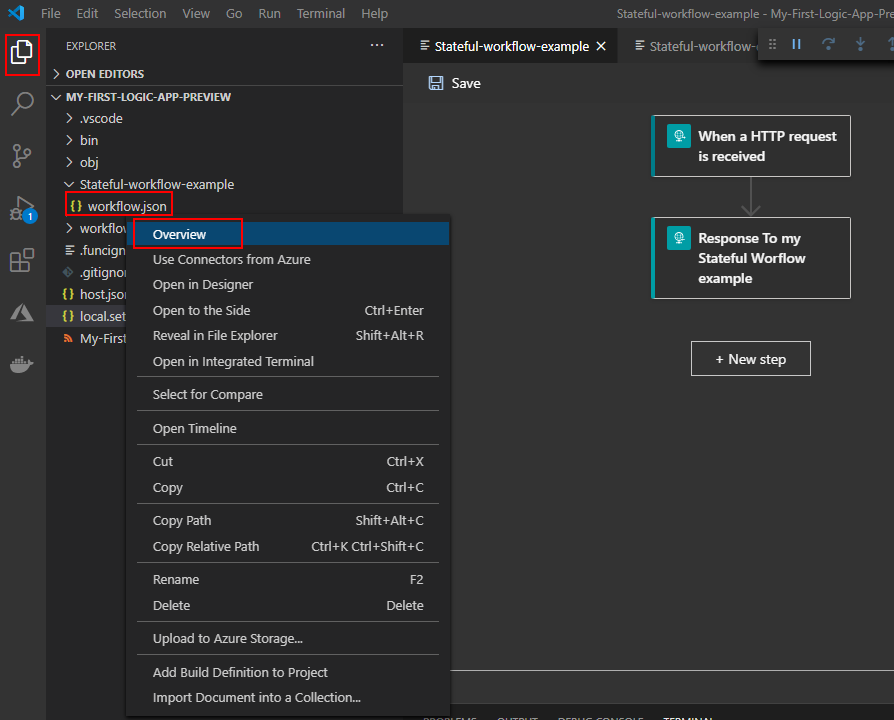
- As the message describes, for us to know the callback URL for the endpoint on the Request trigger, we need to:
- Reopen the Explorer pane so that you can view your project.
- And from the workflow.json file inside the workflow folder – Stateful-workflow-example – right-click and select Overview.
- There, you will find the Workflow Properties, like the Callback URL, but also the local Run History of that workflow
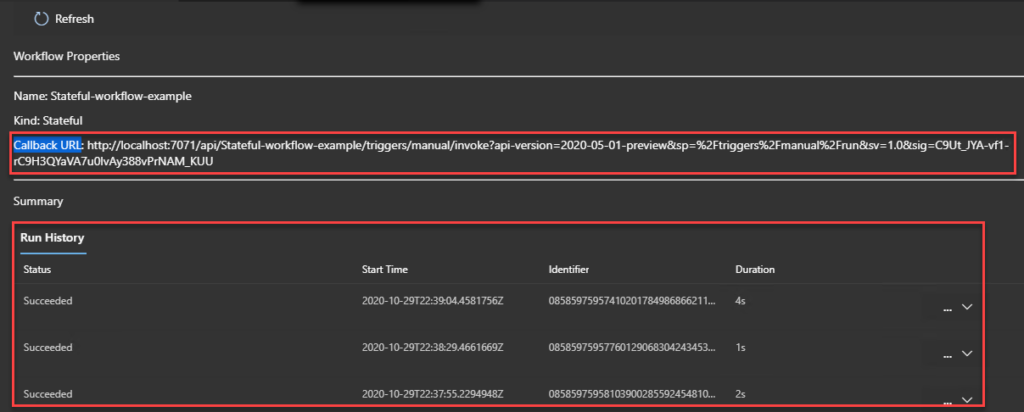
- Copy that URL to Postman or any other tool, and test sending a request to see if you get the desired outcome.
On the Overview page, you will get another entry in the Run History.
How can I add more workflows to my project?
Can I add more workflows to my local project? If so, how can I do it?
Yes, you can. And to do that, you need to:
- Switch back to the Azure pane, under Logic App (Preview), select your Logic App resource, then select Create Workflow.
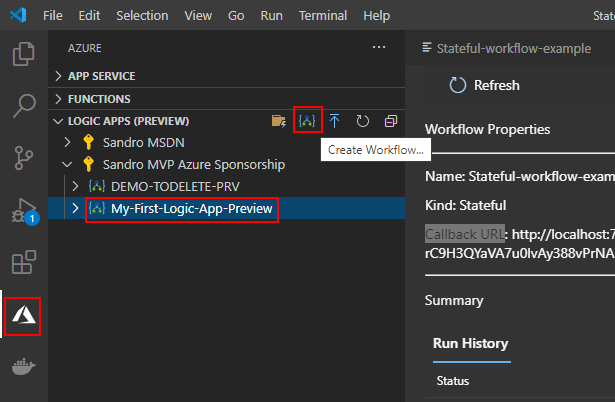
- A wizard will appear asking to select a template for your workflow. Select either Stateful Workflow or Stateless Workflow. We will be using Stateful Workflow.
- Provide a workflow name for the workflow you are creating or leave the default name, Type Another-Stateful-workflow-example, and press Enter.
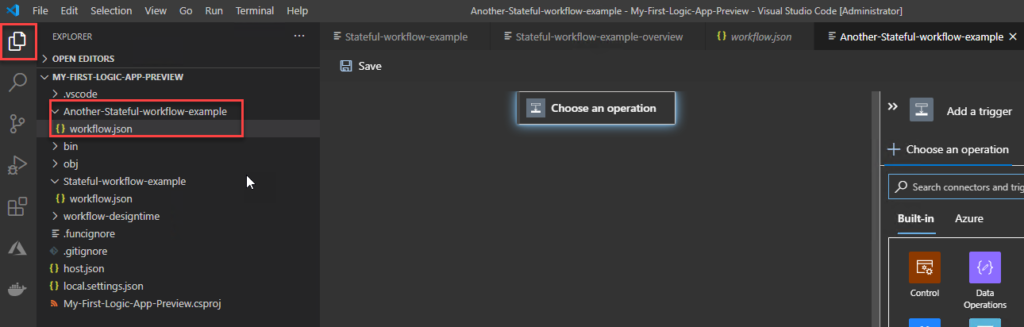
- Now, if we switch back to the Explorer pane, we will notice that another workflow has been added to our local project.
Publish (deploy) to Azure Logic App (Preview) resource
Everything we created above was not created/publish on Azure; they were developed and created locally. Nevertheless, from Visual Studio Code, you can deploy your project and with it all your workflows directly to Azure. If the Logic App (Preview) resource type is not yet created, you can create it in Azure during the deployment.
To do that, you need to:
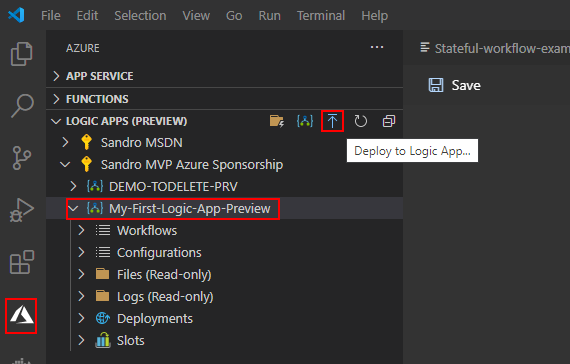
- On the Visual Studio Code toolbar, select the Azure icon.
- On the Azure: Logic Apps (Preview) pane toolbar, select your Logic App (Preview) resource type, in our case, My-First-Logic-App-Preview, and then select Deploy to Logic App.
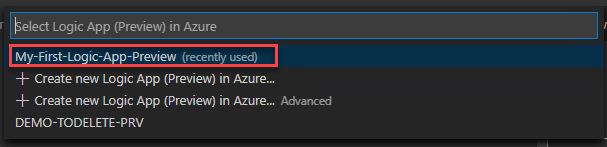
- The deploy wizard will appear, asking to Select a subscription from the list.

- And then Select Logic App (Preview) in Azure. We will be selecting the one that we created previously.
- If a message appears asking you if you want to continue with the deployment and overwrite any previous deployment, select Deploy.
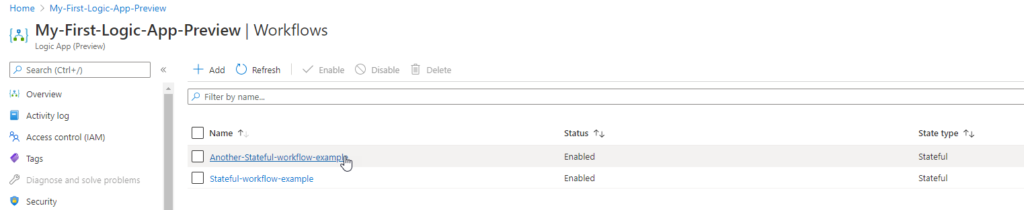
This will trigger the deployment process to Azure. Once the deployment is finished, you will be able to see your stateful workflows live in Azure and enabled by default.
Hope you find this helpful! If you liked the content or found it useful and would like to support me in writing more, consider buying (or helping to buy) a Star Wars Lego set for my son.


Hi Sir,
Thanks a lot for great article
I am getting one error in Designer time,Built in Triggers and actions are not coming, ‘failed to fetch’ error is throwing.
Make sure that all prerequisites are installed and the storage emulator is running.
Make sure you have installed the latest version of Logic Apps Preview extension