For years, paper forms have been the preferred way for people, enterprises and/or event organizers to collect data in their offices (coffee breaks or launch), in the field (inventory, equipment inspections,…) or in events. Although we are entering a Paperless era, in which the use of paper is progressively being eliminated, there are several situations in which the use of paper is still the best or a good option. Either because it is still a requirement or obligation (by legal documents) or just cheaper and more practical.
One of these scenarios can be found at Events Feedback Evaluations forms and, although it is quite simple and quick to create this kind of forms using, for example, Microsoft Forms or alternatively services like SurveyMonkey, let us be honest and analyze the facts:
- Internet access at events is usually very poor or limited and despite almost all our mobile devices have data access, if we are outside our country, in my case outside Europe, data roaming it is still quite expensive;
- Alternatively, we can send/receive an email later to evaluate the event but more likely most of the attendees will ignore it and we will end up receiving little or no feedback at all.
So, at least in my opinion, paper is still one of the best options to perform Evaluations forms and I already used this strategy in some of my last events that I organized: Oporto Global Integration Bootcamp inserted into the Global Integration Bootcamp initiative created by the Microsoft Community and supported by Microsoft, TUGA IT 2017, … and and if they are a little tired or sleepy – let be honest, it happens in all events – you can always distract a little and wake up again by filling the form
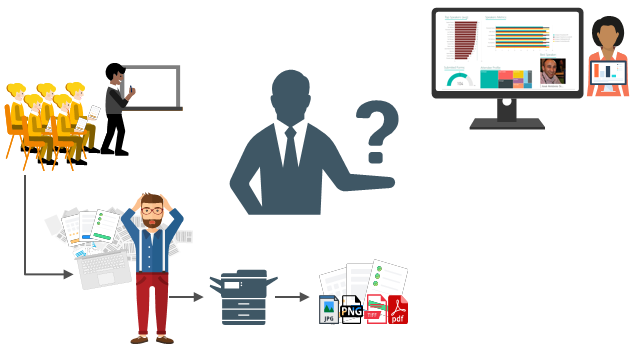
The main problem in having Evaluations forms in a physical paper is: How can we easily convert paper in data to generate additional value? How can we perform operations on it and easily gain insights?
There is plenty of OCR solutions/software’s in the market – most of them are still very expensive – that can easily scan the documents from different devices and process them using algorithms to analyze and extract the data with high confidence. Some even allow the users to manually review the extracted data from the documents before they are integrated into different information systems that normally tend to be the file system or databases.
However, neither of them is prepared to connect and integrate with all of the new technologies/SaaS products/data analysis platforms that appear at today’s frantic pace, like Power BI. If you are lucky, some of these products may also allow you to “easily” extend the product to connect to another system through their custom extensibility model systems but that normally means costs and time to develop some additional connector.
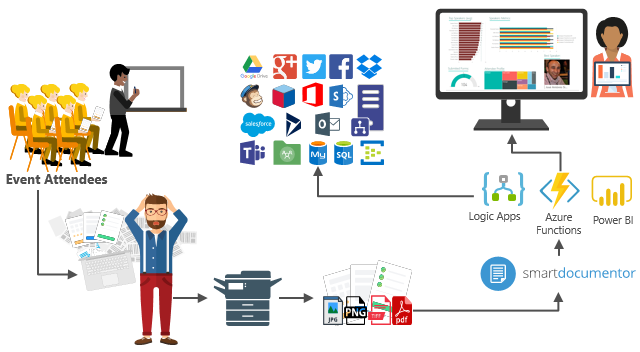
In order to solve these problems for my previous events, in which I wanted to have the evaluations forms to be processed in real-time, i.e., as the attendees handed in the forms, the results were presented in a public Power BI dashboard in a matter of seconds. I end up creating a solution composed of several products and technologies (choosing what I think to be the best tool for a particular problem) composed by:
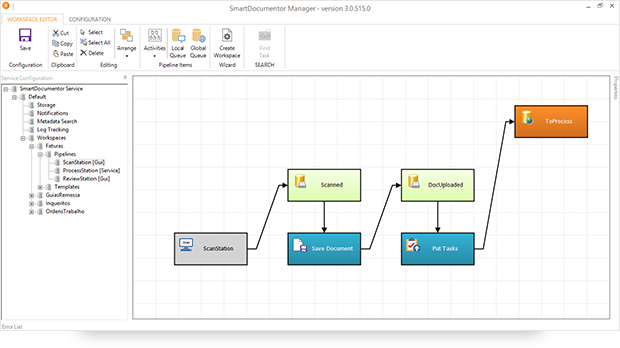
- DevScope SmartDocumentor OCR that, not also allowed me to extract the data from my Survey documents (actually it can process any king do documents like Invoices or Expenses) and easily integrate with other systems, but also to intelligently set my OCR streams (flows), defining:
- Different receive processing points (or locations), like Email, FTP, File Share or directly from scanner devices;
-
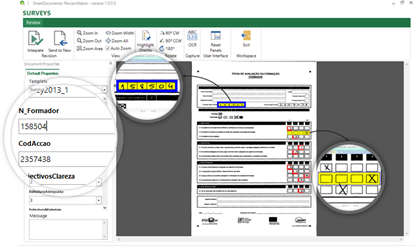
- Create/test my recognition templates and review/ validate the data which is gathered;
- By default, SmartDocumentor exports data and documents to multiple Enterprise Resource Planning (ERP), Customer Management (CRM) or Document Management (ECM) like Windows system files, SharePoint, Office 365, Azure and/or SQL Server. But also, enabled me to connect and send the metadata, XML or JSON, through any kind of HTTP service, and we can delegate this process/tasks to other more smart, powerful and easy to change services like Logic Apps. Of course we can connect to any other system through its extensibility model systems, for example, I could even extend SmartDocumentor by using a PowerShell provider that would enable me to execute PowerShell scripts.
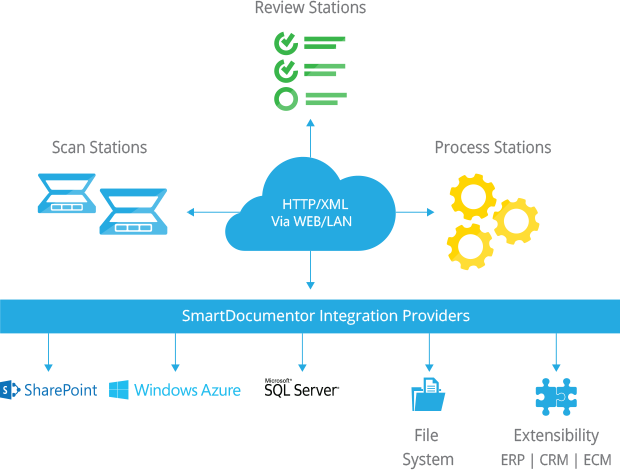
- Azure Logic Apps that provided a very simple, fast and powerful way to implement scalable integrations workflows in the cloud with an uncounted number of connectors across the cloud and on-premises, the list is growing day by day. This will allow us to quickly integrate across different services and protocols but also modify and change quickly the integration flows without requiring to modify and deploy traditional custom code – which normally require having technical human resources (like C# developer) and probably additional costs involved – not anymore with Logic Apps – changes can be performed in a matter of seconds without worrying about if your custom extension broke some product compatibility or affecting other existing OCR processes;
- Azure Functions to run custom snippets of C# to support Logic Apps flow and perform advanced JSON to JSON transformations;
- And finally, Power BI to create interactive data visualization (dashboards and reports)
The solution
SmartDocumentor: to process and extract metadata from paper
Well, I am not going to explain in details how the solution is implemented inside DevScope’s SmartDocumentor for it is not the point of this article, and if you want to know more about it, you can always contact me. However, let me contextualize you in other for you to have the full picture of the problem and the solution:
- SmartDocumentor OCR flow will be listening in two receive processing points (or locations):
- Share Folder – for testing purposes without having the need to have a scanner device;
- and directly from the scanner device – real case scenario.
- We can then specify if:
- We want to review any documents that are being processed to see if the data recognition is performed according to what we intended;
- Or we can create rules based on SmartDocumentor confidence recognition rate, for example:
- If there is a >=90% confidence that the data from the Survey where correctly recognize, skip the review process and integrate directly the document;
- Otherwise, if the recognition confidence rate is <90% deliver the document to the review station for a person to validate and them Integrate the document;
- Or, in my case, because I already have confidence in the process, and is quite tested, we can configure the process to skip the review station step and directly integrate the document. This will also allow you… yes you, the reader, to test this implementation as you will see at the end of this article.
- After receiving and extract the data from the documents (paper), SmartDocumentor will send the metadata to a Logic App HTTP endpoint.
Power BI to deliver interactive data visualization (dashboards and reports)
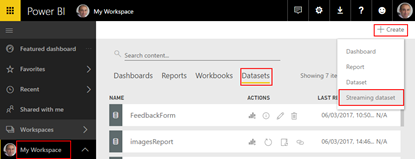
Regarding Power BI, Logic Apps Power BI connector only accepts you to use streaming datasets (this has advantages and some disadvantages that we will see further on), that allows you to easily build real-time dashboards by pushing data into the REST API endpoint. To create your streaming datasets, you should access to Power BI with your account:
- Select your ‘Workspace à Datasets’, and then on the top right corner click ‘+ Create’ and then ‘Streaming dataset’
- In the ‘New streaming dataset’, select ‘API’ and then click ‘Next’
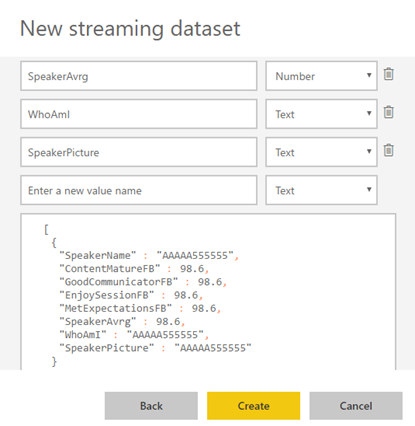
- In the second ‘New streaming dataset’, give a name to your dataset: “FeedbackForm” and then add the following elements:
- SpeakerName (Text) – represents the name of the speaker that is obtained in the evaluation form according to the session.
- ContentMatureFB (Number) – a value between 1 and 9 that is obtained in the evaluation form
- GoodCommunicatorFB (Number) – a value between 1 and 9 that is obtained in the evaluation form
- EnjoySessionFB (Number) – a value between 1 and 9 that is obtained in the evaluation form
- MetExpectationsFB (Number) – a value between 1 and 9 that is obtained in the evaluation form
- SpeakerAvrg (Number) – A simple average calculation (sum all the above metrics divide by 4)
- WhoAmI (Text) – represents the type of attendee you are (developer, architect, …) that is obtained in the evaluation form
- SpeakerPicture (Text) – picture of the speaker according to the session that is obtained in the evaluation form.
- And because we want to create interactive reports in order to have more insights from the event. We need to enable ‘Historic data analysis’ and then click ‘Create’
Limitations: Unfortunately, streaming dataset is meant to be used for real-time streaming and is a little limited in terms of want we can do with it. For example, it doesn’t allow you to combine different sources, like a “table” that can correlate speaker to get their pictures, or to make aggregations of metrics like “Speaker average”. Which means that we need to send all of this information from Logic Apps.
Azure Function to apply JSON transformations (Content Enricher, Content Filter & Name-Value Transformation Patterns)
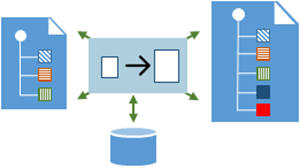
To solve and bypass these streaming dataset limitations we use an Azure Function inside Logic App that not only transforms the JSON message received from SmartDocumentor with the Evaluation metadata but also add missing information – Content Enricher Pattern. It is very common when we want to exchange messages between different systems or applications, that the target system requires more information than the source system can provide. In this case, the source system (paper) will not send the Name of the speaker, the speaker average metric and the picture of the speaker, but our target system (Power BI) expects that information.
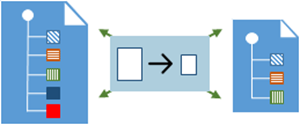
But also, to apply a transformation pattern – Content Filter – that not only removes unnecessarily data elements but it is also used to simplify the structure of the message, i.e., ‘flattens’ the hierarchy into a simple list of elements that can be more easily understood and processed by other systems.
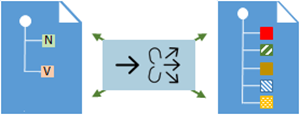
And finally transform a name-value pair (NVP), key-value pair (KVP), field–value pair, attribute-value pair or even Entity-Attribute-Value model (EAV) data representation that is widely used into a to more Hierarchical Schema.
To do that we create a “GenericWebHook-CSharp” function that accepts the name-value pair JSON message, which was originally sent by SmartDocumentor OCR, and generate a friendlier message.
#r "Newtonsoft.Json"
using System;
using System.Net;
using Newtonsoft.Json;
using Newtonsoft.Json.Linq;
public static async Task&amp;amp;lt;object&amp;amp;gt; Run(HttpRequestMessage req, TraceWriter log)
{
log.Info($"Webhook was triggered!");
string jsonContent = await req.Content.ReadAsStringAsync();
dynamic data = JsonConvert.DeserializeObject(jsonContent);
string speakerName = string.Empty;
string speakerPicture = string.Empty;
int pos = 0;
for (int i = 5; i &amp;amp;lt;= 8; i++)
{
if (!String.IsNullOrEmpty(data[i]["Value"].Value))
{
pos = i;
break;
}
}
switch (pos)
{
case 5:
speakerName = "Ricardo Torre";
speakerPicture = "http://blog.sandro-pereira.com/wp-content/uploads/2017/03/RicardoTorre.png";
break;
case 6:
speakerName = "José António Silva e Pedro Sousa";
speakerPicture = "http://blog.sandro-pereira.com/wp-content/uploads/2017/03/JosePedro.png";
break;
case 7:
speakerName = "João Ferreira";
speakerPicture = "http://blog.sandro-pereira.com/wp-content/uploads/2017/03/JoaoFerreira.png";
break;
case 8:
speakerName = "Sandro Pereira";
speakerPicture = "http://blog.sandro-pereira.com/wp-content/uploads/2017/03/Sandro-Pereira.png";
break;
default:
speakerName = "Unknown";
speakerPicture = "http://blog.sandro-pereira.com/wp-content/uploads/2017/03/devscope.png";
break;
}
int result = 0;
decimal avrg = (decimal)((int.TryParse(data[9]["Value"].Value, out result) ? result : 0) + (int.TryParse(data[10]["Value"].Value, out result) ? result : 0) + (int.TryParse(data[11]["Value"].Value, out result) ? result : 0) + (int.TryParse(data[12]["Value"].Value, out result) ? result : 0)) / 4;
JObject eval =
new JObject(
new JProperty("SpeakerName", speakerName),
new JProperty("SpeakerPicture", speakerPicture),
new JProperty("ContentMatureFB", data[9]["Value"].Value),
new JProperty("GoodCommunicatorFB", data[10]["Value"].Value),
new JProperty("EnjoySessionFB", data[11]["Value"].Value),
new JProperty("MetExpectationsFB", data[12]["Value"].Value),
new JProperty("SpeakerAvrg", avrg),
new JProperty("WhoAmI", data[30]["Value"].Value));
log.Info($"Webhook was Complete!");
return req.CreateResponse(HttpStatusCode.OK, new
{
MsgEval = eval
});
}
Notice that for example in the following transformation rule:
...
speakerName = "Sandro Pereira";
speakerPicture = "http://blog.sandro-pereira.com/wp-content/uploads/2017/03/Sandro-Pereira.png";
...
We are transforming the selected session in the Evaluation form to the name of the speaker and his picture. Why the picture URL? Well, as mentioned before, Power BI streaming dataset has some limitation in what we can do by default. So, in order for us to be able to present the speaker picture in the Power BI report and/or dashboard, we are forced to send a public picture URL (in this case it is stored in my blog) as an input of our dataset.
For the same reason, because we cannot make a new measure derived from the others when using streaming dataset, instead we need to send it as an input of our dataset and in order for us to calculate the average performance of a speaker, we will be using this basic formula:
...
decimal avrg = (decimal)((int.TryParse(data[9]["Value"].Value, out result) ? result : 0) + (int.TryParse(data[10]["Value"].Value, out result) ? result : 0) + (int.TryParse(data[11]["Value"].Value, out result) ? result : 0) + (int.TryParse(data[12]["Value"].Value, out result) ? result : 0)) / 4;
...
The output of the function will be again another JSON message this time something like this:
{
  "MsgEval": {
    "SpeakerName": "Nino Crudele",
    "SpeakerPicture": "https://blog.sandro-pereira.com/wp-content/uploads/2017/05/Nino-Crudele.png",
    "ContentClearFB": "8",
    "GoodCommunicatorFB": "8",
    "EnjoySessionFB": "8",
    "MetExpectationsFB": "8",
    "GainedInsightFB": "8",
    "SpeakerAvrg": 8.0,
    "WhoAmI": "Other;Consultant;"
  }
}
Logic Apps to create an integration process flow
The missing piece: Logic App! The tool that allows us to transform a product – in this case, SmartDocumentor OCR software – that in principle like all product seemed closed and limited in terms of features into a product without frontiers/fences. Again, we all know that normally these type of products (OCR) have extensibility model systems that allow you to extend the product with your personal requirements – like SmartDocumentor also does – but this normally means you need to have developer skills that probably will cost you time and money, or additional cost to customize the product according to your needs, something we want to avoid and we will be able to archive using Logic Apps or similar tools/products.
The beauty of using Logic App is that provides us a very simplified, robust, scalable, not expensive and fast way to extend the capabilities of my SmartDocumentor OCR software and integrate with an uncounted number of Cloud and on-premises applications or/and systems.
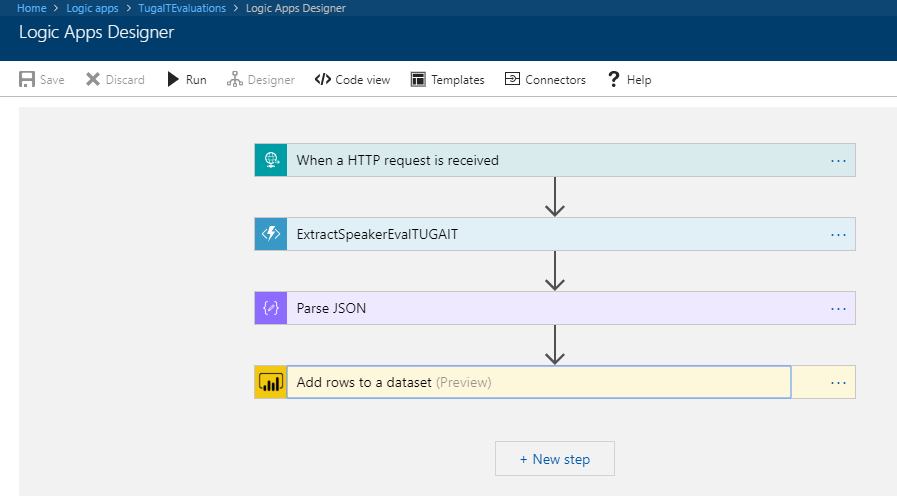
In order to integrate SmartDocumentor OCR with Power BI, we need to create a Logic App that:
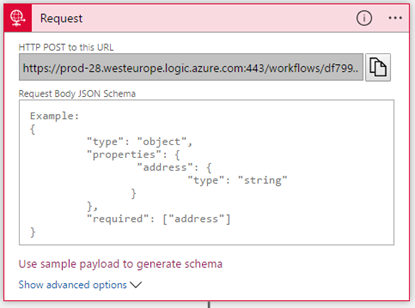
- Accept a JSON through an HTTP Post. For that, we use a ‘Request / Response – Manual’ trigger. And in this case, because we don’t need to have friendly tokens to access the elements of the message, we don’t specify a JSON Schema.
- Call an Azure Function to transform the original SmartDocumetor OCR JSON message to the expected JSON message to send to Power BI. For that, we use an ‘Azure Functions’ action, specifying the function that we created previously.
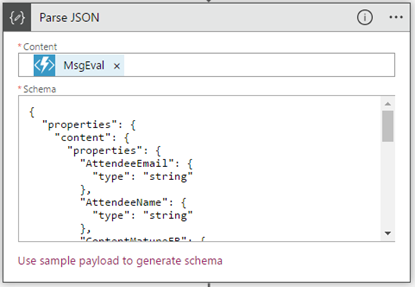
- After that, we use a ‘Parse JSON’ action, only to allow us to parse JSON content into friendly tokens (something like a quick alias to the fields) for being easily consumed in other actions of the process.
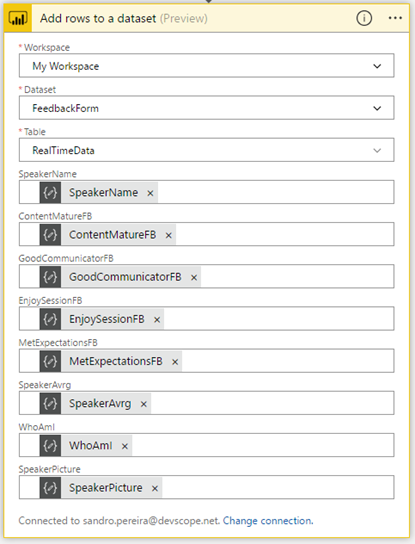
- In the last step of the Logic App: we push the data into the Power BI streaming dataset created earlier by using the new ‘Power BI’ Connector. To do this we need to:
- Add a ‘+New step’, ‘Add an action’, and then enter ‘Power BI’ into the search box. Select “Add row to streaming dataset” from the actions list.
- Select the name of the workspace and then the name of the streaming dataset
- The next step is to select the Table titled “RealTimeData”
- And finally, map the input data fields with the friendly tokens generated in the ‘Parse JSON’ action
Of course, we could have more logic inside, for example, validate if you attendees, or you guys while testing, are filling all the required element and based on that rules perform some actions, but my intention, in this case, was to make and keep the process as simple as possible, normally as we explain earlier we could perform validation on the SmartDocumentor review station but again we can easily add additional validation in the Logic App without any problem.
The final result
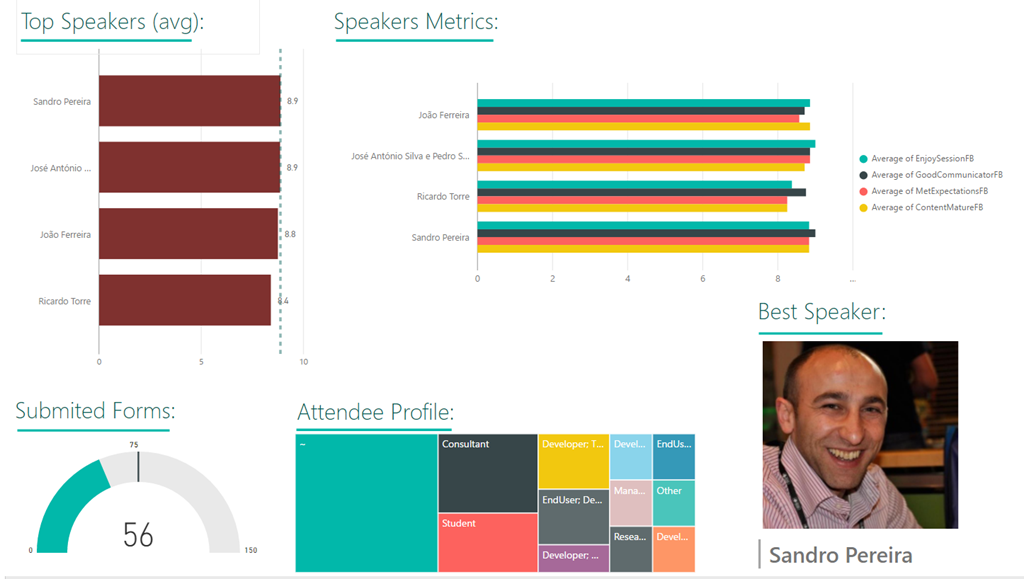
After saving the Logic App and process the Evaluation forms with SmartDocumentor OCR directly from the scanner or thru the file system, the result is this beautiful and interactive report that we can present in a monitor during the breaks of our events:
You may now under, “What do we need to do to extend the process for archiving the messages?“
That is extremely simple, just edit and change the Logic App by adding, for example, a Dropbox, OneDrive or File Connector into your process, configure it and save it! It is that easy!
How can you test the solution?
Of course, it is impossible for you to test the entire process, unfortunately, we cannot submit the paper via the web… at least yet. But you can try part of this solution because by assuming that we already have the paper digitalized/scanned and we only want to try the SmartDocumentor OCR and the integration process.
So, if you want to try the solution, you need to:
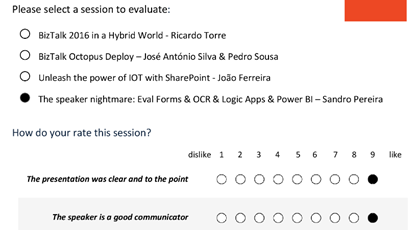
- Download the Evaluation Form (survey) – PNG format – here: https://blog.sandro-pereira.com/wp-content/uploads/2017/04/SpeaketForm_2017-0.png
- Open the form picture in your favorite image editor (Paint or Paint.NET) and just paint your choices, something like this.
- Again, be sure you fill all the necessary fields: session, each rate (only on time) and about you because I didn’t add any type of validation and I’m skyping the Review Sation step
- You don’t need to fill your name, email, company or phone
- You can send multiple form pictures in attach but don’t send any other type of pictures in attach. Again, I can easily create some flow rules to validate but I didn’t implement anything like that.
- Avoid sending email signature with pictures, the process will work but it end up having some Logic Apps runs with failure (didn’t implement these type of validations but it is possible)
- Again, be sure you fill all the necessary fields: session, each rate (only on time) and about you because I didn’t add any type of validation and I’m skyping the Review Sation step
- Email your form attached to sandro.pereira.demos@gmail.com with the following subject “SmartDocumentorSurvey“
- Wait a few minutes, because I have a very simple Microsoft Flow (we will address this process later on in another blog post) listening to this mailbox that:
- Extracts the attachment
- Sends it to SmartDocumentor OCR
- And notifies you that the file was received
- Check your email and access to this public link to see the results: https://app.powerbi.com/view?r=eyJrIjoiZmQyNDM4YmItN2ZkYS00NzEwLThlYWYtMGQxMjQ3ZDI5ZGE2IiwidCI6IjA5ZTI1MWRjLTVlODctNDhiZi1iNGQyLTcxYjAxYWRiOTg0YSIsImMiOjh9
- Unfortunately, due cache policies, updates to reports or visuals to which a Publish to weblink points can take approximately half an hour to be visible to users – this is a Power BI limitation/cache policy – because the link is for a public Power BI report you may only see the results reflected, in the worst scenario, after more or less half an hour.






2 thoughts on “Processing Feedback Evaluations (paper) automagically with SmartDocumentor OCR, Logic Apps, Azure Functions & Power BI”