This post is intended to consolidate some basic principles about Flat File Schema Wizard
First of all, BizTalk Flat File Schema Wizard is a template inside Visual Studio that allows you to convert Flat File into an XML message, which BizTalk can understand, in a graphical a simple manner. That basically supports two types of text files: Positional text files and/or delimited by symbols. See more:
- BizTalk Server: Transform text files (Flat Files) into XML–Introduction (Part 1)
- BizTalk Server: Transform text files (Flat Files) into XML – Necessary tools and artifacts (Part 2)
The following walkthrough shows you how to create a flat-file schema from semicolons separate flat file document that stores people information using the BizTalk Flat File Schema Wizard.
|
Name |
Surname |
Birth year |
Address |
Zip Code |
| Sandro | Pereira | 1978 | Crestuma | 4415 |
| José | Silva | 1972 | Crestuma | 4415 |
File sample:
Sandro;Pereira;1978;Crestuma;4415
Vânia;Braziela;1981;Vila Nova de Gaia;4400
José;Silva;1972;Crestuma;4415
Rui;Barbosa;1975;Lever;4415
You can see that we have, in this example, four records with five fields specifying Name, Surname, Birth year, Address and Zip code of each person.
Now I will walk you through the required steps at design time:
- using the Flat File Schema Wizard to generate the Flat File Schema;
- and the pipeline editor to create a custom pipeline;
To enable the runtime to support the processing of the Flat File described earlier (People)
We begin then by launching Visual Studio and create or open a BizTalk project:
- “File –> New –> Project”, on BizTalk Projects, select the option “Empty BizTalk Server Project”;
- Insert the project name, physical location on the disk and the name of the solution.
Using Flat File Schema Wizard to generate a schema based on a file delimited by Symbols
To create the schema which will recognize the ‘people’ text file, we need to go to the BizTalk solution created in Visual Studio and perform the following steps:
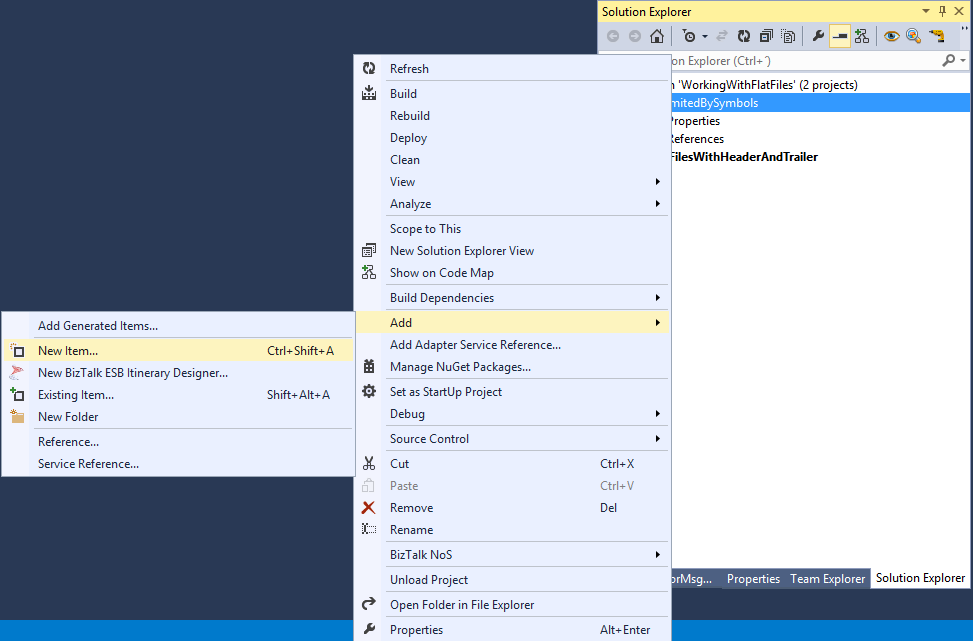
- Press the right button on top of the project in Solution Explorer, and select the option “Add –> New Item…”
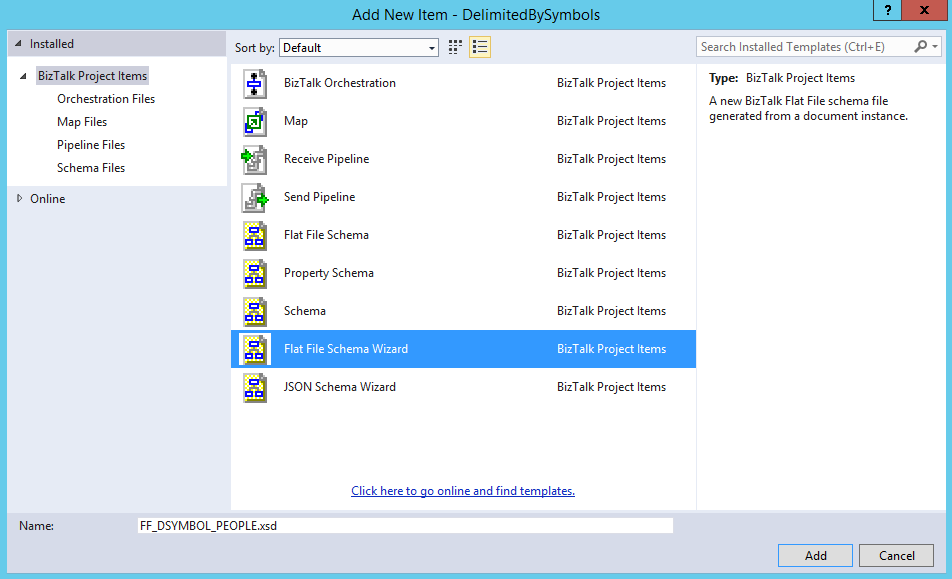
- On “Installed Templates” menu in the window “Add New Item”, select the option “Schema Files”, and then select the option “Flat File Schema Wizard”, then provide the name you want to give the scheme in this example: “FF_DSYMBOL_PEOPLE.xsd”
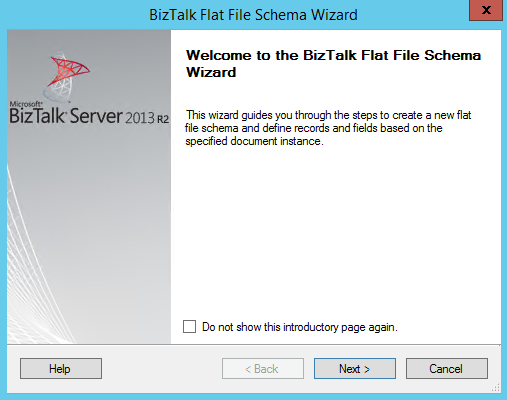
By selecting this option, we will be guided automatically by the tool “BizTalk Flat File Schema Wizard” that will help us to create a Flat File Schema and define its data structure (records, elements, attributes …) based on the text file specified.
- Click “Next” to continue.
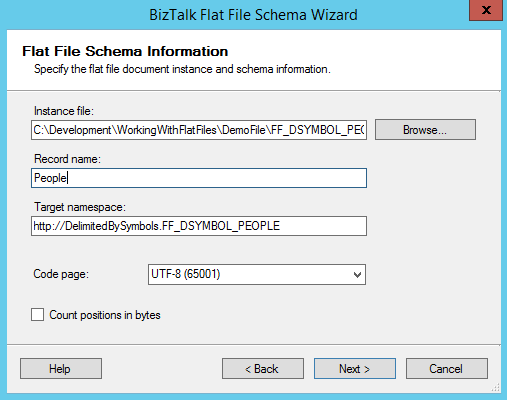
- In the window “Flat File Schema Information” we will have to:
- Select an instance of the text file that will serve as the model of the structure that we want to transform;
- Although it is not necessary, it is good practice to rename the Record name “Root”.
- In this case, we will rename it to “People”
- And finally, assign a “Target namespace” to the scheme and define the encoding of the input file
- Click “Next” to continue.
Note: The wizard will load the text file so that we can begin to split it and map it into the desired structure. In this step, we need to define how the records or rows are differentiated. The structure of the example is: Name;Surname;Birthdate;Address;Zip Code{CR}{LF}
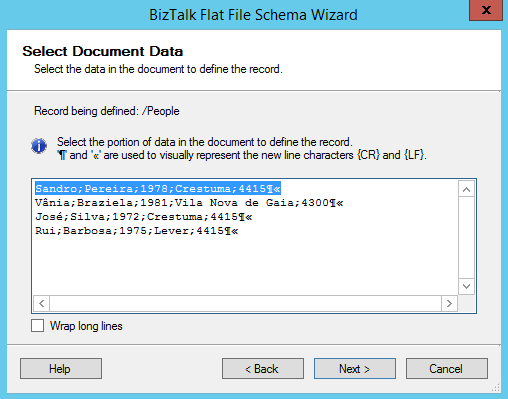
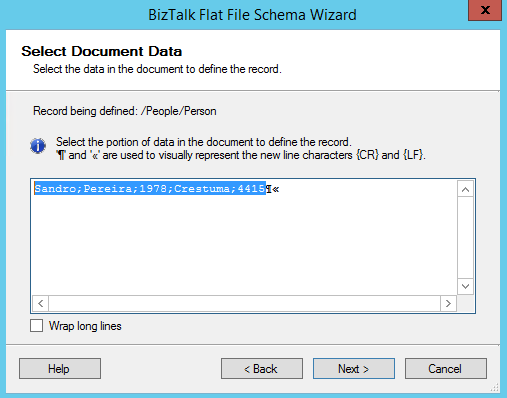
- Since each record “Person” that we want to create is defined in a single line, in the “Select Document Data” we can select only the data portion of the document that will set the record, i.e. the whole first line. Click “Next” to continue.
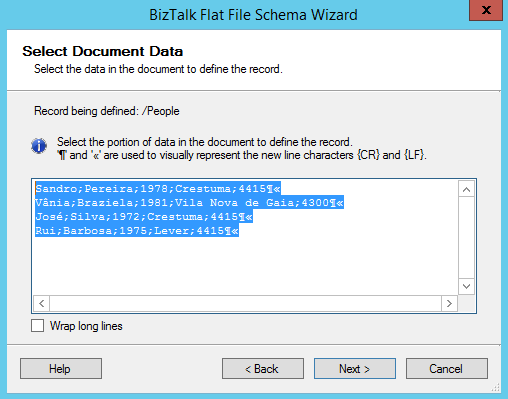
Note: Alternatively, let’s call it: option 2, we could select all the data of the file, however with this approach we need to treat differently the data a few steps ahead in the “Child Elements” window.
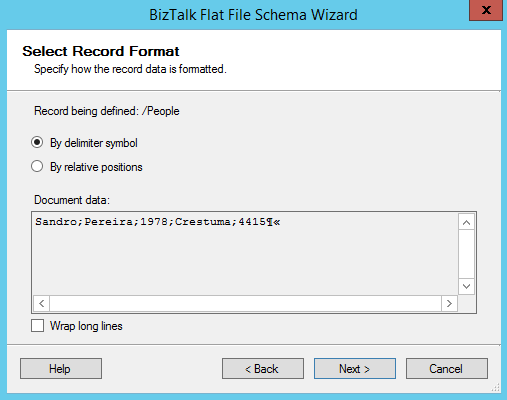
- In the window “Select Record Format” we will define whether we are dealing with a Flat File Delimited by symbols or is positional, in our case we will select the “By delimiter symbol” because each record is delimited by a return Carriage Return/Line Feed ({CR}{LF}). Click “Next” to continue.
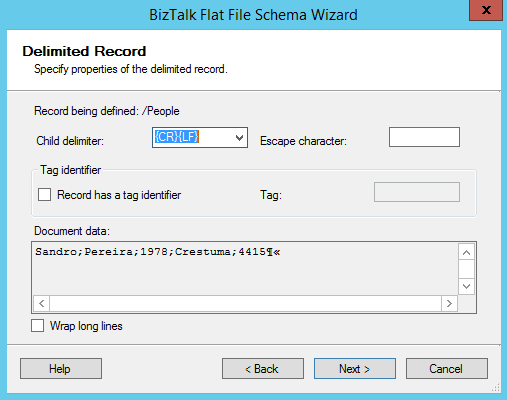
- In the window “Delimited Record” we will provide the record delimiter, in this case as we want to define the structure of person, i.e. each row is a person, our limiter is {CR}{LF} (Carriage Return/Line Feed). The “Child delimiter” combo box include by default the following options: {CR}, {LF}, {TAB}, {SPACE}, {0x1A}, {}, {.}, {;} and {CR}{LF}, however you can provide your own symbol.
- Click “Next” to continue.
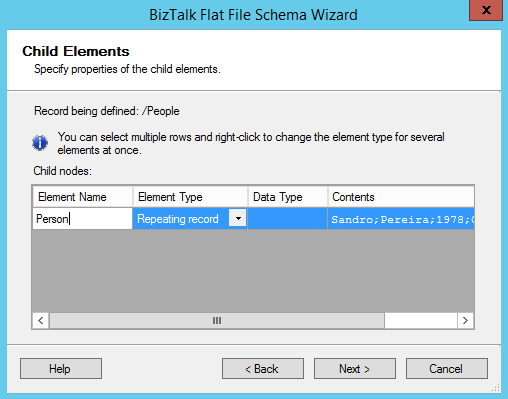
- In the window “Child Elements” we will define what kind of element we want to assign to the registry. As we are defining the Person structure and the file contains multiple people, we have to select the “Element Type” as “Repeating record” If we do not perform this step, we will not have the ability to split the record into multiple elements / attributes individual.
- Note: If you do not define the element as “Repeating record” (or “Record”), you will not have the ability to break down your record into individual elements or attributes.
- Click “Next” to continue.
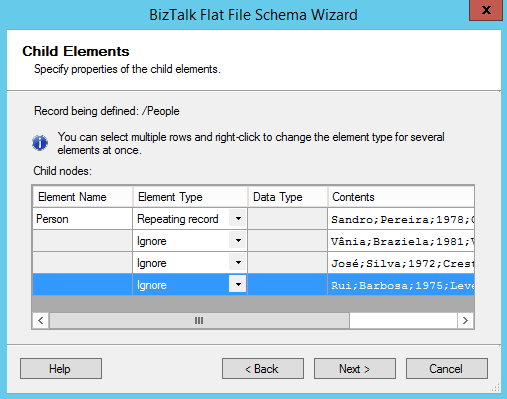
Note: earlier I told that we could select all the data inside the flat file and that we would need to treat the information differently in this step – option 2. So if you select this option, it will present all the lines in the document in this window, because we want to have an “Array” of Persons, in this step we need to select the “Element Type” of the first element as “Repeating record” and the rest of the set as “Ignore” (You set this to Ignore because you have already specified Repeating Record for the Person element)
In this point, I have defined how the element Record looks like but I have not broken down the various elements that make up the record itself. We have just map that each line of the text file corresponds to a record Person.
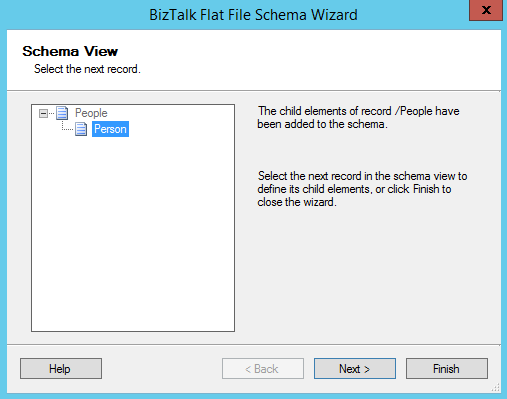
- In the “Schema View”, click “Next” to continue processing the message. Click “Next” to continue.
In this phase, the wizard restarts the whole process described above, but if you noticed, the wizard no longer selects all information contained in the text file, but only what was selected to define the record Person.
- What we will do now is split the information of record “Person” in different elements, for that, we will select only the information required leaving out the Carriage Return/Line Feed. Click “Next” to continue.
- Once again our structure is delimited by symbols (;), then we will select the option “By delimiter symbol” and then c“Next” to continue.
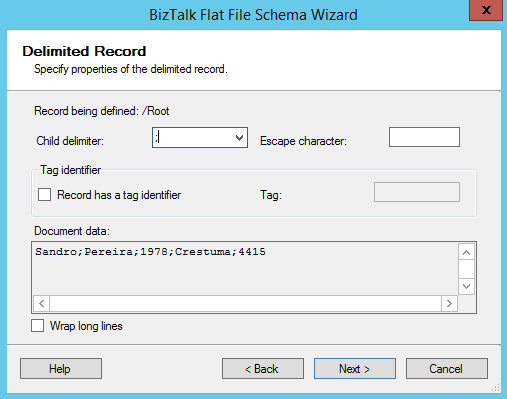
- As we can analyze all the elements are separated by the semicolon (;) that is our delimiter, then in the window “Delimited Record” we must change the value of the “Child delimiter” option to “;”.
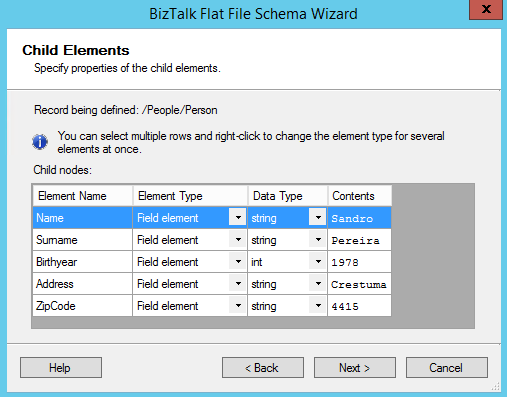
- In this window “Child Elements”, we will define the different elements/attributes of the structure of the record person. This operation is very similar to any XSD, where we can define the different names and data types. Adjust the values according to the table below:
|
Element Name |
Element Type |
Date Type |
| Name | Field element | String |
| Surname | Field element | String |
| Birthyear | Field element | int |
| Address | Field element | String |
| ZipCode | Field element | String |
Note: You should rename the parent node, each record, element or attribute in the BizTalk Flat File Schema Wizard, mainly in this step by modify the “Element Name” field to your desired name, however if you forgot to do that or if you make a mistake defining one of them, you can always rectify it in the Schema Editor. The same applies to the Data Type.
- Click “Next” to continue.
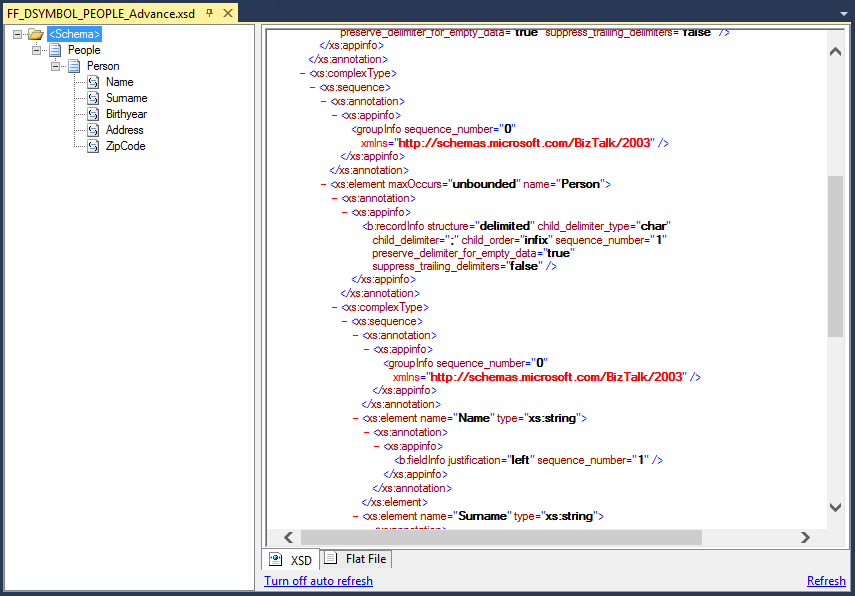
- Finally, the wizard will show the equivalent XML structure that your text file document will have. Once you select the option “Finish”, the scheme will be available for you to use in your BizTalk solution.
After we finalize the creation of the Flat File Schema which will contain the transformation rules of the text file, we can easily test our transformation, without having to get out of our development tool (Visual Studio) and without having to deploy our solution.
If we select the Flat File Schema that we just created and access to its properties, we can see that by default all properties are preconfigured so that we can perform tests to our message transformation:
- The input instance file is configured with the file which was used to create the schema;
- And with the correct input and output formats
- Validate Instance Input Type: Native
- Generate Instance Output Type: XML
To test, you simply right-click on the schema that we just created and select the option “Validate Instance”:
This option will use the configured file to execute and validate all transformation rules defined in the Flat File Schema and present the final result or occurring errors in the “Output” window
Did you know that: Delimited fields in flat files have a limit of 50000000 characters
Creating the Pipeline that will be responsible for processing and transforming the text file
As I explained in detail in one of my previous posts: BizTalk Server: Transform text files (Flat Files) into XML–Introduction (Part 1), the Syntax Transformations occur in the Disassembling and Assembling stages within the receive and send pipelines, having this Flat File schema will not do us much good until we create the pipelines to provide the translation between Flat Files and XML
To create the Receive Pipeline that will be responsible for processing and transforming the text file, we need to go to the BizTalk solution created in Visual Studio and perform the following steps:
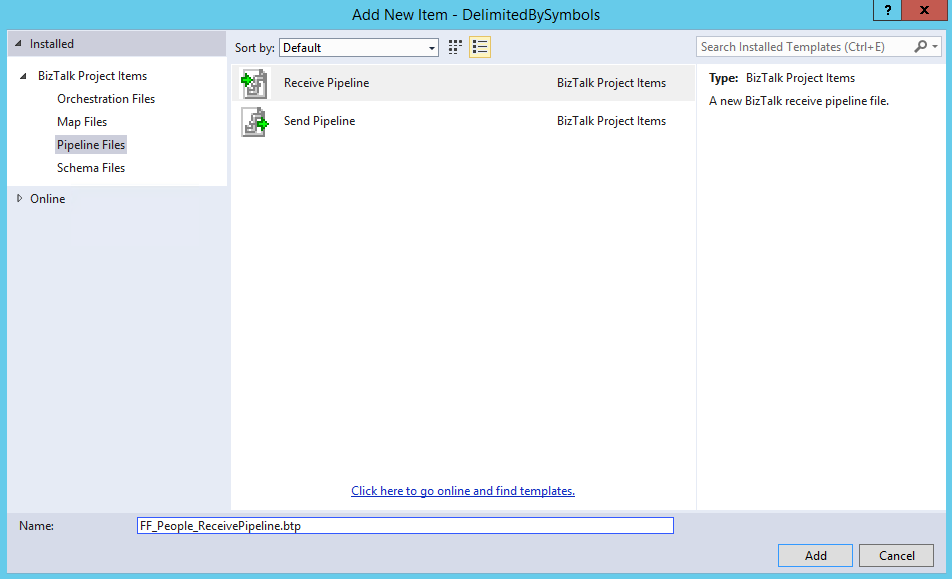
- Press the right button on top of the project in Solution Explorer, and select the option “Add –> New Item…”.
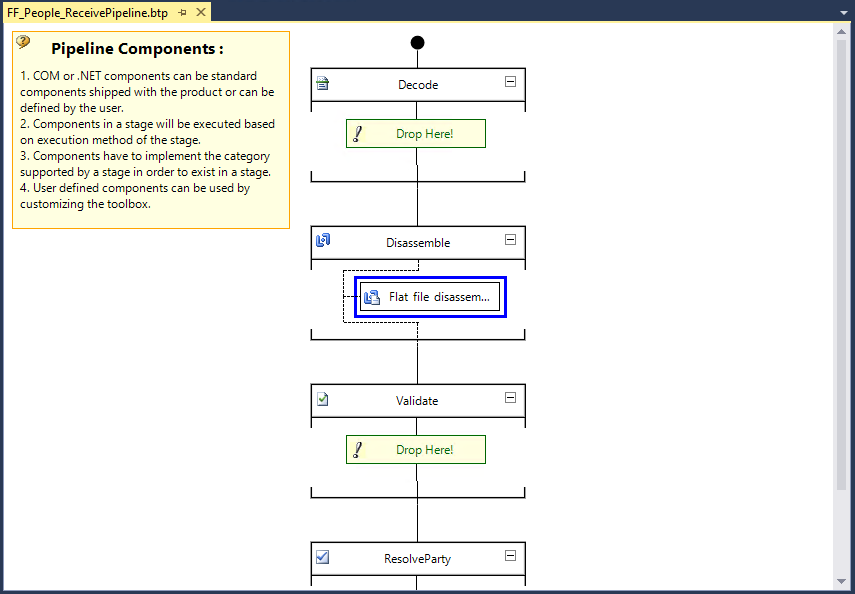
- On “Installed Templates” menu in the window “Add New Item”, select the option “Pipeline Files”, and then select the option “Receive Pipeline”, then provide the name you want to give the pipeline in this example: “FF_People_ReceivePipeline.btp”
- By selecting the option “Add”, the pipeline editor (BizTalk Pipeline Designer) will appear and that will let you view and add components to all the steps associated with receive pipeline: Decode, Disassemble, Validate and ResolveParty.
In this case, the pipeline that we will create it will be responsible for receiving a text file through a receive location and convert it to XML. For that, we will use the “Flat File Disassembler” component which is available in the Visual Studio Toolbox window (Ctrl+W, X).
- Drag it into the Pipeline in step “Disassemble”.
- Finally, select the component “Flat file disassembler”, go to its properties and on the “Document Schema” option: select the schema created earlier, in case the “FF_DSYMBOL_PEOPLE”.
Note: If you want to create a send pipeline in order to transform an XML document into Flat File, we would follow the same steps, the difference is that we would have to drag the component “Flat File Assembler” on stage “Assemble”.
Once you have deployed your solution, you will want to ensure that you select the custom pipeline we just created in the Receive Locations that you expect to receive these flat files.
Takeaway
Now the big questions here is: Do you think the Schema is entirely correct? Does it handle all files accordingly to the expected results?
Or do we need to tune some of the properties of your schema… stay tuned to the next post.
Some references:
- Flat File Messages with Delimited Records
- How to Configure the Flat File Disassembler Pipeline Component
- BizTalk Flat File Schema Wizard
Related posts:
You can download all the code used here from:
 Flat Files Schemas: Dealing with Files Delimited by Symbols
GitHub




Thank you, this is very helpful to me. In this example, if you had a header record in the flat file defining the column names, how would you exclude it from the schema, or ultimately, the xml file created from the schema? thank you
Hi Sandro,
Thank you this article has really helped.
I am stuck with one of the csv files though. The csv contains Legal Name field which has a comma in the value (e.g. 10027065,”LName, FName”,”LName, FName”,ShortName,,FName,ABC,alb.csw@gmail.com,NULL,444444444,”Unit 7, 22
XX avenue”,,,,City,2230,State,Country,P,A,58:53.0,58:53.5,abc¶«)
Here “LName, FName” is one column “Legal Name” and when I create a schema using comma as delimiter, it separates LName and FName into different tags but I want to ignore , which is inside “”.