
This may be the most important section in order for you to accomplish a successful BTARN installation and configuration, and at the same time prevent further problems. Again, the installation and configuration process is very simple; however, correctly configuring the accelerator in order to work properly can be difficult if you do not plan correctly for it.
This part will focus on how to prepare your existing BizTalk Server 2013 R2 environment for BTARN.
📝 One-Minute Brief
Proper environment preparation is the secret to a successful BizTalk Accelerator for RosettaNet (BTARN) installation. This guide walks you through the critical steps of configuring BizTalk Host and Host Instances. You’ll learn how to create a dedicated BTARN service account, configure hosts as “Authentication Trusted” and “32-bit only,” and manage the complex “account switching” process required to satisfy BizTalk’s security constraints. Avoid common configuration dead-ends by following this detailed host separation strategy.
Create a new account to be associated with the BTARN hosts
As mentioned before, the accelerator requires both BTARN in-process and BTARN isolated host to be marked as Authentication Trusted and 32-bit only, and the account associated with these Host instances should be the same; otherwise, BTARN will not work correctly.
Authentication Trusted is off by default when you create a new host, or if you don’t specify in the BizTalk Server configuration process that you want this setting to be enabled. And BizTalk will not allow you to use the same user account for both trusted and untrusted hosts.
Also, because of security aspects, we don’t want to have all our host instances marked as Authentication Trusted, it is necessary for us to create:
- A new user account that will be associated with the trusted hosts.
- And a new user account (support account) that will help us in the switching host process from untrusted to trusted.
Note: Sometimes it is often easier/more desirable to create a new User Group with the same privileges as the BizTalk Application Users group (let’s say: BTARN BizTalk Application Users) and a new user account that will be associated with this group to run all the BTARN processes.
To accomplish that, we need to:
- Press the Windows key to switch to the Start screen, type Computer Management, and click on the Computer Management option from the Search menu.
- On the left three of the Computer Management screen, expand System Tools > Local Users and Groups and select Users.
- Right-click on the Users folder, and then select New User…

- In the New User dialog box, do the following:
- User name: Type the user name. For this guide, let’s assume btsadmin.
- Full name: Optionally, type a full user name for this account.
- Description: Optionally, type a description for this account.
- Password: Type a password for the user.
- Confirm password: Confirm the password for the user.
- And leave only the “Password never expires” checkbox enabled
Note: Make sure that the user that you are creating (btsadmin) it has:
- The same privileges of the existing BizTalk Admin Account (in my case, or in developer environments).
- It has the same privileges as the existing Account associated with the BizTalk Application Users group.
Repeat the same steps to create another account for support, let´s call it supportacc:
- This account will be deleted after the installation/configuration.
- A normal user account, it doesn’t require any particular privileges.
(Re)Configure BizTalk Host and Host Instances to support BTARN
BizTalk Server provides great flexibility for addressing high availability, because you can strategically dedicate logical hosts to run specific areas of functionality, such as receiving messages, sending messages, or processing orchestrations.
By default, the BizTalk configuration will create two BizTalk Hosts and Host Instances:
- BizTalkServerApplication: This is the default Host and Host Instance created during configuration that will do all the work on the BizTalk Server, i.e., is the default send and receive handler for all installed adapters (other than HTTP, WCF (BasicHttp, CustomIsolated, WebHttp, and WSHttp), and SOAP Receive Handlers), and is also used for processing orchestration and tracking.

- BizTalkServerIsolatedHost: The logical container for HTTP, WCF (BasicHttp, CustomIsolated, WebHttp, and WSHttp), and SOAP Receive Handlers.

Although a single BizTalk Host can contain items that receive, send, and process messages, it is considered a best practice to create different hosts for each function to create security boundaries and for easier management and scalability. In particular, we recommend that you use different hosts for processing and receive/send operations. And that you separate trusted and non-trusted items.
While there are benefits to creating additional host instances, there are also potential drawbacks if too many host instances are created.
- Each host instance is a Windows service (BTSNTSvc.exe), which generates additional load against the MessageBox database and consumes computer resources (such as CPU, memory, and threads).
Regarding the BTARN installation and configuration process, it becomes more difficult to configure when we have multiple hosts and host instances created, compared with the default configuration (with only two BizTalk hosts and Host Instances), and the reasons are:
- The accelerator requires both in-process and isolated hosts that will run BTARN artifacts to be marked as Authentication Trusted (this setting is off by default when you create a new host), 32-bit only, and should run under the same service account.
To ensure everything is installed and configured properly, we have different options:
- Temporarily mark all the hosts as Authentication Trusted and the 32-bit only host as the default host.
- Of course, this is not the recommended solution, but it is the easier one.
- Or we need to properly configure the hosts and host instances to handle BTARN correctly.
Because I have all my environments, even my developer environments, with host separation according to some of the best practices described here: BizTalk Server Best Practices: Create and Configure BizTalk Server Host and Host Instances. I need to properly configure the hosts and host instances to handle BTARN correctly. To accomplish that, we need to:
- Press the Windows key to switch to the Start screen, type BizTalk Server, and click on the BizTalk Server Administration option from the Search menu.
- In the console tree, expand BizTalk Server Administration, expand the BizTalk Group, click Platform Settings, and then click Host Instances.
- Now we need to change all the host instances, with the exception of BizTalkServerApplication and BizTalkServerIsolatedHost (these two will be running the BTARN artifacts), to run under this last user that we just created in the last section: btsadmin.
- Right-click on the host instance name, for example, BizTalkServerReceiveHost, and select Stop.

- In the details pane, right-click the host instance you want to modify, and then click Properties, for example, BizTalkServerReceiveHost.
- In the Host Instance Properties dialog box, click Configure to modify the service account information.

- Change the logon credentials to run under the btsadmin account.

- Do the rest for all the host instances that you have, with the exception of BizTalkServerApplication and BizTalkServerIsolatedHost host instances.

The next step is to configure the both BTARN in-process and isolated hosts to be marked as Authentication Trusted and 32-bit only but because we still have two non-trusted host instances running with the same account that we need to mark as trusted and we cannot have the same account being used as Authentication Trusted and non Authentication Trusted, we first need to provisionally change one of the host instances, to use the “supportacc” account, we can use for example the “BizTalkServerIsolatedHost” host instance
- Right-click in the BizTalkServerIsolatedHost name, and then click Properties.
- In the Host Instance Properties dialog box, click Configure to modify the service account information.
- Change the logon credentials to run under the supportacc account.
Now we need to change the BizTalkServerApplication Host configuration and mark it as:
- 32-bit only: By default, it is already marked as 32-bit only.
- And Authentication Trusted.
To accomplish that, we need to:
- In the BizTalk Server Administration console tree, under Platform Settings, click Hosts.

- In the Hosts pane, right-click the host that is not trusted, in this case, BizTalkServerApplication, and then click Properties.
- In the Host Properties dialog box, on the General tab:
- Verify if the 32-bit only checkbox is selected; if not, select the 32-bit only checkbox.
- Verify if the Authentication Trusted checkbox is selected; if not, select the Authentication Trusted checkbox.

- And then click OK.
- Now do the exact same to the BizTalkServerIsolatedHost host.

Because the BTARN BizTalk Host Instance Account and the BizTalk Isolated Host Instance Account should be the same, we need to change the “BizTalkServerIsolatedHost” host instance logon account, which we momentarily configured to run under the supportacc account, to be the same as the BizTalkServerApplication host instance: Administrator.
- In the BizTalk Server Administration console tree, under Platform Settings, click Host Instances.
- Right-click in the BizTalkServerIsolatedHost, and then click Properties.
- In the Host Instance Properties dialog box, click Configure to modify the service account information.
- Change the logon credentials to run under the Administrator account.

Finally, you should restart all the BizTalk Host instance services.
Note: Because we don’t really want to run all our isolated processes under a trusted host instance, I recommend you to create a new Isolated Host and Host Instance that you should configure as non-“Authentication Trusted” and set to run under the “btsadmin” account (in this scenario). For that operation please check the following MSDN articles:
Configure the Default Host and Default Handlers
The last concern that you need to have regarding BizTalk Host and Host instances is:
- General Default Host in the group.
- And the Default send handler of the HTTP Adapter and the SQL Adapter.
Again, as explained previously, when we are installing the RosettaNet Accelerator, the installer will install all the BTARN assemblies into the default BizTalk Application: BizTalk Application 1, and will attempt to configure all the orchestrations and ports (receive and send) to run not with the first host that it finds that is marked as Authentication Trusted but instead with the default host and handlers that are configured in the environment.
To ensure that everything will be configured properly, or at least minimize some problems, with the BTARN configuration process, you need to:
- Make sure the BTARN in-process host (BizTalkServerApplication) is the general Default Host in the group.

- Make sure the BTARN in-process host (BizTalkServerApplication) is the default send handler of the SQL Adapter (yes, the old, obsolete one – not the WCF-SQL), and it is also associated with the receive handler.

- Make sure the BTARN in-process host (BizTalkServerApplication) is the default send handler of the HTTP Adapter.

- And of course, the BTARN isolated host (BizTalkServerIsolatedHost) is configured to be the receive handler of the HTTP Adapter.

Create the IIS_WPG group
When configuring BTARN on Windows 8.1, Windows Server 2012, and Windows Server 2012 R2, you must create the IIS_WPG group manually. We need this because RosettaNet accelerator requires the IIS_WPG group (group provided by IIS 6.0 that provides the minimum set of user rights and permissions required to run an application), but unfortunately for us, this group doesn’t exist anymore in the SO listed above, so you need to create it manually. Otherwise, BTARN installation will fail.
To accomplish that, you need to:
- Press the Windows key to switch to the Start screen, type Computer Management, and click on the Computer Management option from the Search menu.
- In the console tree, expand System Tools, expand the Local Users and Groups, and then click Groups.

- Right-click on the Groups folder, and then select New Group…
- In the New Group dialog box, set the following parameters:
- In the Group name, type IIS_WPG.
- In Description, type RosettaNet IIS group.

- Click Create, and then click Close.
Create a WebService extension for BTSHTTPReceive.dll
BTARN uses the HTTP adapter to send (left picture) or receive (right picture) PIPs to and from different partners:

If the PIP process is asynchronous, each message transmission over the Internet occurs on a different HTTP connection. If the PIP is synchronous, each message transmission occurs on the same connection, which the HTTP adapter holds until the process is complete.
For that reason, we need to create a web service extension for the BTSHTTPReceive.dll and configure the IIS isolation mode. To accomplish that, we need to:
- Press the Windows key to switch to the Start screen, type IIS, and click on the Internet Information Services (IIS) Manager option from the Search menu
- In the Internet Information Services (IIS) Manager screen, select the root Web server entry. In the Features View, double-click Handler Mappings.

- And then in the Actions pane, click Add Script Map…

- In the Add Script Map dialog box, in the Request path field, type BtsHttpReceive.dll.
- In the “Executable” field, click the ellipsis (…) button and browse to C:\Program Files (x86)\Microsoft BizTalk Server 2013 R2 \HttpReceive.
- And select BtsHttpReceive.dll and then click OK.
- In the Name field, type BizTalk HTTP Receive.
- In the “Executable” field, click the ellipsis (…) button and browse to C:\Program Files (x86)\Microsoft BizTalk Server 2013 R2 \HttpReceive.
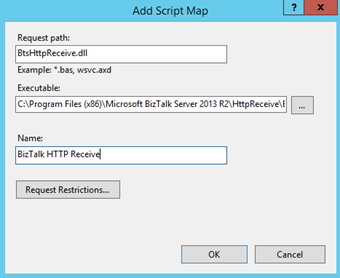
- Then click Request Restrictions.
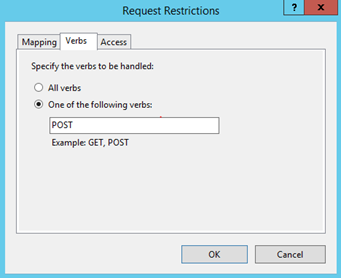
- In the Request Restrictions dialog box, click the Verbs tab and then select One of the following verbs.
- Enter POST as the verb.
- On the Access tab, select Script, and then click OK.
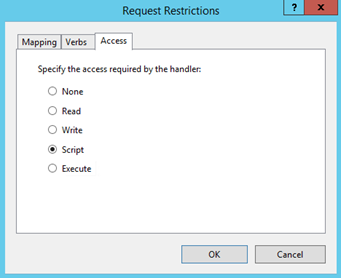
- When prompted to allow the ISAPI extension, click Yes.
- Do the exact same process this time using the C:\Program Files (x86)\Microsoft BizTalk Server 2013 R2\HttpReceive64\BTSHTTPReceive.dll.

Related links:
- How to Install and Configure Microsoft BizTalk 2013 R2 Accelerator for RosettaNet: Important considerations before you install BTARN (Part 1)
- How to Install and Configure Microsoft BizTalk 2013 R2 Accelerator for RosettaNet: Install and configure Microsoft BizTalk 2013 R2 Accelerator for RosettaNet (BTARN) (Part 3)
- How to Install and Configure Microsoft BizTalk 2013 R2 Accelerator for RosettaNet: Additional Configurations of BizTalk 2013 R2 Accelerator for RosettaNet (Part 4)
- How to Install and Configure Microsoft BizTalk 2013 R2 Accelerator for RosettaNet: Troubleshooting Your Installation (Part 5)
Hope you find this helpful! If you liked the content or found it useful and would like to support me in writing more, consider buying (or helping to buy) a Star Wars Lego set for my son.

