
Constructing a Flat Files Schema – Practical example
For this project, we will use the BizTalk Server 2010 and Visual Studio 2010, and we will explain step by step what needs to be developed. Briefly, these are the steps we have to perform:
- Creating an instance of the text file that will serve as a test file for the project.
- Creating the Schema which will recognize the text file.
- Creating the Pipeline that will be responsible for processing and transforming the text file.
- Deploy the BizTalk Server solution.
- Configuring the BizTalk application.
- Run the solution.
The solution of this example, as well as all the code, is available on GitHub: https://github.com/sandroasp/BizTalk-Server-Learning-Path/tree/master/Working-with-Schemas/Transform-text-files-Flat-Files-into-XML
📝 One-Minute Brief
This practical guide (Part 3 of the series) provides a step-by-step tutorial on building a BizTalk solution to transform a delimited text file (CSV) into XML. It covers creating a BizTalk project in Visual Studio, using the Flat File Schema Wizard to define repeating records and field delimiters (like semicolons and line breaks), and testing the transformation using the “Validate Instance” feature. The post also includes links to the full source code on GitHub.
We begin by launching Visual Studio 2010 and creating a new BizTalk project:
- “File –> New –> Project”, on BizTalk Projects, select the option “Empty BizTalk Server Project”;
- Insert the project name, physical location on the disk, and the name of the solution.
Creating an instance of the text file that will serve as a test file for the project
Before we begin our development, we need to create an instance or sample of the text file that will serve as a model for the creation of the Flat File Schema. Therefore, we will create the following text file on our file system that will be used in our solution:
- Create a folder “<solution>\TESTFILES” where we will create/put the messages we want to transform. In this article, we will use a text file delimited by symbols, which will be composed of several lines with the following content:
Sandro;Pereira;1978-04-04;Crestuma;4415 Crestuma
José;Silva;1970-09-19;Crestuma;4415 Crestuma
Rui;Barbosa;1975-09-19;Lever;4415 Lever
Each line consists of the following structure: Name (Nome), Surname (Apelido), Birthdate (Data Nascimento), Address (Morada), and Zip Code (Código Postal).
Note: in () is the equivalent in Portuguese found in pictures. The file “PESSOAS.txt” that we use for testing is available in the directory “<solution >\TESTFILES”.
- We will also create two folders that we will configure in the BizTalk Administration Console in order to test the solution.
- Create a folder “<solution >\PORTS\IN” which will serve as the place of entry of Flat File files for conversion;
- Create a folder “<solution >\PORTS\OUT” which will serve as the output location of the files after they have been converted.
Creating the Schema which will recognize the text file
To create the schema that will recognize the text file, we need to go to the BizTalk solution created in Visual Studio and perform the following steps:
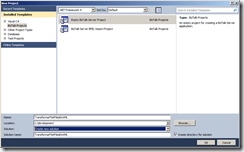
- Press the right button on top of the project in Solution Explorer, and select the option Add > New Item…
- On the Installed Templates menu in the window Add New Item, select the option Schema Files, and then select the option Flat File Schema Wizard. Provide the name you want to give the scheme in this example: TXT_to_XML.xsd

- By selecting this option, we will be guided automatically by the tool “BizTalk Flat File Schema Wizard” that will help us to create a Flat File Schema and define its data structure (records, elements, attributes …) based on the text file specified. Select “Next” to continue.

- In the window Flat File Schema Information, we will have to:
- Select an instance of the text file that will serve as the model of the structure that we want to transform.
- Although it is not necessary, it is good practice to rename the Record name Root. In this case, we will rename it to People (Pessoas).
- And finally, assign a Target namespace to the scheme and define the encoding of the input file.

- The wizard will load the text file so that we can begin to split it and map it into the desired structure. In this step, we need to define how the records or rows are differentiated. The structure of the example is:
Name;Surname;Birthdate;Address;Zip Code{CR}{LF}
(Nome;Apelido; Data Nascimento;Morada;Codigo Postal{CR}{LF})
Since each record Person (Pessoa) that we want to create is defined and contained in a line, in the Select Document Data, we will select all the data portion of the document that will set the record, i.e., the whole first line.

- In the window Select Record Format, we will define whether we are dealing with a Flat File Delimited by symbols or positional. In our case, we will select the By delimiter symbol, which is delimited by a return Carriage Return/Line Feed.

- In the window Delimited Record, we will provide the record delimiter, in this case, as we want to define the structure of a person (Pessoa), i.e., each row is a person, our limiter is {CR}{LF} (Carriage Return/Line Feed).

- In the window Child Elements, we will define what kind of element we want to assign to the registry. As we are defining the Person structure and the file contains multiple people, we have to select the Element Type as Repeating record. If we do not perform this step, we will not have the ability to split the record into multiple elements/attributes individual.

- At this stage, we successfully created the record Person (Pessoa), i.e., we have just mapped that each line of the text file corresponds to a record Person. In the Schema View, select Next to continue processing the message.

- At this stage, the wizard restarts the whole process described above, but if you noticed, the wizard no longer selects all information contained in the text file, but only what was selected to define the record Person. What we will do now is split the information of record “Person” in different elements, for that, we will select only the information required leaving out the Carriage Return/Line Feed.

- Once again, our structure is delimited by symbols (;), then we will select the option By delimiter symbol.

- As we can analyze, all the elements are separated by the semicolon (;), which is our delimiter. In the window Delimited Record, we must change the value of the Child delimiter option to “;“.

- In this window, Child Elements, we will define the different elements/attributes of the structure of the record person. This operation is very similar to any XSD, where we can define the different names and data types. Adjust the values according to the image:

- Finally, the wizard will show the equivalent XML structure that your text file document will have. Once you select the option Finish, the scheme will be available for you to use in your BizTalk solution.

After we finalize the creation of the Flat File Schema, which will contain the transformation rules of the text file, we can easily test our transformation without having to get out of our development tool (Visual Studio) and without having to publish our solution.
If we select the Flat File Schema that we just created and access to its properties, we can see that by default all properties are preconfigured so that we can perform tests to our message transformation: the input instance file is configured with the file which was used to create the schema; and the correct input (Validate Instance Input Type: Native) and output (Generate Instance Output Type: XML) formats.

To test, you simply select the schema and, with the right mouse butto,n select the option Validate Instance:

This option will use the configured file and validate all transformation rules defined, and subsequently present the final result or any occurring errors:

Creating the Pipeline that will be responsible for processing and transforming the text file
To create the Receive Pipeline that will be responsible for processing and transforming the text file, we need to go to the BizTalk solution created in Visual Studio and perform the following steps:
- Press the right button on top of the project in Solution Explorer, and select the option Add > New Item…
- On the Installed Templates menu in the window Add New Item, select the option Pipeline Files, and then select the option Receive Pipeline, provide the name you want to give the pipeline in this example: ReceivePipelineCustomPessoas.btp.

- By selecting the option Add, the pipeline editor (BizTalk Pipeline Designer) will appear, and that will let you view and add components to all the steps associated with the receive pipeline: Decode, Disassemble, Validate, and ResolveParty. In this case, the pipeline that we will create will be responsible for receiving a text file through a receive location and converting it to XML. For that, we will use the Flat File Disassembler component, which is available in the Visual Studio Toolbox window (Ctrl+W, X). Drag it into the Pipeline in step Disassemble.

- Finally, select the component Flat file disassembler, go to its properties, and on the “Document Schema” option: select the schema created earlier, in case the TXT_to_XML.

Note: If you want to create a send pipeline in order to transform an XML document into a flat file, we would follow the same steps; the difference is that we would have to drag the component “Flat File Assembler” on stage “Assemble”.
Deploy the BizTalk Server solution
All artifacts created yet must be installed on BizTalk Server 2010. However, before we can deploy the solution, there are some settings we need to configure or guarantee:
- Before deploying the Visual Studio solution into a BizTalk application, it is necessary that all project assemblies are signed with a strong name key, since they must be installed in the global assembly cache (GAC). For this, we need:
- In Visual Studio Solution Explorer, right-click on the project name and select the Properties option.
- Select the Signing tab and choose New in the drop-down box Choose a strong name key file.

- Assign a name, for example, TXTtoXML.snk.

- Likewise, before deploying the Visual Studio solution into a BizTalk application, we need to first define the BizTalk deployment properties, especially the properties of the “BizTalk Group”. If the Visual Studio solution contains multiple projects, we need to set the properties for each project separately.
- In Visual Studio Solution Explorer, right-click on the project name and select the Properties option
- Select the Deployment tab and configure the name we want to assign to the BizTalk application in the Application Name property; in our example, TransfFlatFilesEmXML Demo. The remaining properties may stay with the default values.

- To learn more about these properties, go to https://docs.microsoft.com/en-us/biztalk/core/how-to-set-deployment-properties-in-visual-studio
Finally, we can build and deploy the project so that it is published as a BizTalk application inside BizTalk Server:

However, in order to publish a BizTalk solution, you must be a member of the group BizTalk Server Administrators. If the option Install to Global Assembly Cache is enabled in the Deployment properties, then you also need permissions to read/write in the GAC.
Related links
- BizTalk Server: Transform text files (Flat Files) into XML – Introduction (Part 1)
- BizTalk Server: Transform text files (Flat Files) into XML – Necessary tools and artifacts (Part 2)
- BizTalk Server: Transform text files (Flat Files) into XML – Conclusion (Part 4)
Hope you find this helpful! If you liked the content or found it useful and would like to support me in writing more, consider buying (or helping to buy) a Star Wars Lego set for my son.


Very detailed write up, Thanks. One follow up though. An issue I have been having with my flat files is that they are not always stand alone lines. How to you suggest relating lines within the same flat file and making them into hierarchical xml? I have not found a very straight forward way to do this.
Joe;Phone1;home
Joe;Phone2;mobile
Joe
Phone1
Phone2
Hi,
In the case you describe:
Joe;Phone1;home
Joe;Phone2;mobile
is impossible to do this only with the Wizard.
Normally at this stage we only perform semantic transformations, in your case, you are also changing the syntax of the message through the union of lines based on an attribute of the message. This king of union it’s not possible to accomplish with the wizard, however you have two options:
1- Create a custom pipeline component to make this transformation
2- Or use the wizard to translate txt to xml (with multiple “joe” lines) and then create a map that join all “duplicate” lines in one
If your flat file was composed with structure similar to this:
PERSON:Joe
PHONE: Phone1;home
PHONE: Phone2;mobile
PERSON:Ken
PHONE: Phone1;home
PERSON:Ben
PHONE: Phone1;home
PHONE: Phone2;mobile
Then you could create, using only the wizard, an hierarchical xml by relating Person lines with Phone line within the same flat file
Sandro,
Do you think you can do a tutorial or give me guidance on using the Flat File Wizard to model complex data that meets this type of requirement.
1. The tag identifier for each data line is not at the position 0 but 8.(Off Set Tag)
2. Each type of data line can appear arbitrary number of time and in arbitrary order.(Random Ordering of Data)
Hi,
I follow all step but i take a this error;
Warning 1 Validate call on component ‘Flat file disassembler’ failed. C:st900057My DocumentsVisual Studio 2012ProjectsBTSBTSReceivePipelineCustomPerson.btp BTS
Warning 2 Validate call on component ‘Flat file assembler’ failed. C:st900057My DocumentsVisual Studio 2012ProjectsBTSBTSSendPipelineCustomPerson.btp BTS
Error 3 Access is denied. (Exception from HRESULT: 0x80070005 (E_ACCESSDENIED)) 0 0
Error 4 at Microsoft.BizTalk.Gac.Fusion.IAssemblyCache.InstallAssembly(AssemblyCacheInstallFlag flags, String manifestFilePath, IntPtr referenceData)
at Microsoft.BizTalk.Gac.Gac.InstallAssembly(String assemblyPathname, Boolean force)
at Microsoft.BizTalk.Deployment.BizTalkAssembly.GacInstall(String assemblyLocation)
at Microsoft.BizTalk.Deployment.BizTalkAssembly.PrivateDeploy(String server, String database, String assemblyPathname, String applicationName)
at Microsoft.BizTalk.Deployment.BizTalkAssembly.Deploy(Boolean redeploy, String server, String database, String assemblyPathname, String group, String applicationName, ApplicationLog log) 0 0
Error 5 Unspecified exception: ”
Access is denied. (Exception from HRESULT: 0x80070005 (E_ACCESSDENIED))”
Access is denied. (Exception from HRESULT: 0x80070005 (E_ACCESSDENIED)) 0 0
Error 6 Access is denied. (Exception from HRESULT: 0x80070005 (E_ACCESSDENIED)) 0 0
Error 7 Failed to add resource(s). Change requests failed for some resources. BizTalkAssemblyResourceManager failed to complete end type change request. Access is denied. (Exception from HRESULT: 0x80070005 (E_ACCESSDENIED)) 0 0
Do you help me?
Onur, you need access to write to the GAC. Open visual studio as an administrator then try to deploy again