There are some important considerations or suggestions, since these operations are not mandatory, that we can set before starting the installation and configuration of both servers.
📝 One-Minute Brief
This third part of the BizTalk 2010 installation series covers the essential “pre-flight” checklist for your servers. It details critical configuration steps including machine naming limits, local administrator group assignments, disabling IPv6 and UAC, configuring MS DTC for remote transactions, and enabling Network COM+ access. Following these best practices ensures a smooth installation and avoids common configuration errors.
Machine name
If your computer name is longer than 15 characters, BizTalk Server Configuration will not work.
Join the Local Administrators Group
To be able to install and configure BizTalk Server 2010, you have to log on to the server using a Domain User who has Administrator rights on both the SQL Server and the BizTalk Server.
So the next step is to add the BizTalk Server Administrators group to the Local Administrators group on both machines.
To join to Local Administrators Group:
- Click Start > Control Panel > Administrator Tools > Computer Management > Local Users and Groups > Groups.
- Add your user account and BizTalk Server Administrators group to the Administrators group.
By default, the Windows Builtin\Administrators group has the sysadmin SQL role on the SQL Server.
The user running the BizTalk Server configuration must belong…
The user running the BizTalk Server configuration must belong to the following user groups:
- To the Administrators group on the local computer
- To the System Administrators group on the SQL Server computer
- To the domain group used for the BizTalk Server Administrators group
- And to the domain group used for the SSO Administrators group
To simplify things, put this user in the BizTalk Server Administrators group. After BizTalk Server is configured and installed, the user does not have to be part of the BizTalk Server Administrators group anymore.
By default, the Windows Builtin\Administrators group has the sysadmin SQL role on the SQL Server.
Once SQL Server is installed, you will be able to check that by opening the SQL Server Management Console, going to Security\Server Roles, and double-clicking on the sysadmin role. The pop-up window will show all the windows and SQL logins having the sysadmin role.
Install Critical Windows Updates
Before installing BizTalk Server or its prerequisites, make sure you have installed the latest critical Windows updates from Microsoft.
To install Windows updates:
- Click Start, point to All Programs, and then click Windows Update.
- Follow the directions on the Windows Update site.
- If prompted, restart your computer
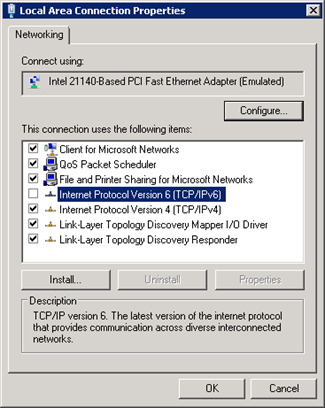
Disable IPv6
IPv6 is the latest address protocol that will eventually replace IPv4. Windows Server 2008 R2 kept this protocol enabled by default, but it is also a fact that IPv6 is not yet common, and many software, routers, modems, and other network equipment do not support it yet. So it may be a wise approach to disable it for now. Also by turning off, it will facilitate the process of detecting which port certain application are listening.
IPv6 can be disabled either through the DisabledComponents registry value or through the checkbox for the Internet Protocol Version 6 (TCP/IPv6) component in the list of items on the Networking tab for the properties of connections in the Network Connections folder. The following figure shows an example:
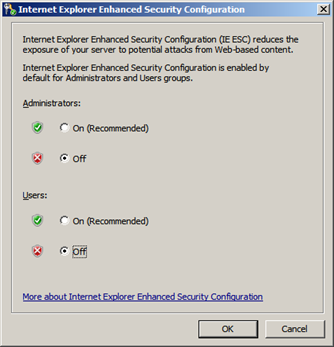
Turn off Internet Explorer Enhanced Security Configuration
Internet Explorer Enhanced Security Configuration establishes a configuration for your server and for Microsoft Internet Explorer that decreases the exposure of your server to potential attacks that can occur through Web content and application scripts. As a result, some websites may not display or perform as expected.
By default, Internet Explorer Enhanced Security Configuration is enabled on Windows Server 2008 R2 and can be configured through Server Manager.
To Turn off Internet Explorer Enhanced Security Configuration in Windows Server 2008 R2:
- Open the Server Manager by going to Start > Server Manager.
- In the Server Manager, browse to the Security Information section and click Configure IE ESC. In the figure below, the IE ESC is located in the very lower-right corner of the window.

- A dialog box appears, letting Internet Explorer Enhanced Security Configuration be enabled/disable separately for normal users and administrators, turn off both.
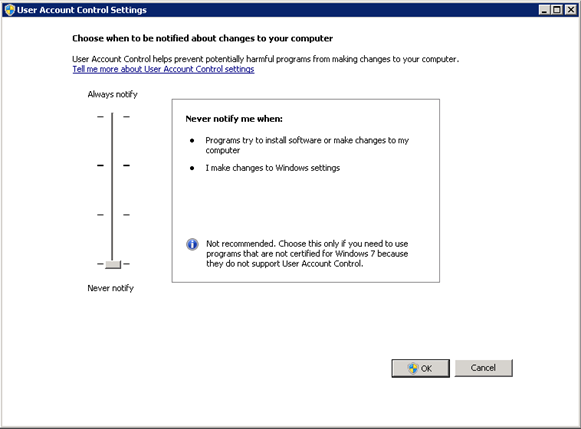
Disable User Account Control
User Account Control (UAC) is a security component that allows an administrator to enter credentials during a non-administrator’s user session to perform occasional administrative tasks.
Whenever you need to configure a Windows Server 2008 R2 setting, even if you are logged on as the administrator, you need elevated privileges. This is by design and part of the fierce security initiative in Windows Server 2008. Before you can complete any administrative task, the User Account Control manager pops up with a Continue message.
To Disable User Account Control (UAC):
- Click Start, and type Change User Account Control Settings.
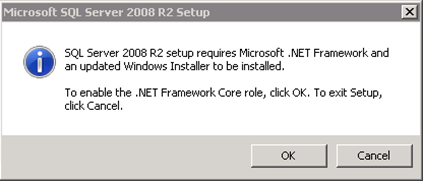
.NET Framework 3.5 SP1 requirement
The .NET Framework 3.5 SP1 (also referred to as .NET Framework 3.5.1) is a prerequisite for SQL Server 2008 R2; however, you should install .NET Framework 3.5 SP1 on both machines (BizTalk Server and SQL Server).
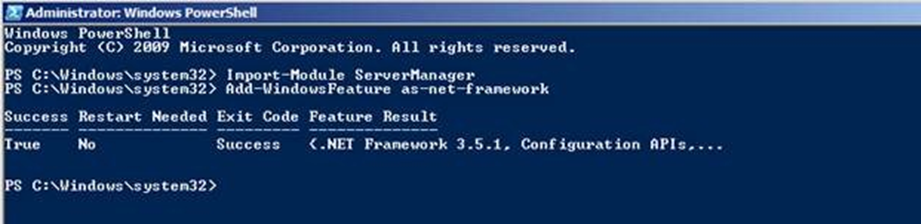
In Windows Server 2008 R2, the .NET Framework is a feature, and installing it is different when compared to older versions of the Windows Operating System. In previous versions, one could either download the .NET Framework 3.5.1 install binaries from the Microsoft download site or use the install binaries from the SQL Server 2008 installation media. Starting with Windows Server 2008, the method of installing .NET Framework 3.5.1 has changed.
To install/enable .NET 3.5 SP1 on Windows Server 2008:
- Using PowerShell
- Click the Start button in the lower left-hand corner of the display.
- Highlight All Programs and select Accessories
- Expand Windows PowerShell and right-click Windows PowerShell and select Run as administrator. Click Yes on the User Account Control box.
- At the PowerShell command prompt, type the following commands, and then press ENTER after each command:
- Import-Module ServerManager
- Add-WindowsFeature as-net-framework
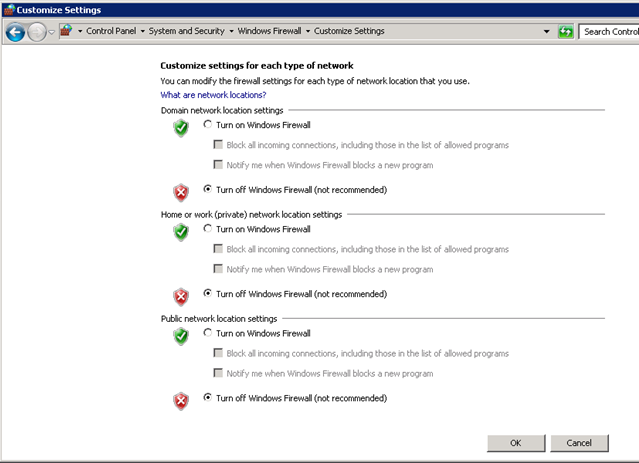
Turn Off Windows Firewall
In your scenario,s I advise you to turn Windows Firewall off on both machines. However, as I explained earlier, I will use firewalls in both machines to emulate network access
To turn Windows Firewall off:
- Click Start, and type Windows Firewall.
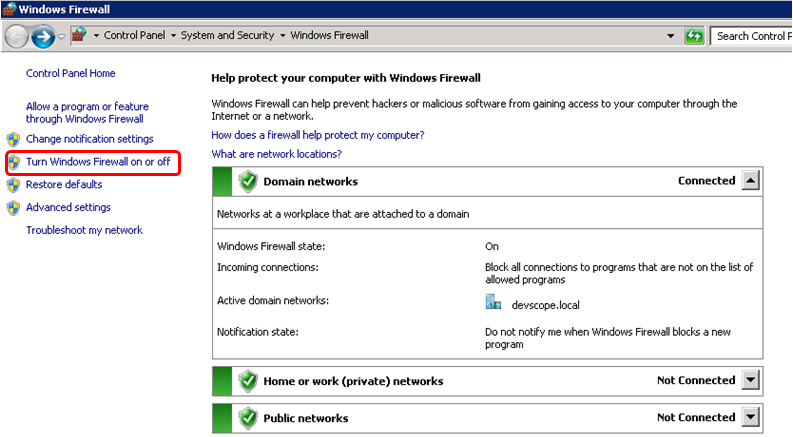
- Select Turn Windows Firewall on or off option.
- And select the option Turn off Windows Firewall (not recommended) in all three settings.
Configure Microsoft Distributed Transaction Coordinator (MS DTC)
In Windows server 2008 R2 MSDTC is installed by default.
In order for BizTalk to run against its databases located on a remote SQL server, you will need to turn on MS DTC options (both on the SQL Server and BizTalk Server).
Configure MSDTC on BizTalk and SQL Servers:
- Click Start > Run, type dcomcnfg, and hit the Enter key
- Under Component Services > My Computer > Distributed Transaction Coordinator, right-click Local DTC and select Properties. Click the Security tab.
- Ensure that the Network DTC Access, Allow Inbound, Allow Outbound, and No Authentication Required options are selected, and all others are cleared.
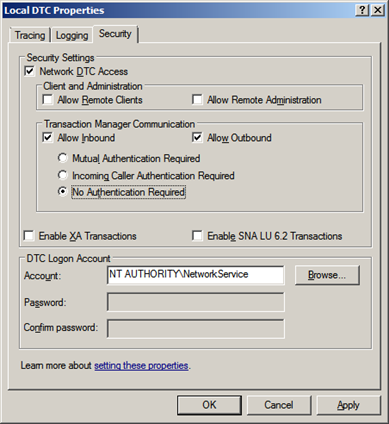
- Click OK.
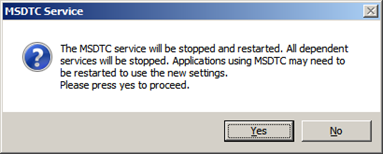
- Click Yes.
NOTE1: It is suggested that a minimum of 100 ports are set, between ports 1024 to 10000.
NOTE2: If you receive COM+ related events or errors because of this setting you can revert it later or increase the ports range accordingly.
References:
Network COM+ access considerations
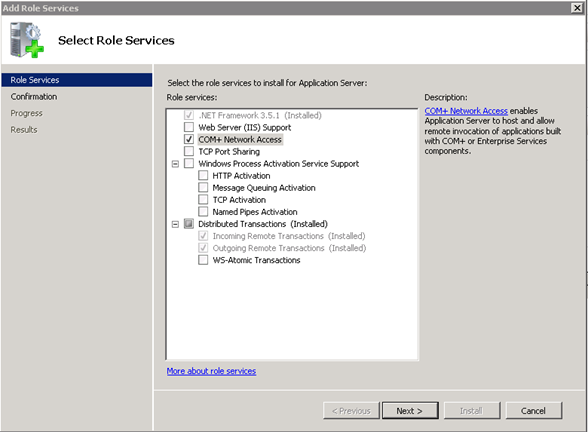
Network COM+ access must also be enabled for all BizTalk and SQL servers. It is turned off by default on Windows Server 2008 R2.
The Application Server role installation process provides an option for enabling COM+ Network Access. When COM+ Network Access is enabled, a firewall exception rule is created that opens port 135.
In order to make DCOM applications work in Windows Server 2008 R2, you need to do install the Application role Application and then select the COM+ network access role service.
A quick test of DCOM access is the DCOM test client/server app; however, to do this test, it is still necessary to give permissions at the firewall level.
Related Links
- Installing BizTalk Server 2010 in a Basic Multi-Computer Environment – Installation scenario (Part 1)
- Installing BizTalk Server 2010 in a Basic Multi-Computer Environment: The need for a Domain Controller – Windows Groups and Service Accounts (Part 2)
- Installing BizTalk Server 2010 in a Basic Multi-Computer Environment: Preparing and Install SQL Server 2008 R2 machine (Part 4)
- Installing BizTalk Server 2010 in a Basic Multi-Computer Environment: Preparing and install prerequisites on BizTalk Server 2010 machine (Part 5)
- Installing BizTalk Server 2010 in a Basic Multi-Computer Environment: Testing environment connectivity’s (Part 6)
- Installing BizTalk Server 2010 in a Basic Multi-Computer Environment: Install and configure BizTalk Server 2010 machine (Part 7)
Hope you find this helpful! If you liked the content or found it useful and would like to support me in writing more, consider buying (or helping to buy) a Star Wars Lego set for my son.

