
When using Azure Service Bus for enterprise application integration or message queuing, an often overlooked aspect is how to handle messages that cannot be processed—for example, due to application errors, expired locks, TTL expiration, or repeated processing failures. Azure Service Bus provides a dead-letter queue (DLQ) for these messages. Still, there are essential configuration choices to consider: dead-lettering can occur automatically, or you can implement manual dead-lettering in your consumer logic.
📝 One-Minute Brief
Azure Service Bus supports both automatic and manual dead-lettering to handle messages that cannot be processed, whether due to retries, TTL expiration, or business-rule failures.
Choosing the right approach—and monitoring the DLQ proactively—ensures messages never get lost or stuck silently in the system.
This leads to the central question: When should you use each approach, and how can effective monitoring prevent messages from becoming “stuck” and invisible within the system?
Key Differences
The dead-letter queue (DLQ) is automatically created for every queue or topic subscription in Azure Service Bus.
Automatic dead-lettering occurs when certain broker-controlled conditions are met. For example:
- MaxDeliveryCount exceeded: When a message’s retry count surpasses the configured
MaxDeliveryCount, the broker moves it to the DLQ with the reasonMaxDeliveryCountExceeded. - Message TTL expiration: If a message’s time-to-live expires and
EnableDeadLetteringOnMessageExpiration = true, the message is automatically dead-lettered.
Manual dead-lettering occurs when your consumer code (or integration logic) explicitly calls a dead-letter operation, such as DeadLetterMessageAsync, after determining that a message cannot be processed (e.g., malformed payloads or business-rule violations).
It’s important to note that even when automatic dead-lettering is enabled, the DLQ does not clear itself or retry messages. Any messages moved there remain until you explicitly handle, inspect, or remove them.
When to Configure
If you have a queue or subscription where processing might repeatedly fail (for example, due to transient system errors or lock expirations), configure MaxDeliveryCount (default is 10). After the specified number of failed delivery attempts, the message will automatically be moved to the DLQ.
If you also work with messages that have a TTL (meaning they must be processed within a specific time window) and you don’t want expired messages to simply disappear, enable dead-lettering on message expiration.
If your application logic can detect specific business rules or payload errors, such as malformed data, missing fields, or invalid state, implement manual dead-lettering. In this scenario, catch the condition in your code and call the dead-letter operation with a custom reason and description.
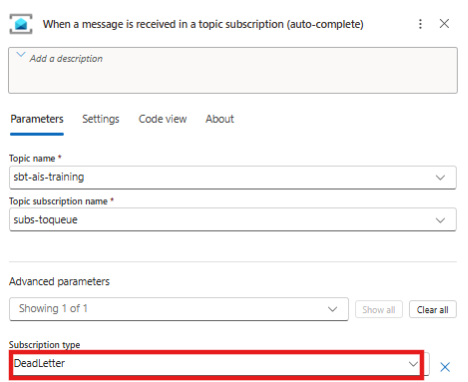
Most importantly, monitor the DLQ. Create a process or workflow using Azure Logic Apps, an Azure Function, or another automation that reads from one of the following paths:
<queuePath>/$deadletterqueue<topicPath>/Subscriptions/<subName>/$deadletterqueue
This process should inspect the DeadLetterReason and DeadLetterDescription, and then either trigger alerts or reroute the message for reprocessing.
Technical quick-check: In the Azure portal (or via CLI/ARM templates), verify the following queue or subscription settings:
ForwardDeadLetteredMessagesTo(optional, for automatically forwarding DLQ messages to another queue or topic)MaxDeliveryCountDeadLetteringOnMessageExpiration(or its equivalent setting)
Quick Practical Tip
- First, open the Azure portal. In the search bar, type “Service Bus” and open the resource. You can also access it directly by clicking the Service Bus icon if it’s already visible on your dashboard.

- Open your Service Bus namespace and select the relevant queue or topic.
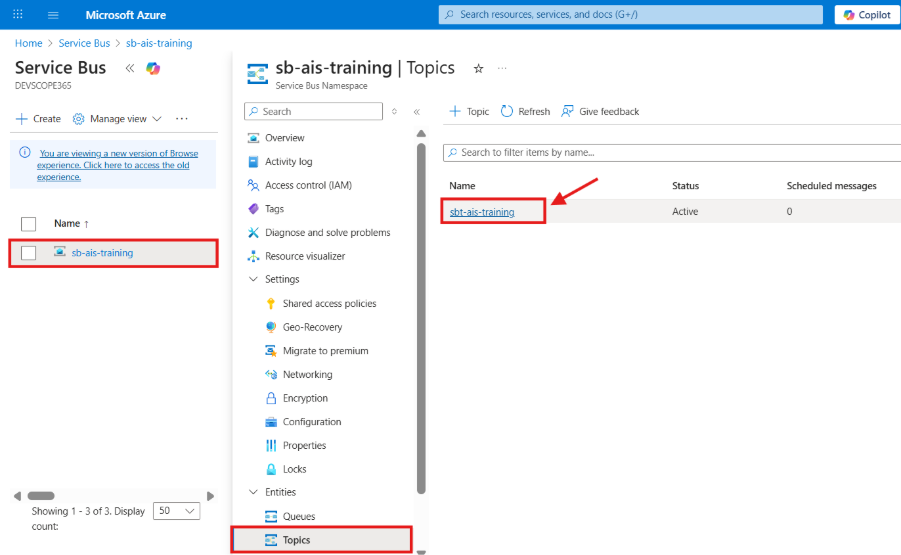
- Select the Subscription you want.

- Check Max delivery count (choose a value appropriate to your retry policy). You can do it by typing the value in the box or just by simply dragging to the value you want.

- Ensure Dead-lettering on message expiration is enabled if you rely on TTL for messages.

- Create a small Logic App or Azure Function that polls the Dead Letter Queue (DLQ) for messages, logs the DeadLetterReason, and either sends a notification (via Teams or email) or resubmits the message after it has been fixed. The Logic App should include all the logic required to handle these messages.
- Start by adding a trigger to your Logic App.
- For demonstration purposes, this Logic App handles messages with the TTLExpiredException reason by sending an email notification.
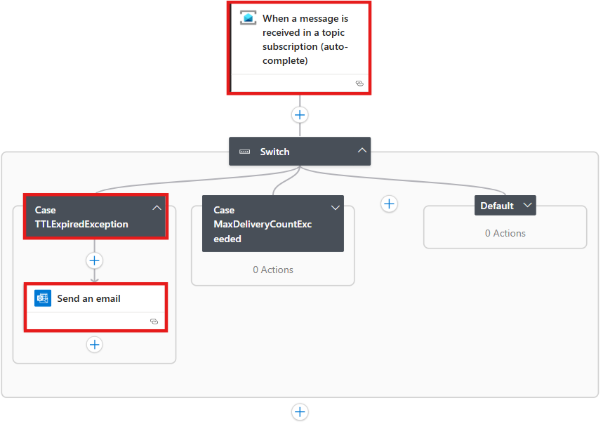
- After sending a message with a short TTL (for testing purposes), the message will expire, move to the Dead Letter Queue, and trigger the email notification.

To lazy to read? We’ve got you covered! Check out our video version of this content!
Hope you find this helpful! If you enjoyed the content or found it useful and wish to support our efforts to create more, you can contribute towards purchasing a Sauron’s Action Figure for Sandro’s son, yep, not for me!


Great breakdown of when to rely on automatic dead-lettering versus handling it manually in the consumer. I especially liked the reminder that proactive DLQ monitoring is just as important as the dead-lettering strategy itself—too many teams assume DLQ is ‘set and forget.’ In my experience, pairing manual dead-lettering with clear business-rule validations helps keep processing pipelines cleaner and avoids surprises during incident reviews.