This series of posts will explain in detail – a step-by-step guideline – how to install and configure Microsoft BizTalk Server 2013 R2 on a standalone environment running Windows Server 2012 R2. This information will help you plan the installation and configuration of BizTalk Server 2013 R2, applications and components on which it depends focused on creating a development environment (you can also follow this tutorial to help you create production environments, however, if this is the case you need to skip some steps).
Assumptions and out of scope
It will be assumed that the operating system: Windows Server 2012 R2 and the latest critical Windows updates from Microsoft already have been installed.
In this scenario, it will be performed a full installation of Microsoft BizTalk Server 2013 R2, with the exception of the deprecated SharePoint Adapter (SharePoint Services Service Side Object Model (SSOM)). The following components will be installed:
- Enterprise Single Sign-On (SSO).
- BizTalk Group.
- BizTalk Runtime.
- Business Rule Engine.
- BAM Tools and Alerts.
- BAM Portal.
- BizTalk EDI/AS2 Runtime
- Microsoft BizTalk Adapters for Enterprise Applications (BizTalk Adapter Pack)
- Microsoft UDDI Services
- Microsoft BizTalk ESB Toolkit
Important considerations before setting up the server
There are some important considerations or suggestions, since some of these operations are not mandatory, that we can set before starting the installation and configuration of the server.
As always one of the downsides of dealing with a new version of Windows Server is figuring out to where some of the features/options have moved in this new release. Fortunately for us, this version is similar or identical to the previous one (Windows Server 2012) making it easier the installation and configuration process.
Join the Local Administrators Group
To be able to install and configure BizTalk Server 2013 R2, you have to log on the server using an administrator account on the local computer.
To add a member to a local group using the Windows interface
- Press the “Windows key” to switch to the Start screen.
- Type “Computer Management” and click on “Computer Management” option from the Search menu.

- Right-click the group to which you want to add a member, click “Add to Group”, and then click “Add”.

- In the Select Users, Computers, or Groups dialog box, do the following:
- To add a user account or group account to this group, under “Enter the object names to select”, type the name of the user account or group account that you want to add to the group, and then click “OK”.
- To add a computer account to this group, click “Object Types”, select the “Computers” checkbox, and then click “OK”. Under “Enter the object names to select”, type the name of the computer account that you want to add to the group, and then click “OK”.
Note: If you are planning to create a production environment you can see the list Windows user (or service accounts) and group affiliations used by BizTalk Server and some best practices of naming convention here: User and Service Accounts Used in BizTalk Server
Change the Machine name
An important consideration that you take into consideration is: if your computer name is longer than 15 characters, BizTalk Server Configuration will not work.
- Start by running the “Server Manager”, if it is not already open, from either:
- On the Windows taskbar, click the Server Manager button
- On the Start screen, click Server Manager
- In the Server Manager Dashboard, from the scope pane (on the left side) click on “Local Server”.
- In the Server Properties for the “Local Server”, click on the “Computer name” property to be able to change it

- Click on the “Change” button to edit computer name and domain information, which will pop up this dialog:

- Now you can finally change the name of the computer. You’ll have to reboot after you make this change.

Disable IPv6 (optional)
IPv6 is the latest address protocol that will eventually replace IPv4. Windows Server 2012 R2 kept this protocol enabled by default, but it is also a fact that IPv6 is not yet common and many software, routers, modems, and other network equipment do not support it yet. So it may be a wise approach to disable it for now. Also by turning off, it will facilitate the process of detecting which port certain application are listening.
IPv6 can be disabled either through the “DisabledComponents” registry value or through the checkbox for the Internet Protocol Version 6 (TCP/IPv6) component in the list of items on the Networking tab for the properties of connections in the Network Connections folder. The following figure shows an example:

Turn off Internet Explorer Enhanced Security Configuration (optional)
Internet Explorer Enhanced Security Configuration established a configuration for your server and for Microsoft Internet Explorer that decreases the exposure of your server to potential attacks that can occur through Web content and application scripts. As a result, some Web sites may not display or perform as expected.
Important Note: This step is optional and I only suggest to do this in development environments. For some clients, this feature can be very important in production environments and they don’t want to disable.
By default, Internet Explorer Enhanced Security Configuration is enabled on Windows Server 2012 R2 and can be configured through Server Manager.
To disable Internet Explorer Enhanced Security Configuration (IE ESC) in Windows Server 2012 R2
- Start by running the “Server Manager”, if it is not already open, from either:
- On the Windows taskbar, click the Server Manager button
- On the Start screen, click the Server Manager.
- In the Server Manager Dashboard, from the scope pane (on the left side) click on “Local Server”.
- In the Server Properties for the “Local Server”, you’ll see the option for “IE Enhanced Security Configuration”. Click “On” to change the option.

- A dialog box appears, letting Internet Explorer Enhanced Security Configuration be enabled/disable separately for normal users and administrators, turn off both. After disabling both options, click “OK”.

- Click the Refresh button at the top of the Server Manager and the “IE Enhanced Security Configuration” should now show as “Off”
Disable User Account Control (optional)
User Account Control (UAC) is a security component that can help prevent unauthorized changes to your computer and that allows an administrator to enter credentials during a non-administrator’s user session to perform occasional administrative tasks. Whenever you need to configure a Windows Server 2012 R2 settings, even if you are logged on as the administrator – you need elevated privileges – this is by design, and part of the fierce security initiative in Windows Server 2012 R2. UAC notifies you when changes are going to be made to your computer that requires administrator-level permission and before you can complete any administrative task, the User Account Control manager pop-up with a ‘Continue’ message. These types of changes can affect the security of your computer or can affect settings for other people that use the computer.
Important Note: It is recommended that you leave UAC on to help make your computer secure. This step is optional and I only suggest to do this in development environments. For some clients, this feature can be very important in production environments and they don’t want to disable.
To Disable User Account Control (UAC):
- Press the “Windows key” to switch to the Start screen.
- Type “Change User Account Control Settings” or “UAC” and click on “Change User Account Control Settings” option from the Search menu.

- Select “Never notify me when…” to disable UAC.

Turn Windows Firewall off (optional)
I always advise you to turn Windows Firewall on BizTalk Server development environments unless there are specific reasons for not doing that.
Important Note: This step is an option and I only suggest to do this in development environments. For some clients, this feature can be very important in production environments and they don’t want to turn off. However, in many scenarios, these machines are not exposed to the outside and even if this occurs, they can be “protected” by the own network infrastructure, and in such cases may not require that the Windows Firewall be turn on.
To turn Windows Firewall off:
- Press the “Windows key” to switch to the Start screen.
- Type “Windows Firewall” and click on “Windows Firewall” option from the Search menu.

- Select “Turn Windows Firewall on or off” option

- And select the option “Turn off Windows Firewall (not recommended)” in both settings

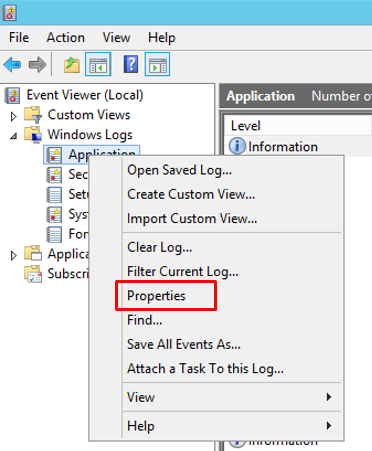
Configure the Application Event Log
BizTalk Server setup keeps a record of events in the Application Event Log. Depending on the BizTalk Server features installed, the amount of space required in the log may exceed its limit. If the application event log runs out of space during BizTalk Server setup, the installation will fail. To prevent this from happening, you can change the settings in the Application Event Log.
To change settings in the Application Event Log:
- Press the “Windows key” to switch to the Start screen.
- Type “Event Viewer” and click on “Event Viewer” option from the Search menu.

- In the Event Viewer, expand Windows Logs.
- Right-click “Application”, and then click “Properties”. This opens the Log Properties dialog box.
- To see how much available space your log has, compare the Log Size field with the Maximum log size field.
- To provide more space in the event log, enter a higher number in the Maximum log size field.
- To enable overwriting of old events when the log becomes full, select Overwrite events as needed.
- To clear the log events, click “Clear Log”.
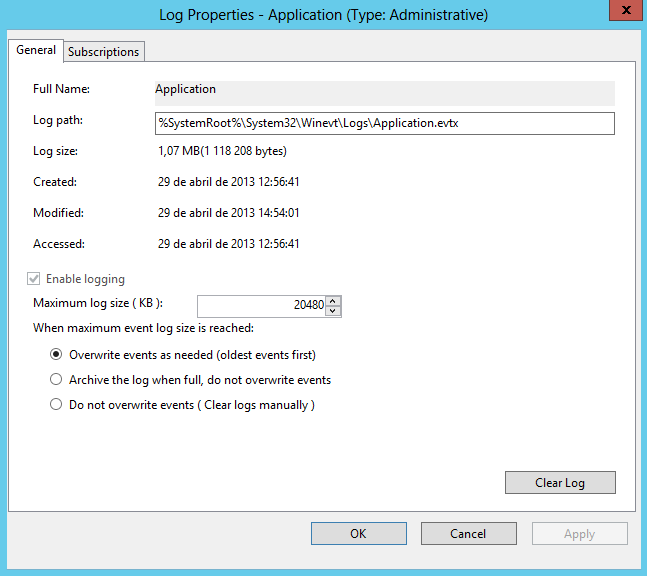
- Click “OK”, to close the Event Viewer.
Install Critical Windows Updates
Before installing BizTalk Server or its prerequisites, make sure you have installed the latest critical Windows updates from Microsoft.
To install Windows updates:
- Press the “Windows key” to switch to the Start screen.
- Type “Windows Update” and click on “Windows Update” option from the Search menu.

- Click “Check for updates” and if exist new updates available, install them

- If prompted, restart your computer
Related links
- BizTalk Server 2013 R2: Installation and Configuration – Enable Internet Information Services (Part 2)
- BizTalk Server 2013 R2: Installation and Configuration – Install Windows Identity Foundation (WIF) (Part 3)
- BizTalk Server 2013 R2: Installation and Configuration – Install and configure SMTP Server Feature (Part 4)
- BizTalk Server 2013 R2: Installation and Configuration – Install Microsoft Office Excel 2013 (Part 5)
- BizTalk Server 2013 R2: Installation and Configuration – Install Visual Studio 2013 (Part 6)
- BizTalk Server 2013 R2: Installation and Configuration – Install SQL Server 2014 (Part 7)
- BizTalk Server 2013 R2: Installation and Configuration – Configure SQL Server Database Mail feature (Part 8)
- BizTalk Server 2013 R2: Installation and Configuration – Install and Configure BizTalk Server 2013 R2 (Part 9)
- BizTalk Server 2013 R2: Installation and Configuration – Configure SQL Server Network Configuration protocols (Part 10)
- BizTalk Server 2013 R2: Installation and Configuration – Validate Mail account used by BizTalk to send BAM Alerts (Part 11)
- BizTalk Server 2013 R2: Installation and Configuration – Installing BizTalk Adapter Pack (Part 12)
- BizTalk Server 2013 R2: Installation and Configuration – Install and Configure Microsoft UDDI Services (Part 13)
- BizTalk Server 2013 R2: Installation and Configuration – Install and Configure the Microsoft BizTalk ESB Toolkit (Part 14)
- BizTalk Server 2013 R2: Installation and Configuration – Configure BizTalk Server SQL Jobs (Part 15)
- BizTalk Server 2013 R2: Installation and Configuration – Optimize the BizTalk Server 2013 R2 environment (Part 16)
- BizTalk Server 2013 R2: Installation and Configuration – Optimize the BizTalk Server 2013 R2 environment (Part 17)
- BizTalk Server 2013 R2: Installation and Configuration – Optimize the BizTalk Server 2013 R2 environment (Part 18)
- BizTalk Server 2013 R2: Installation and Configuration – Install additional Developer tools (Part 19)

Reblogged this on Khotso Charles Mokhethi.
Hola Sandro, me ha gustado mucho tu blog. Tengo una pregunta que me ha gastado muchos dias en resolver y es que al instalar Biztalk Server 2013 R2 en un Windows Server 2012R2 en la parte donde quiere instalar los componentes redistribuibles de requerimientos previos me da el Error al comprobar la firma del archivo CAB de componentes. Pese a lo hago de forma automática y de forma manual descargando el archivo CAB. ¿Tienes una idea que me salve? Gracias