
Following Sandro’s last post on BizTalk Server: Automation Deployment with Azure DevOps – Create a build agent, we’re going to show how to create the deployment steps by creating the Pipeline and Release Pipeline, using a few DevOps tasks.
The standard BizTalk Deployment task does a decent job in deploying the application, but it doesn’t handle changing tokens or registering DLLs in the GAC.
To deploy on multiple machines or to change your Bindings according to your environment, you have to make your file dynamic. This means replacing your connections with variables.
📝 One-Minute Brief
Deploying BizTalk Server solutions through Azure DevOps requires more than just a prepared build agent. This article explains how to deploy a BizTalk project within an Azure DevOps pipeline, covering the key steps needed to automate builds and prepare artifacts for consistent deployments across environments.
Let’s start with the basics:
Creating the project and installing it in DEV
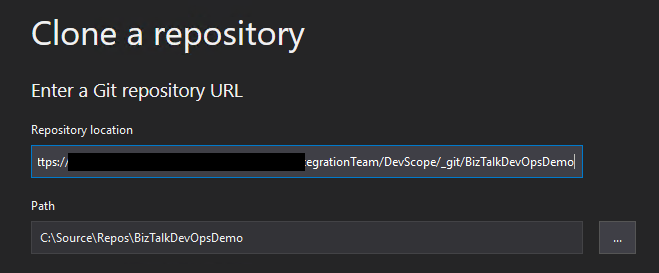
As always, it’s better to first create the DevOps repository and clone it on your machine.

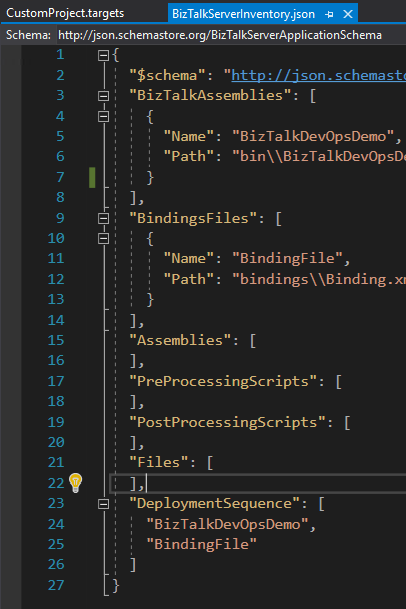
Having this created, you need to get your project working and have a Deployment Project as well. This will contain the required DLLs and Binding files, along with pointers to your BTS project. This will also contain the Application name to be deployed and some other configurations.
You will see that you can set the BizTalk Assemblies path, as well as other Assemblies, Pre- and Post-processing scripts, and the Deployment Sequence. This is one of the most important steps, because, as you know, it does matter in which order you deploy your BT Assemblies.
When referencing your BT projects, make sure the Application Project uses the same framework version as your other projects. If it’s not the same version, it will not be able to copy the DLLs to the referenced Path and will fail to build.
Building this project will generate a ZIP file containing everything needed. You can try to publish it directly after configuring the application.
The bindings file that is created with the project is just an empty template, so you’ll want to deploy your application in your Dev Environment and create those bindings. It will make a difference if you export your application bindings when it’s started and when it’s stopped, so keep that in mind.
For this example, I’m going to export the bindings with the Application fully stopped.
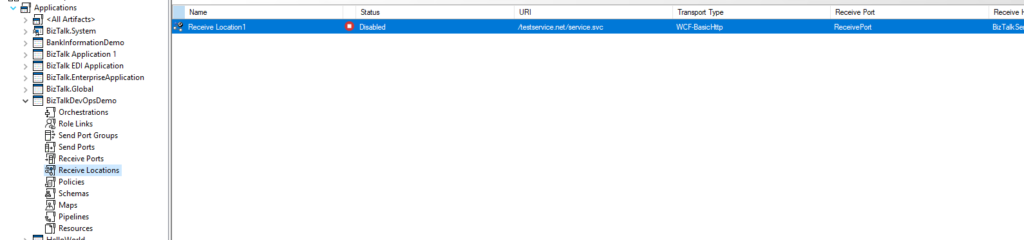
Your standard Bindings export will carry the ports and URIs/connections straight from the Admin console. Through a little magic, we will configure these values to be dynamic, and it’s super easy.
Making your Bindings dynamic for deployment
Now you’ve exported the bindings, and you want to make them ready for DevOps and to accept multiple configurations.
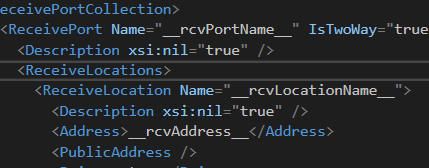
From my example, you can see that the ReceiveLocation and ReceivePort names are static. If we tokenize this, you can call it whatever you want, therefore reducing the risk of colliding with other existing ports in your end systems.
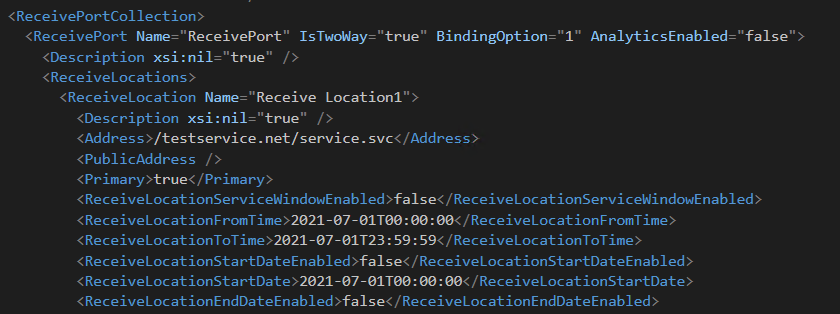
So, keeping the desired token in mind, I’m going to replace these values, including the ReceiveLocation address, with variables and token identifiers. With a few magic touches, we end up with something like this:
And that’s it. Of course, this is a very small and simple example, but even with a goliath project, the pattern will remain the same. You find what you want to make dynamic, tokenize it, save, and upload your changes to your Repo.
Building your Pipeline and Release Pipeline
Now you have your source code in your Repository, your bindings ready for dynamic changes, and you want to deploy it.
You will need to set up your build Pipeline before you can get your Release ready, so get to work.
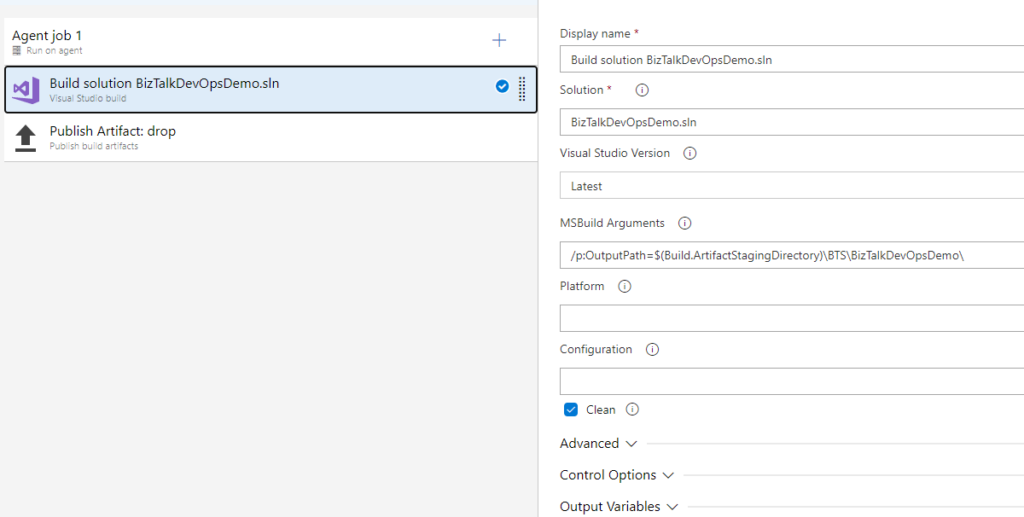
The Pipeline itself doesn’t need to be too complicated; you just need to build your Solution, with or without the OutPath argument (I found that setting this would make my life easier in some projects), and publish the drop.
With your drop created, your Release pipeline needs the following tasks:
- Extract Files – to unzip your file
- Replace Tokens (a great extension by Guillaume Rouchon, more info here)
- Archive Files – to zip it back
- BizTalk Server Application Deployment – I recommend this, but you can do it with PowerShell
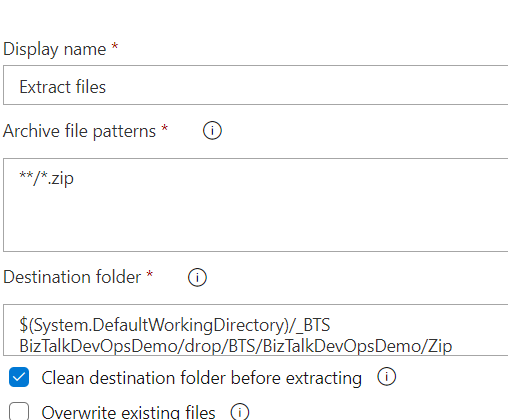
Extracting your file contents is straightforward; you just need to select your zip in your drop contents and a destination folder. Keep in mind that you will need to know where it lands to zip it back.
Replacing the Tokens is just as before you select the *.XML mask or point directly to your bindings and select the Token that it should be looking for. Remember that the variables you define are case sensitive. You can also use a Variable Group; it is a great way to know your environment-specific variables or common variables you might have.
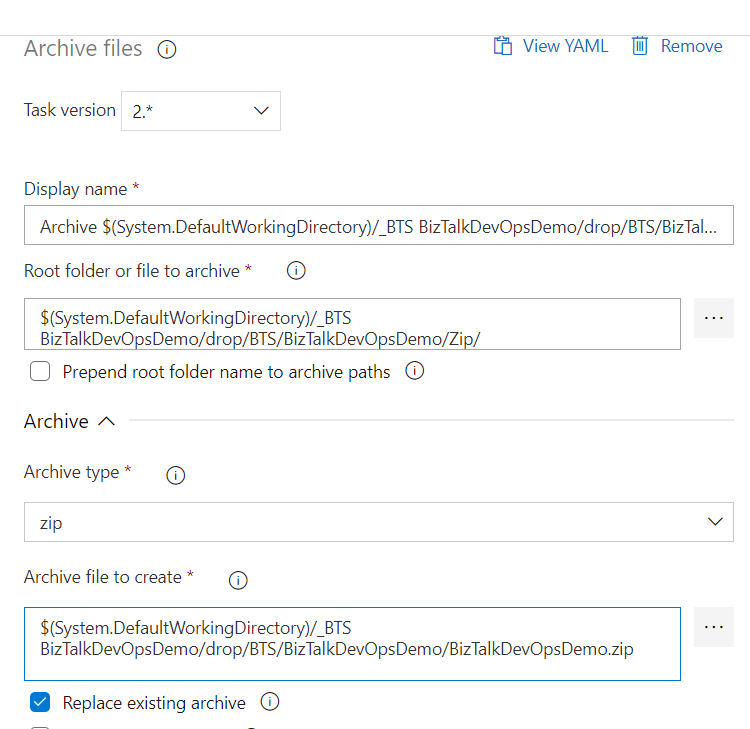
Once this is done, you can proceed to recreate the Zip file and its contents. The destination folder you’ve selected when Unzipping will now be the Root folder you are pointing to.
Remember to deselect the Prepend root folder name to archive paths option. If you keep this selected, your file will end up with a structure like Zip / bindings instead of just bindings, and the deployment will fail because it’s not the expected folder structure. Also, select the Replace existing archive option; otherwise, you will create a copy and deploy the original version instead.
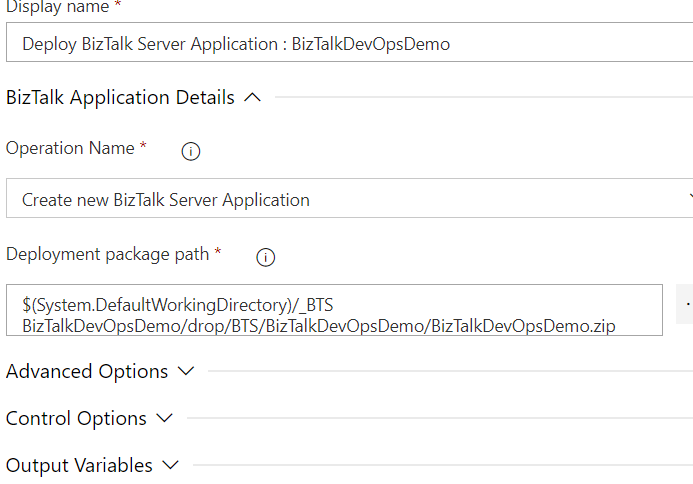
And for the final step, the Deployment Task. I chose to use the standard task instead of PowerShell, because I didn’t want to handle scripts at this point.
Select the Zip package and set the operation to Create. From what I’ve found out, this will Upsert your application, while Update will not create the app if it doesn’t exist.
And this is what you need. If you’ve set everything properly, your Release Pipeline will deploy your Application to your Server and get it up and running, with the parameters you’ve set in your bindings file.
It took a while to understand how this process worked, but in the end, it turned out to be very simple, and all it took was to apply the same concept we already used with the ARM deployment for Azure resources.
Happy coding!
Hope you find this helpful! If you liked the content or found it useful and would like to support me in writing more, consider buying (or helping to buy) a Star Wars Lego set for my son.


This is a process that replaces BTDF. I am facing one issue using this process, How can I read a variable from the DevOps release pipeline in BizTalk orchestration. Earlier in BTDF we used SSOSettingsFileReader.ReadString to read a variable in orchestration. Is any option available in this new way of deployment.
Hello Parveen,
For this you’d need to read directly from SSO, grab the value to a environment variable in DevOps and then you’d replace it in the Bindings file or the Orchestration file.
There’s no Out-of-the-box task or PowerShell command for this, so you’d need to write a custom helper and execute this in the pipeline as if you’d be running a console app.
Sandros’ tool for SSO Application Configuration CLI Tool already contains the necessary code to read from the repository.
We’re already working on another change to this tool and provide some other functionalities, including registering a SSO application from DevOps without extra work.
Hello Pedro,
Thanks for the response. I want to read the environment variable from devops release pipeline. I know we can accesss these variables in binding file of application project using $(‘variable’), but is there a way to access the environment variable inside orchestration? I don’t want to use sso now. Instead want to access variable directly from release pipeline.
You can’t access the release pipeline after you’ve executed it. It’s not how that works.
You use the pipeline to deploy the contents and then you need to use SSO to get your values in runtime.
I’m following the Microsoft official tutorial in order to configure BizTalk 2020 with DevOps, and the release pipeline is deploying the MSI “properly” but at the end I’m getting the error message: “No mapping was made between account names and security identifiers.”. Any suggestion? I’m developing in my personal Hyper V, Windows server 2016, I really would do appreciate any help.
Hello Josue,
From what you describe, it appears that the user you’ve selected is not available in the environment. Taking the answer from a colleague:
“Most likely you have a role defined in database that contains users or user groups not available in deployment environment. For example you have user group Domain1\UserGroup1 specified in role, but you are trying to deploy this database in environment where Domain1 is not available. To fix this error simply replace users or user groups with values that are correct in deployment domain.”
Thanks for your response Pedro,
I uninstalled SQL and BizTalk, so I cleaned up all, but I’m still facing the same problem, the Azure Pipeline service is running under my administrator account, is the same account I use for SQL and BizTalk.
“he user you’ve selected is not available in the environment” <- you meant the user that runs the Azure Pipeline service?
Thanks a lot in advance!
I forgot to mention, I’m working in the same machine, I developed my BizTalk project in VS 2019, and want to deploy the project in the same VM.
Thanks in advance.
Finally, I did it works, seems like there is something wrong in my VM hosted in Hyper V, I installed a Dev BizTalk environment in my local pc, and it worked, I replicate the same scenario, and it worked like a charm! thanks, Pedro!
I’m looking for an example of how to use variable groups to define variables for each environment? How would you tell the Token Replace task to use a specific group?
Hi Benson,
You can achieve this by using the variable Groups. When you assign the group to a stage scope (for example a TST deployment Stage), the Replace Tokens task will use all the variables available in this group.
Remember to link the group and assign the scope, else they will be used at a Release level.
I’ll be posting a tutorial for this soon. 🙂
Hi, how do you refer to another BizTalk application when deploying from DevOPS?
Is that done in the “BizTalk Server Application Project”?
Hi Niklas,
Each BTS Application Project will refer to one Application. If you need to cross refer applications, I’m afraid you will need to do this in the Admin Console. Neither the bindings contain this information nor is there a field in the BizTalkServerInventory.json file that helps us with this. It is most likely a DB record that does this link.
Maybe through PowerShell this can be achieved or through the API.
So would you say it´s better to move away completely from Shared resources rather than(for example) re-configure a receive pipeline after every deploy because there is no defined way of solving this issue today?
No, it’s still achievable with DevOps.
Had to discuss this with Sandro and after some digging, we were able to discover how to.
You will need your bindings all defined with the cross-reference to another Application. After this, proceed to commit it in DevOps as usual.
In the Pipeline, you have an option, in the Advanced Tab. Here you can write the name of the application you want to reference.
Tested it now and it worked. Thank you for the help!
Hi Pedro,
After successfully deployment of any application in BizTalk server 2020 through Devops, BizTalk server automatically starts the application.
Is there any way we can stop the application either by using Post processing Script in BizTalkServerInventory.Json or by any other process post deployment within the same release
request to please help me regarding this
Hi Yamina,
You can input a powershell script to stop the Application, but I’ve found that when exporting the bindings with the Application stopped, it will retain this status when deploying through DevOps.
So, if you export the bindings for a stopped application, it should be stopped when you create it in other environments.
Hi Pedro,
thanks for your response.
below are the steps that we are following to create a pipeline and release pipeline to deploy a solution.
for Build pipeline we are adding below task:
1. Add Visual studio build in which we select project solution under the Solution.
2. Add the Publish build artifacts in which we are publishing the path of the application which contains Bindings file and BiztalkInventory.json file
For Release pipeline we are adding below task:
1. we have added BizTalk Server Application Deployment in which under Deployment package path we select the Zip package and set the operation to Create.
2. and we have added one powershell task in whcih we are calling below powershell script whose value are updated in the variable for respective application. i.e; application name, Sql intance and Stop script name with path placed in dev, pre prod and production server.
Power shell scrip to stopp the application:
if ($args.count -eq 0) {
“You must specify the BizTalk Application name to stop!”
}
else{
$BTSAppName = $args[0]
$SQLInstance = $args[1]
$BizTalkManagementDb =”BizTalkmgmtdb”
[void] [System.reflection.Assembly]::LoadWithPartialName(“Microsoft.BizTalk.ExplorerOM”)
$Catalog = New-Object Microsoft.BizTalk.ExplorerOM.BtsCatalogExplorer
$Catalog.ConnectionString = “SERVER=$SQLInstance;DATABASE=$BizTalkManagementDb;Integrated Security=SSPI”
$BTSApp = $Catalog.Applications[$BTSAppName]
if ($BTSApp.Status -ne “stopped”)
{
“Stopping” + $BTSApp.Name
$BTSApp.Stop(“StopAll”)
$catalog.SaveChanges()
}
else
{
$BTSApp.Name + ” is already stopped”
}
}
Now as per your suggestion, when i tried to export the bindings for a stopped application, and update it our binding file and remove the PowerShell stop application task from the release pipeline and deploy it.
so once the solution is build and deployed, the application remains in started state.
so to stop it with deployment i have to add the task for powershell script which will run the script after application deployment and stooped the application successfully.
but i am trying to avoid to add this additional PowerShell script and want to keep the application in stopped state.
how can we do that?? pls suggest if you have any idea regarding this…
Hi Yamina,
Having the application stopped when exporting the bindings might activate it when deploying. It shouldn’t but the BizTalk engine might start it.
In the bindings file, you can manually define what state you want in your Orchestrations and Ports. Look for the “State” attribute in the XML.
For example:
<Service Name="XMLValidator.BizTalk_Orchestration1" State=”Unenlisted” TrackingOption=”ServiceStartEnd MessageSendReceive OrchestrationEvents” AnalyticsEnabled=”false”>
Also, you can check in the ReceivePorts for the property Enabled.
This should be enough for you to control your Application state.
Thanks.
Let me try that as well
hi Pedro,
I tried the above mentioned steps but no luck the application remain in started state post deployment.
Do we have any other option to stop the application after deployment without running PowerShell script task post BizTalk deployment task.
hi Pedro can you help regarding even though i tried ur advice , no luck
Hi Yamina,
I’ve been looking at your scenario and the application should not be starting. Are you sure there are no scripts running in the background or anything, that can be starting the Application?
Also, instead of using the “Create” action in the Deployment task, switch it to Update.
The Create may be triggering the App start, as it thinks that the application doesn’t exist yet and needs to get it up and running ASAP.
If none of this helps, you may need to use the PS script for now, until there’s not a better option.
Hi Pedro,
we are not running any additional script to be run in the background to start the application but i guess there might be some script which is running in the background that is causing to start the Application but i dont know how to check we are simply using below task in CI/CD pipeline respectively:
steps:
– task: VSBuild@1
steps:
– task: ms-biztalk.deploy-biztalk-application.custom-release-task.BizTalkApplicationDeploy@2
displayName: ‘Deploy BizTalk Server Application : ‘
also I switch it to Update action and deploy the same application and it again start the application at the end of deployment.
it would be really helpful if you can create a BLOG with this scenario as a specific requirement
Hi,
We have created a deploy for an integration and as a last step we want to start it, ticking the “start application” tickbox under advanced settings. It gives error “Orchestration is not configured”. You know the step where orchestration handler is selected and the virual ports in orchestrations is mapped to an actual port. Is there a good ways to automate this step?
Hello Pedro,
After having follow the steps to create my release, I have this issue without any detail
executing the “Deploy Server Application deployment” task
“##[error]Cannot bind argument to parameter ‘Path’ because it is null.”.
Do you have any suggestion ?
Hi Pedro, nice and useful post. Is it possible to have the source code for the BTSDevopsDemo in order to follow your instructions? Does this apply only to BTS 2020 or other versions of BTS, for instance BTS2K16? Thanks in advance