

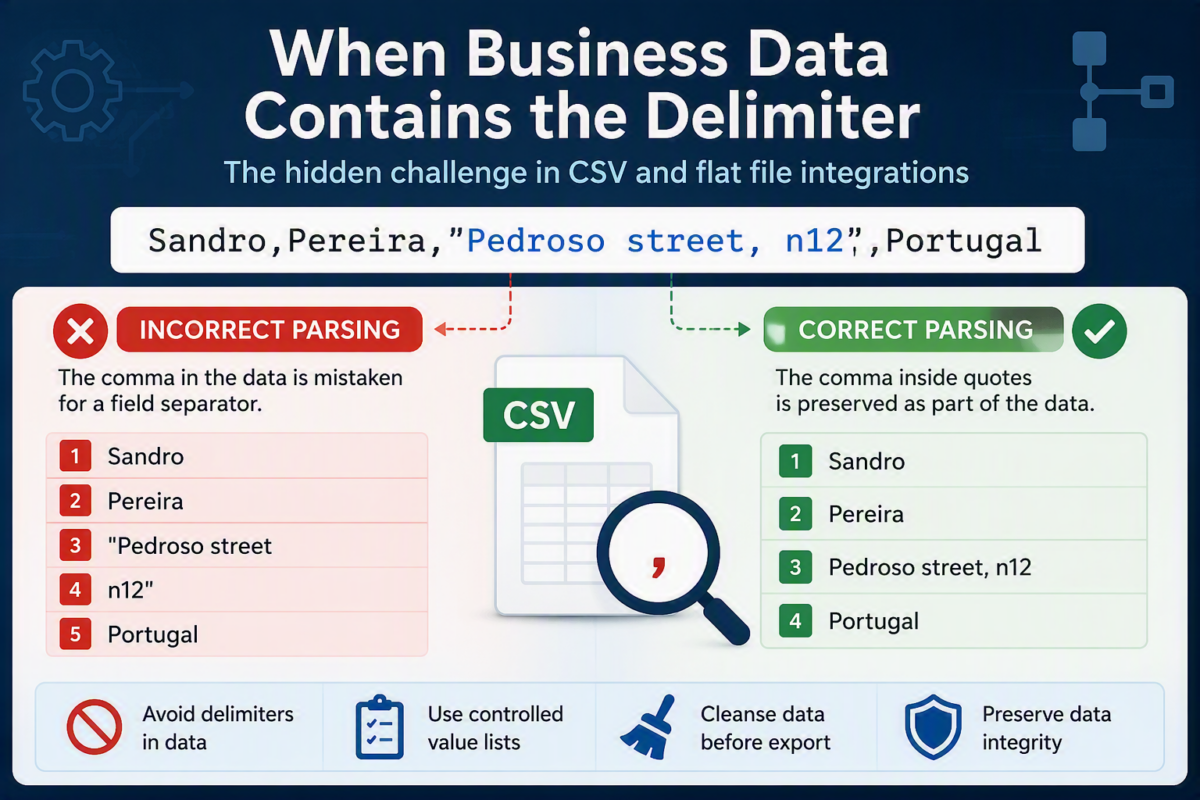
In the previous articles, we explored a common flat file parsing challenge: business data contains the same character used as the field delimiter. When this happens, parsers can split a single field incorrectly into multiple fields. As a result, you may face validation errors, invalid record structures, or even failed integrations.
Although preventing delimiter characters from appearing inside business data is the ideal solution, real-world scenarios rarely make it that easy. Legacy systems, third-party applications, customer requirements, and market-specific formats often limit our control over the data we exchange.
In this article, we examine two practical workarounds that you can implement in both BizTalk Server and Azure Logic Apps to process these files successfully.
The first approach uses custom code to sanitize or transform incoming data before parsing. The second approach uses the Flat File Schema Wizard and a representative sample file that already contains delimiters inside business data. This strategy helps the parser recognize the intended file structure more accurately.
Each approach offers advantages and drawbacks. Neither solution is perfect, and personally, I would not consider either one the preferred option. However, specific scenarios may justify using either one. Your decision should depend on the nature of the challenge, your team’s skills, how much control you have over the source data, and your long-term maintenance requirements.
Let’s explore each option in detail.
📝 One-Minute Brief
When CSV files contain delimiter characters as part of the business data, traditional flat file parsing can fail. This article explores two practical workarounds for BizTalk Server and Azure Logic Apps, explains how they work, and discusses their limitations in real-world integration scenarios.
The Common Approach: Custom Code
As I mentioned earlier in this blog series, many teams immediately turn to custom code when they encounter this problem. Don’t get me wrong, custom code is a valid solution. However, it also introduces several disadvantages.
In BizTalk Server, developers often create a custom pipeline component to preprocess incoming files before the Flat File Disassembler parses them.
In Azure Logic Apps, developers typically implement similar logic by using Azure Functions, Local Functions, Inline Code actions, or other preprocessing mechanisms.
These solutions can solve the parsing challenge, but they also increase complexity. Teams must develop, test, deploy, and maintain additional code. Over time, this extra effort can raise operational costs and make troubleshooting harder.
A typical implementation looks like this:
public static string ReplaceCsvDelimiter(string csv)
{
    StringBuilder result = new StringBuilder();
    bool insideQuotes = false;

    for (int i = 0; i < csv.Length; i++)
    {
        char c = csv[i];

        if (c == '"')
        {
            insideQuotes = !insideQuotes;
            result.Append(c);
        }
        else if (c == ',' && !insideQuotes)
        {
            result.Append(';');
        }
        else
        {
            result.Append(c);
        }
    }

    return result.ToString();
}
The purpose of this code is to replace delimiter characters that are outside quoted values while preserving those that belong to the data itself.
Technically, this works. The integration layer can then process the file safely without splitting fields incorrectly.
I’m not going to explore this approach much since we already spoke about it in the first post.
Another way to use the Flat File Schema Wizard: using a file that contains delimiters inside the business data
In the last blog post, to generate the flat file schema, we used a sample of the message without having delimiters inside the business data, which was this data:
Sandro,Pereira,Pedroso Street,4415-345,Pedroso,Portugal
However, today for this exercise, we are going to use a sample that contains delimiters inside the business data:
Sandro,Pereira,"Pedroso Street, n12",4415-345,Pedroso,Portugal
And, of course, we are going to split it using a different approach. But basically, we are going to follow the same steps we did last time:
- Right-click the project in Solution Explorer and select the option Add > New Item…
- On the Installed Templates menu in the Add New Item window, select the option Schema Files, and then select the option Flat File Schema Wizard. Then provide the name you want to give the schema in this example: PersonWithWorkaround.xsd.
Selecting this option launches the BizTalk Flat File Schema Wizard, which guides to through creating a Flat File Schema and defining its data structure (records, elements, attributes, …) based on the specified text file.
- On the Welcome to the BizTalk Flat File Schema Wizard window, click Next to continue.
- In the Flat File Schema Information window, we will have to:
- Select an instance of the text file that will serve as the model of the structure that we want to transform.
- Although it is not necessary, it is good practice to rename the Record name Root.
- In this case, we will rename it to Persons.
- Finally, assign a Target namespace to the schema and define the input file encoding.
- Click Next to continue.
Note: The wizard loads the text file so we can split it and map it to the desired structure. In this step, we need to define how the parser differentiates records (rows). The structure of the example is: FirstName;LastName;Address;PostalCode;City;Country{CR}{LF}
- Since each Person record that we want to create is defined in a single line, in the Select Document Data, we can select only the data portion of the document that will set the record, i.e., the whole first line. Click Next to continue.
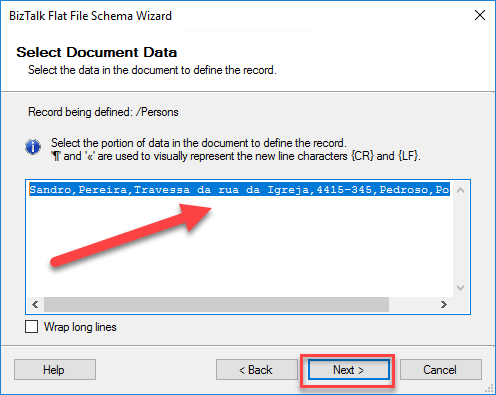
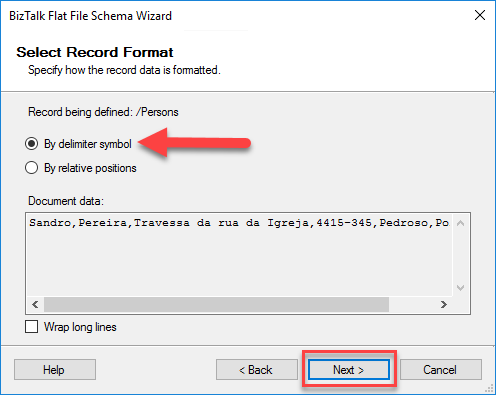
- In the Select Record Format window, we will define whether we are dealing with a Flat File Delimited by symbols or positional. In our case, we will select the By delimiter symbol because each record is delimited by a return Carriage Return/Line Feed ({CR}{LF}). Click Next to continue.
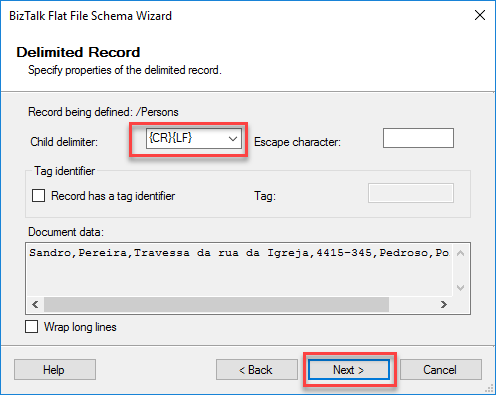
- In the Delimited Record window, we will provide the record delimiter; in this case, since we want to define the structure of a person (i.e., each row is a person), our delimiter is {CR}{LF} (Carriage Return/Line Feed). The Child delimiter combo box includes, by default, the following options: {CR}, {LF}, {TAB}, {SPACE}, {0x1A}, {}, {.}, {;}, and {CR}{LF}. You can provide your own symbol.
- Click Next to continue.
- In the Child Elements window, we define the element type we want to assign to the registry. As we are defining the Person structure and the file contains multiple elements, we have to select the Element Type as Repeating record. If we do not do this step, we will not be able to split the record into multiple elements/attributes.
- Note: If you do not define the element as a Repeating record (or Record), you will not have the ability to break down your record into individual elements or attributes.
- Click Next to continue.
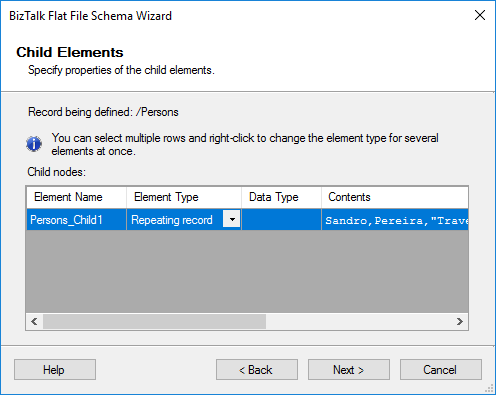
Note: Earlier, I said that we could select all the data inside the flat file and that we would need to treat the information differently in this step. So if you see several similar lines being present in this window, because we want to have an Array of Persons, in this step we need to select the Element Type of the first element as Repeating record and the rest of the set as Ignore (You set this to Ignore because you have already specified Repeating Record for the Person element)
At this point, I have defined what the element Record looks like, but I have not broken down the various elements that make up the record itself. We have just mapped that each line of the text file corresponds to a Person record.
- In the Schema View window, click Next to continue processing the message. Click Next to continue.
In this phase, the wizard restarts the whole process described above. However, if you noticed, the wizard no longer selects all the information from the text file. Instead, it selects only the information that defines the Person record.
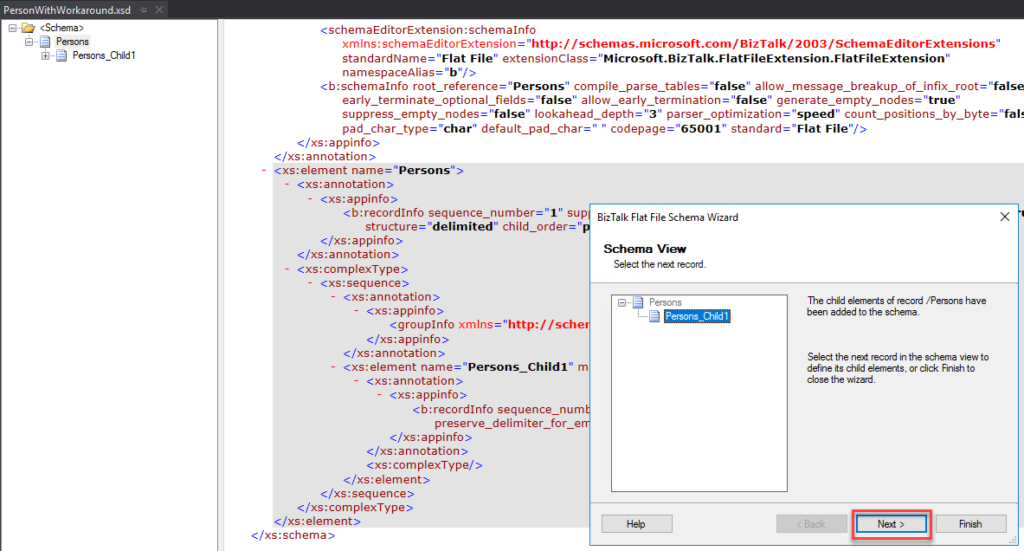
Note: until here, everything was the same as the previous exercise. Now it will have significant changes.
- Now we will split the Person record information into different elements. To do that, select only the required information, leaving out the Carriage Return/Line Feed. Click Next to continue.
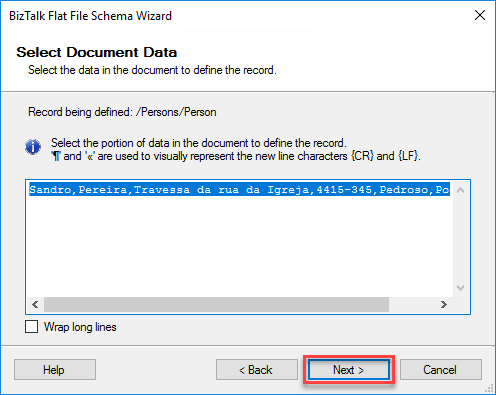
- Again, our structure is delimited by a symbol, in this case a double quote(“). For that reason, we will need to select the option By delimiter symbol and then click Next to continue.
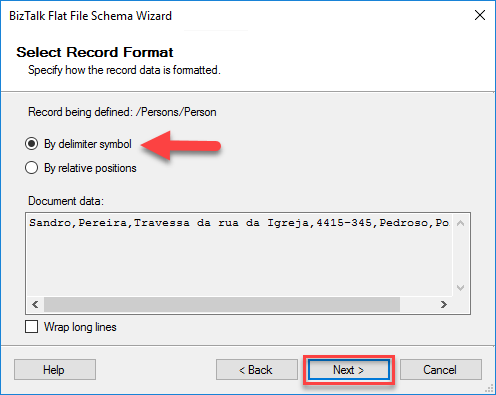
- As we can see, all elements are separated by the double quote(“), which is our delimiter; then, in the Delimited Record window, we must change the Child delimiter option to “ (double quote).
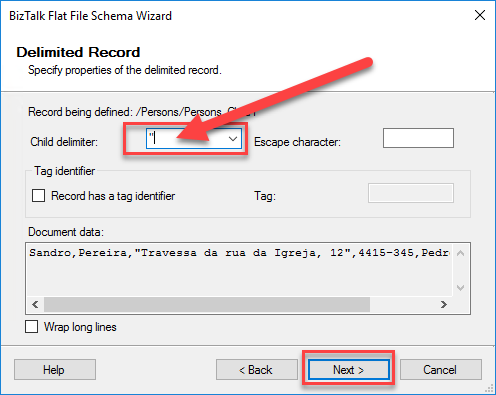
- In the Child Elements window, we will define the different elements/attributes in the Person record structure. This operation is similar to any XSD, where we define the names and data types. Adjust the values according to the table below:
| Element Name | Element Type | Date Type |
| Name | Record | |
| Address | Field element | String |
| AddressAdditionalInfo | Record |
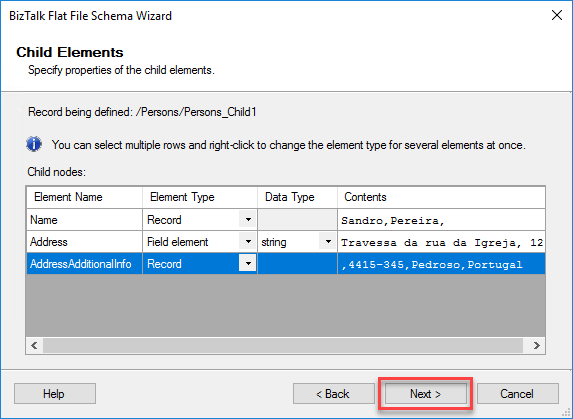
- Click Next to continue.
- In the Schema View window, we will see the main structure being built, but now we need to define the two records present. To start with the Name record, click Next to continue processing the message.
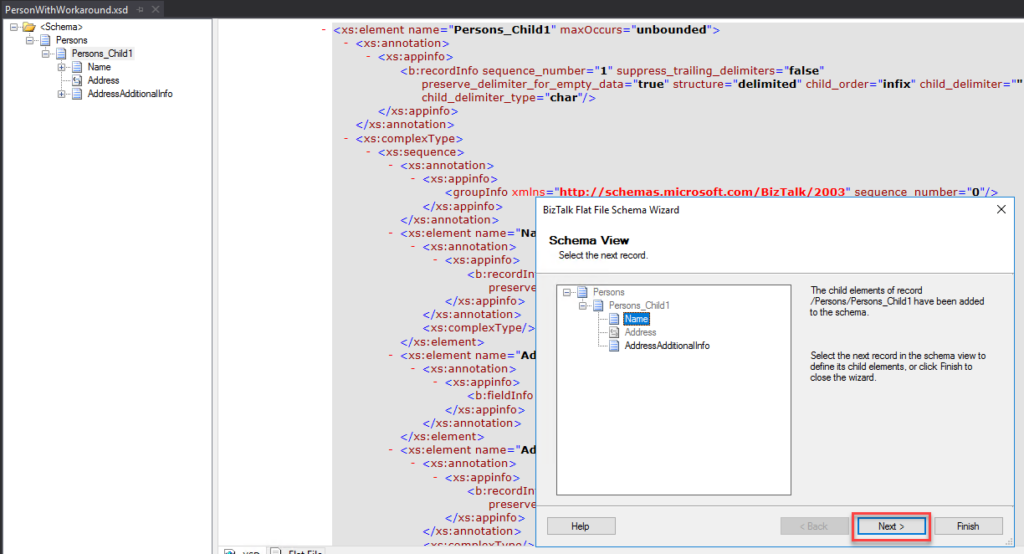
- In the Select Document Data window, notice that only the Name part is selected. That is the part we need to define the Name record structure. Click Next to continue.
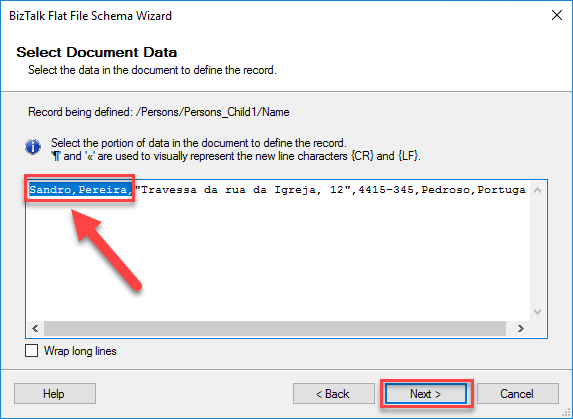
- On the Select Record Format window, again, our structure is delimited by a symbol, in this case a comma (,). For that reason, we will need to select the option By delimiter symbol and then click Next to continue.
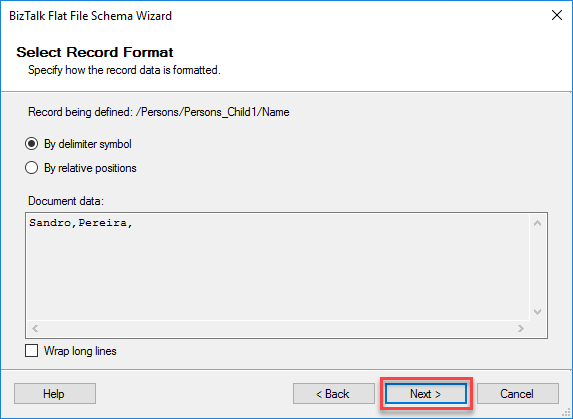
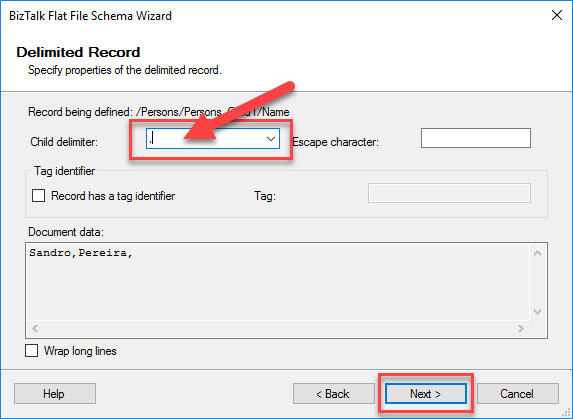
- As we can see, all elements are separated by the double comma (,), which is our delimiter; then, in the Delimited Record window, we must change the Child delimiter option to comma.
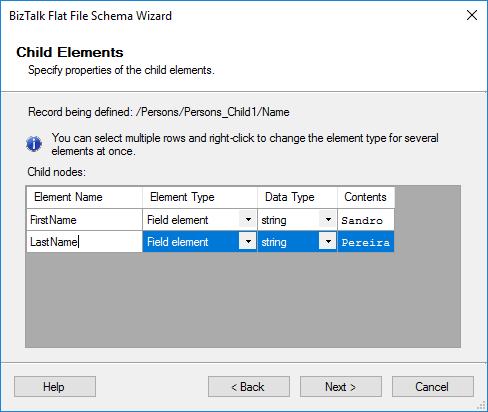
- In the Child Elements window, we will define the different elements/attributes in the Name record structure. Adjust the values according to the table below:
| Element Name | Element Type | Date Type |
| FirstName | Field element | String |
| LastName | Field element | String |
- Click Next to continue.
- Again, in the Schema View window, you will see the main structure being built, but now you need to define the two records present. To start with the AddressAdditionalInfo record, click Next to continue processing the message.
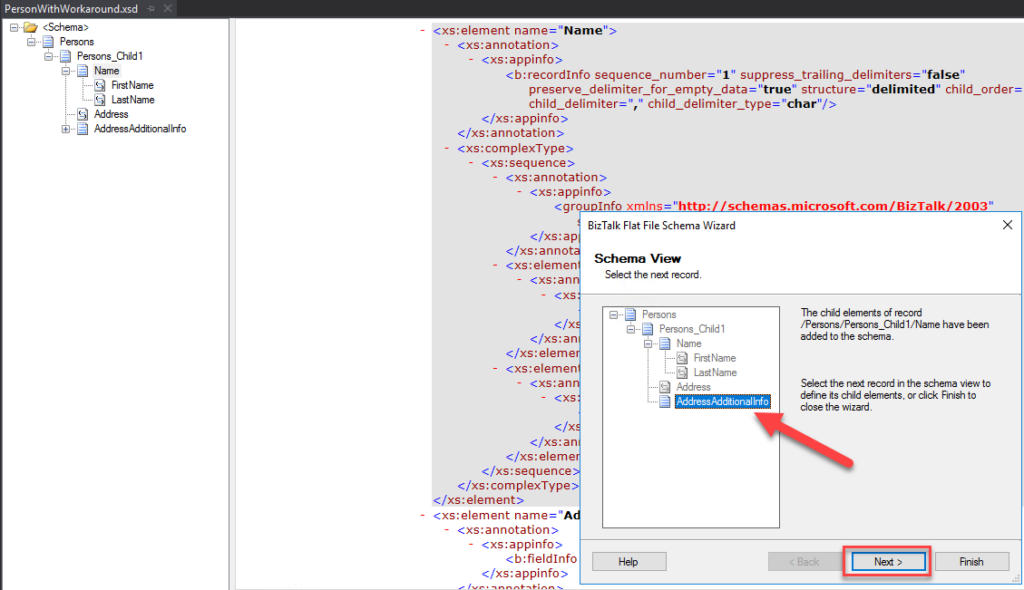
- In the Select Document Data window, notice that only the AddressAdditionalInfo part is selected. This is the part we need to define the Name record structure for. Click Next to continue.
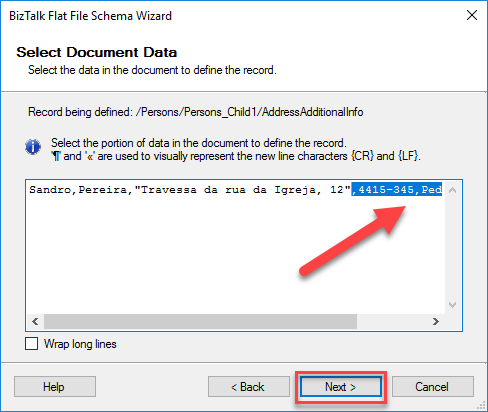
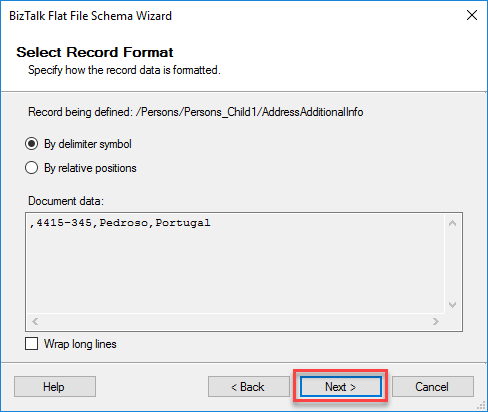
- On the Select Record Format window, again, our structure is delimited by a symbol, in this case a comma (,). For that reason, we will need to select the option By delimiter symbol and then click Next to continue.
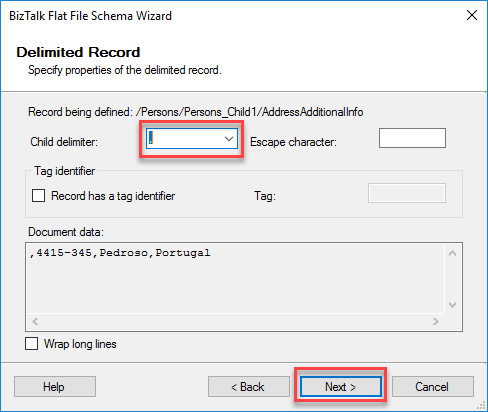
- As we can see, all elements are separated by the double comma (,), which is our delimiter; then, in the Delimited Record window, we must change the Child delimiter option to comma.
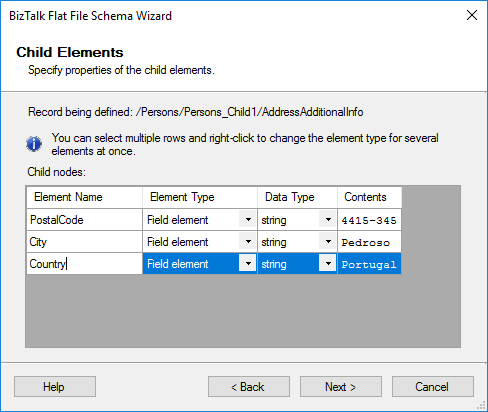
- In the Child Elements window, we will define the different elements/attributes in the AddressAdditionalInfo record structure. Adjust the values according to the table below:
| Element Name | Element Type | Date Type |
| PostalCode | Field element | String |
| City | Field element | String |
| Country | Field element | String |
- Click Next to continue.
- Finally, the wizard shows the equivalent XML structure your text file document will have. Once you select the option Finish, the schema will be available for you to use in your BizTalk solution.
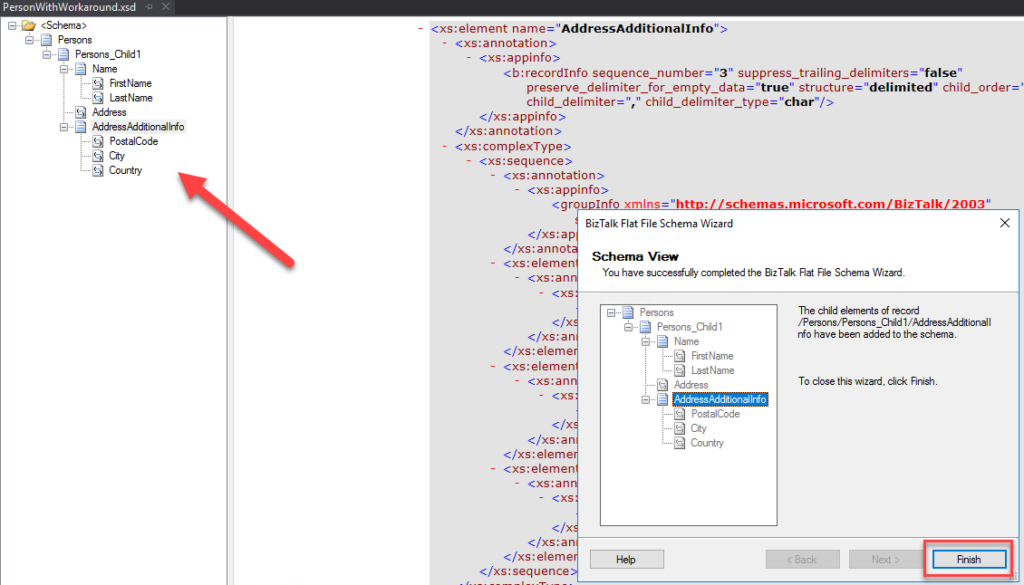
After we finalize the creation of the Flat File Schema, which will contain the transformation rules of the text file, we can easily test our CSV translation without having to get out of our development tool (Visual Studio) and without having to deploy our solution.
How to test the flat file schema
After the creation of the flat file schema, we can easily test our CSV translation without having to get out of our development tool (Visual Studio) and without having to deploy our solution into BizTalk or to Azure.
For that, we just need to:
- If you check the PersonWithWorkaround.xsd Properties window, you will see that the CSV file we have used to generate our flat file schema is automatically defined as our Input Instance Filename.
- Notice that the file contains delimiters inside the business data.
- In the Solution Explorer, right-click on the PersonWithWorkaround.xsd file and select the Validate Instance option. This will take the CSV file defined in the previous property and try to parse it to XML.
- In the Output window, you will see errors if a problem occurs, or an output link with the result of the CSV parsing.
- Press the Ctrl key + left-click on the mouse.
- This opens the CSV parsing output in a dedicated window, and as you can see below, it parses the file correctly.
<Persons xmlns="http://POC.CSV.WithComma.PersonWithWorkaround">
  <Persons_Child1 xmlns="">
    <Name>
      <FirstName>Sandro</FirstName>
      <LastName>Pereira</LastName>
    </Name>
    <Address>Pedroso Street, n12</Address>
    <AddressAdditionalInfo>
      <PostalCode>4415-345</PostalCode>
      <City>Pedroso</City>
      <Country>Portugal</Country>
    </AddressAdditionalInfo>
  </Persons_Child1>
</Persons>
With this strategy, we can now parse the Address element correctly:
- It contains the full business data value, including the comma: Pedroso Street, n12
- It does not include the double quote as part of the element value.
- Notice that the double quote character basically tells the CSV file that this is the full string of that column.
And, of course, all the other values also parse correctly.
Now, if we take the first sample file that does not contain the delimiter inside the business data (it does not have the string inside double quotes because it does not contain any delimiter character) and try to test it against our new flat file schema, we will notice that it ends up with the following error:
The current definition being parsed is Persons_Child1. The stream offset where the error occured is 15. The line number where the error occured is 1. The column where the error occured is 15.

This happens because the parser tries to find a double quote inside the line so it can parse the Address value, but it cannot find one. As a result, this workaround only works when every line in the file contains double quotes around the Address value.
Why This Is Not Always the Best Solution
Although this workaround allows BizTalk Server and Logic Apps to correctly parse CSV files that contain delimiters inside business data, it is important to understand that it comes with several limitations. In real-world integration scenarios, relying solely on this approach can make your solution more fragile and difficult to maintain.
The biggest drawback is that it assumes a very strict file structure. The schema requires double quotes around the Address field at all times. If a record does not contain quotes because the business data does not include a comma or any other delimiter character, the parser fails. In other words, the following record:
Sandro,Pereira,Pedroso Street,4415-345,Pedroso,Portugal
will not be successfully processed by the schema we created because the parser expects to find the opening and closing double quotes around the Address field.
This requirement means the sender must apply the same formatting rules consistently to every record in the file. Unfortunately, that is not always the case. Some systems add quotes only when required, while others add them to every field. As a result, files generated by different systems, or even different versions of the same system, may not follow the exact format that the schema expects.
Another limitation is flexibility. We designed this workaround for a specific scenario where only one field contains a delimiter. As the CSV structure becomes more complex, multiple fields may contain commas, semicolons, line breaks, or other special characters. When that happens, the schema logic quickly becomes harder to design, understand, and maintain.
It is also important to remember that CSV files follow conventions rather than a single strict standard. Many applications surround fields that contain delimiters with double quotes, but CSV files can follow many different formats. Some systems use different text qualifiers, delimiters, escape characters, or locale-specific conventions. As a result, a schema that targets a single variation may not work with other equally valid CSV formats.
Because of these limitations, treat this technique as a workaround rather than a universal solution. It can be useful when you control the file format or when all trading partners consistently send data by using the same quoting rules. However, when you receive files from multiple external systems, you will often need a more robust approach.
Next Steps
Although this workaround may solve the problem in controlled scenarios, it is far from being a universal solution. In the next part of this blog post series, we will explore a more reliable, production-ready approach, implement it step by step, and show how it can handle delimiter characters embedded in business data without adding constraints to the input file format.
I hope you find this helpful! If you liked the content or found it useful and want to help me write more, you can consider buying (or helping to buy) my son a Star Wars LEGO set.