

When working with Azure Logic Apps Standard, one of the most common (and unpleasant) surprises happens right after deployment: Your workflows start running immediately.
In non‑production environments, this might be acceptable. In Production, however, this can lead to:
- Triggers firing before dependencies are ready
- Connectors failing because secrets or identities aren’t configured
- Unwanted executions and noisy alerts
Just like with Logic Apps Consumption, deploying Logic Apps Standard disabled by default is often the safest and most controlled approach. But in Standard, things work a bit differently.
Today, we’ll cover a critical practice that every integration architect should understand: how to properly control the initial state of your Logic Apps Standard workflows at deployment time.

📝 One-Minute Brief
By default, Logic Apps Standard workflows start running right after deployment, which can cause unwanted executions in production. This tip explains how to control the initial state using App Settings, ensuring safer and more controlled deployments.
Why is this different in Logic Apps Standard?
With Logic Apps Consumption, you can control the workflow state directly in the ARM template by setting the state property. You can check how to in the previous tip we published: Logic Apps Best Practices, Tips, and Tricks: #50 Controlling the Initial State of a Logic Apps Consumption.
With Logic Apps Standard:
- The Logic Apps Standard is an “App Service“.
- Each workflow runs inside that app.
- Workflows don’t expose a
stateproperty in the ARM/Bicep definition. - Neither the Logic Apps Standard projects inside VS Code have those properties we set up in Logic App Consumption.
So… how do we control the initial state?
The key: workflow state via App Settings
In Logic Apps Standard, each workflow’s state is controlled via an App Setting on the underlying App Service.
This is the setting pattern:
"Workflows.<WorkflowName>.FlowState": "Disabled"
Example: disabling workflows by default inside VS Code project
Let’s assume that we have a Logic Apps Standard workspace project inside VS Code with 3 workflows:
- sasp-poc-stfw.
- team-test-stfw.
- and test-stfw.
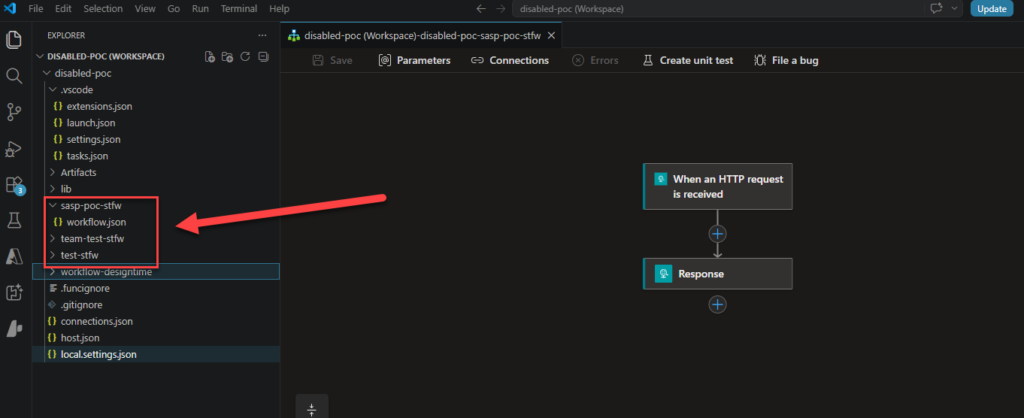
And our goal is to configure them to be deployed in a disabled state. In this proof of concept, we will deploy the solution directly from VS Code, but the strategy will be the same if you use DevOps pipelines or Bicep scripts.
So, to accomplish this, we need to:
- Inside VS Code, open the local.settings.json file.
- and add the following lines:
     "Workflows.sasp-poc-stfw.FlowState": "Disabled",
    "Workflows.team-test-stfw.FlowState": "Disabled",
    "Workflows.test-stfw.FlowState": "Disabled"

When the deployment finishes:
- The Logic App exists
- The workflow is deployed
- ✅ The workflow does NOT start running

The trick is that for any kind of deployment strategy you implement inside the organization, you need to add the following application setting for each workflow you want to deploy as disabled:

The trick
Now the trick you need to know:
- To set workflows to disabled, you can use one of these values: “Disabled” or “disabled“.
- For every other value, the workflows will be enabled by default.
- The absence of these app settings will mean the workflows are enabled by default.
Hope you find this helpful! If you liked the content or found it useful and would like to support me in writing more, consider buying (or helping to buy) a Star Wars Lego set for my son.