
Understanding the Problem
In enterprise integration scenarios, it’s often not enough to simply send messages to a transport destination. Although we often focus on sending the message payload correctly — XML, JSON, CSV, etc. — in real-world enterprise scenarios, sending the message body is only part of the story, and we might need to enrich those messages with additional custom metadata. This metadata can be used for:
- Topic subscription filters.
- Downstream routing.
- Correlation and tracking.
- Business-level classification.
- Consumer-specific processing logic.
Instead of placing that information in the message body, a cleaner, more scalable approach is to use custom context properties that are then converted into Service Bus message properties.
When you integrate BizTalk Server with Azure Service Bus, the platform already exposes several built-in message properties, such as ContentType, CorrelationId, Label/Subject, and others, accessible through the messaging adapter. But what if you need to send custom metadata alongside your message? How do you do that from a BizTalk Server pipeline or orchestration?
In this post, we’ll dive into a practical, reliable pattern for populating custom Service Bus context properties from within BizTalk Server before sending messages to Service Bus — without extra effort.
📝 One-Minute Brief
In this article, we will explore how to:
- Define custom BizTalk context properties
- Set them in an orchestration
- Set them in a custom send pipeline component
- Ensure they are transmitted as Service Bus message properties
- Verify everything using Service Bus Explorer
Why set custom context properties?
In cloud messaging, context properties are used for:
- Routing and filtering in subscribers
- Application metadata (e.g., business keys)
- Correlation and diagnostic purposes
- Consumer processing logic
For example, imagine:
- A Service Bus Topic receiving orders
- Multiple subscribers
- Each subscriber is only interested in events with a specific region code or business unit
Putting that information in context properties (instead of inside the message body) allows consumers to filter efficiently and reduce unnecessary processing.
How BizTalk Server sends Service Bus messages
When BizTalk sends a message through the Service Bus adapter, the adapter translates BizTalk message context properties into Service Bus message properties.
That means:
- If a property exists in the BizTalk message context when the send port executes, the adapter can forward it to the Service Bus as a message property.
This is exactly how built-in properties like ContentType, CorrelationId, and Label work.
The same principle applies to custom properties.
This means we can inject our custom properties into the message context before the send port executes.
Step 1 – Create a custom Property Schema
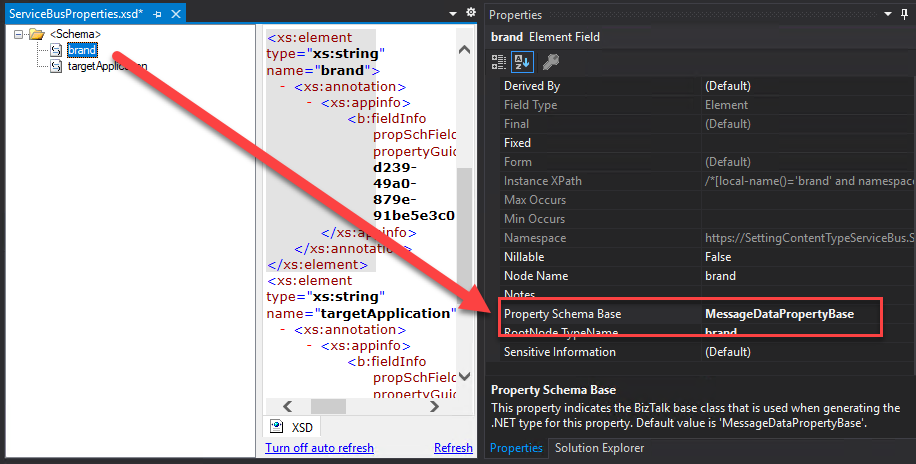
The first step is to define a custom BizTalk property schema. For that, we need to create a new property schema in your BizTalk project:
- Right-click the project name, then choose Add > New Item…
- Choose Property Schema, give it a name, and click Add.

- In the property schema, add the element you want to promote to the service bus. In my case, I add:
- brand.
- and targetApplication.

- Make sure that for both of these elements to set up the Property Schema Base property value to MessageDataPropertyBase.
Afterwards, we need to deploy this schema.
This allows you to:
- Promote properties.
- Reference them strongly in orchestrations.
- Use them in send port filters if needed.
- And promoted them to the context of the message in Service Bus.
Step 2 – Setting custom Context Properties in an Orchestration
If you are using orchestrations, you can set context properties in a Message Assignment shape (inside a Construct Message shape) before sending the message.
Example:
msgOut = msgIn;
msgOut(SBMessaging.ContentType) = msgIn.ContentType;

msgOut(SettingContentTypeServiceBus.targetApplication) = "sb-outbound";
msgOut(SettingContentTypeServiceBus.brand) = "Sandro Pereira";
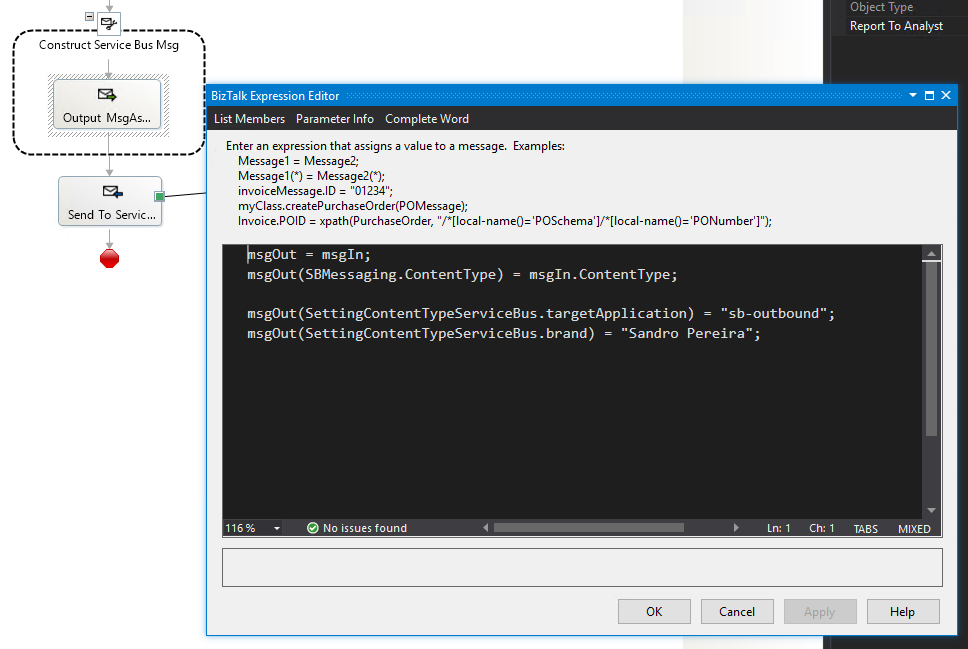
At runtime, these properties are written into the message context.
Step 3 – Setting Custom Properties in a Send Pipeline Component
If you are not using orchestrations—or if you want a centralized approach—you can set properties in a custom send pipeline component.
Below is a simplified example.
using System;
using Microsoft.BizTalk.Message.Interop;
using Microsoft.BizTalk.Component.Interop;

public class SetServiceBusProperties : IBaseComponent, IComponent
{
    public IBaseMessage Execute(IPipelineContext pContext, IBaseMessage pMsg)
    {
        if (pMsg == null)
            return null;

        pMsg.Context.Write(
            "targetApplication",
            "https://SettingContentTypeServiceBus.ServiceBusProperties",
            "sb-outbound"
        );

        pMsg.Context.Write(
            "brand",
            "https://SettingContentTypeServiceBus.ServiceBusProperties",
            "Sandro Pereira"
        );

        return pMsg;
    }
}
Add this component to the Encode stage of your send pipeline and configure your send port to use that pipeline.
Step 4 – Mapping to Azure Service Bus message properties
Once the context properties exist when the adapter executes, the Service Bus adapter transmits them as message properties.
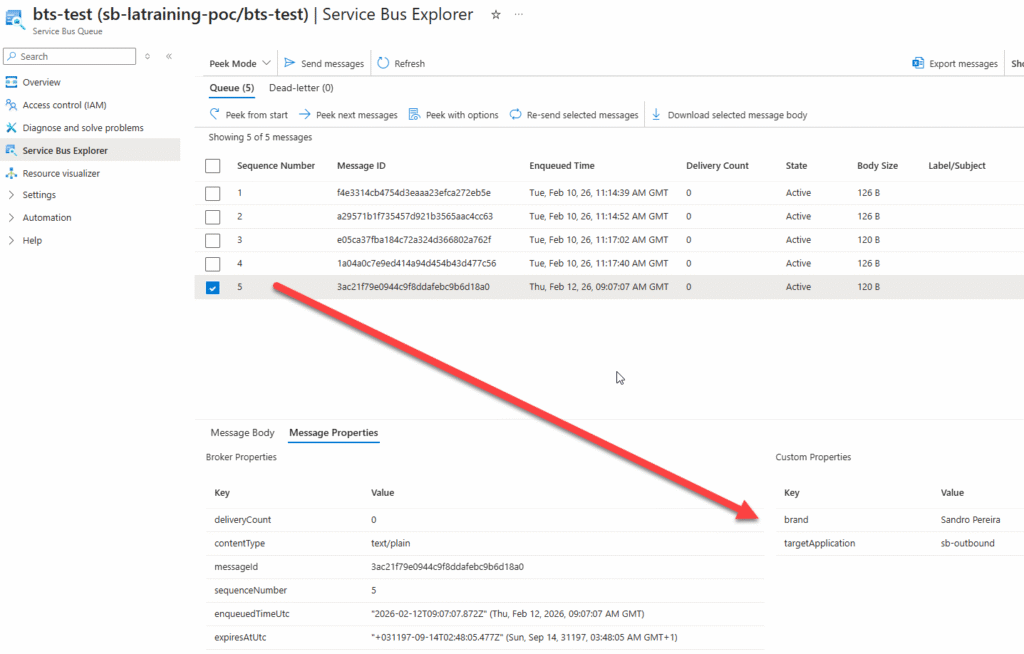
On the Service Bus side, they become the message’s Custom Properties.
For example:
brand = Sandro PereiratargetApplication = sb-outbound
These can then be used in Topic subscription filters:
brand = 'Sandro Pereira' AND targetApplication = 'sb-outbound'
This enables clean filtering without parsing the message body.
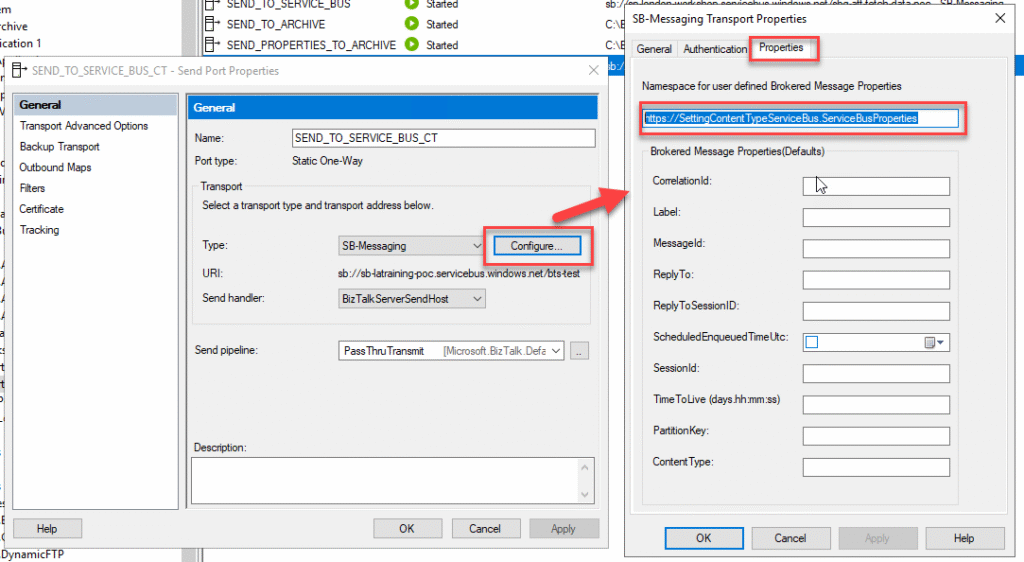
To accomplish that inside BizTalk Server, we need to specify what the Property schema to be promoted to the Service Bus. To accomplish that, we need to:
- Access the Service Bus Send port.
- On the send port General tab, click Configure…
- On the SB-Messaging Transport Properties window, select the Properties tab and in the Namespace for user defined Brokered Message Properties property type your Property schema namespace.
- In my case: https://SettingContentTypeServiceBus.ServiceBusProperties
- Click OK.
Step 5 – Verifying in Service Bus Explorer
To confirm everything works:
- Send a test message through BizTalk.
- Open Service Bus Explorer (or Azure Portal).
- Peek or receive the message.
- Inspect the message properties section.
You should see:
If the properties are not visible:
- Ensure they are written before the send port executes.
- Verify the namespace matches the property schema.
- Confirm the correct adapter is being used.
- Make sure you have correctly deployed your BizTalk Server solution and restarted the host instances
Summary
Setting custom context properties when sending messages from BizTalk Server to Azure Service Bus allows you to enrich messages with metadata that supports:
- Cleaner subscriber filtering.
- Better separation of concerns.
- More maintainable integration patterns.
- Reduced payload parsing.
By defining a property schema and specifying context properties in orchestrations or send pipelines, you can ensure those properties are transmitted to the Service Bus and are available to downstream consumers.
This approach keeps your integration architecture clean, scalable, and cloud-ready.
Sample Source Code
You can download the source code from GitHub:
Hope you find this helpful! If you liked the content or found it useful and would like to support me in writing more, consider buying (or helping to buy) a Star Wars Lego set for my son.

