
Power BI Embedded is a Microsoft Azure service that allows you to embed Power BI reports, dashboards, and visualizations into your own custom applications—web apps, portals, or SaaS platforms—without requiring users to have a Power BI license.
It provides a way for developers and organizations to deliver interactive, secure, and scalable analytics experiences directly inside their apps using the Power BI REST API and JavaScript SDK.
📝 One-Minute Brief
Power BI Embedded capacities can generate significant Azure costs when left running unnecessarily. This post explains how to use Azure Logic Apps to schedule, pause, and resume Power BI Embedded capacities, helping teams implement effective cost‑optimization and FinOps practices.
Power BI Embedded uses Azure capacity-based pricing through Power BI Embedded capacities (A SKUs). You pay per hour based on the SKU tier you choose (e.g., A1, A2, A3…), which determines the performance level and concurrency.
| SKU | vCore | Memory | Estimated Cost/Hour | Use Case |
|---|---|---|---|---|
| A1 | 1 | 3 GB | ~$1.008/hour | Dev/test, low-traffic apps |
| A2 | 2 | 5 GB | ~$2.016/hour | Small production deployments |
| A3 | 4 | 10 GB | ~$4.032/hour | Medium scale apps |
| A4 | 8 | 25 GB | ~$8.064/hour | Large enterprise workloads |
| A5 | 16 | 50 GB | ~$16.128/hour | High-performance/parallel users |
| A6 | 32 | 100 GB | ~$32.256/hour | Heavy usage, multi-tenant SaaS apps |
If I take my subscription as an example, I have 3 Power BI Embedded instances:
- 2 capacities using A1 SKU
- and 1 capacity using A2 SKU

If we consider that a month has 730 hours, it means that if my Power BI Embedded capacities are running 24 hours a day, my total cost at the end of the month will be $2,937.74.
- 2 A1 capacities * 730 = $1,471.83
- 1 A2 capacity * 730 = $1,465.91
Why is this important?
Now, you may notice by the name that two of those capacities are development/test environments that are normally paused/stopped and only started when needed. The typical problem is that developers/users cannot be trusted to pause them when they finish their work, which means these resources remain on for several days, including at night and on weekends when they are not in use.
The other capacity is only needed during the day and is activated on demand; Even if I had to start it in an automated way, this was only required during business hours, which means instead of 730 hours/month, we only need it to be working between 160 to 184 hours. Taking the worst-case scenario:
- 1 A1 instance * 184 = $185.49
That means a $550.42 savings each month! That is $6,605.04 a year in a single Power BI Embedded A1 SKU capacity!
How can we improve this and optimize the costs?
Certainly, you will find various ways to pause (suspend) Power BI Embedded capacity in an automated manner, depending on your environment and preferred automation tools. Some of these options may be using:
- Azure Automation Runbook (PowerShell or Python)
- Azure CLI in DevOps Pipeline
- Azure Scheduler (Deprecated) or Third-party Schedulers
In this blog post, I will explain the one I’m more familiar with: Azure Logic Apps (using Managed Identity + HTTP action). This approach is best suited for low-code automation, particularly with scheduling and event triggers.
To implement this strategy/approach, we need to:
- The first step is to create a new Logic App. In this sample, we will use Logic App Consumption, which is also advantageous in terms of costs and well-suited for these scenarios. Alternatively, you can use Logic App Standard if you prefer.
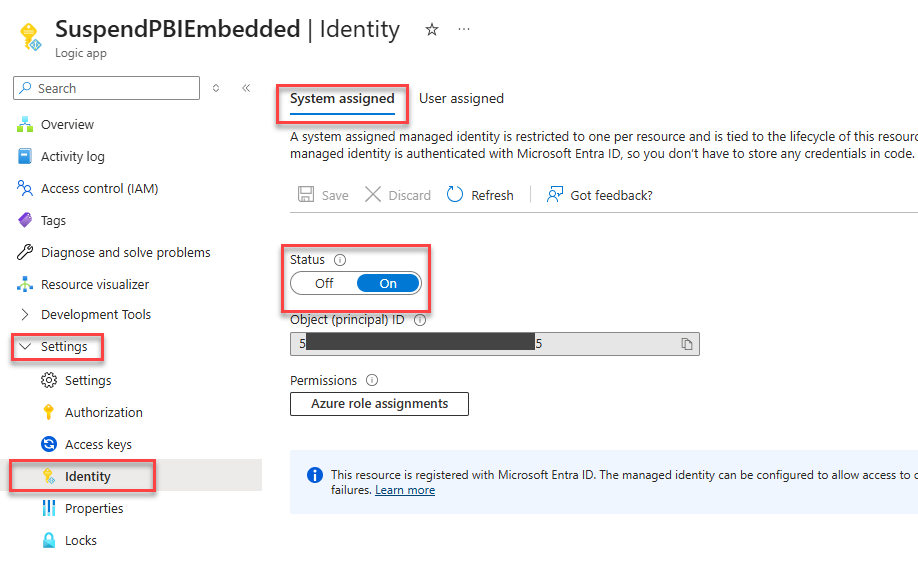
- After we create the Logic App, the second step is to enable System-assigned Managed Identity on the Logic App. To do that, you need to:
- Click on the Identity option under the Settings section. On the System assigned tab, set the Status option to On.
- Now, the third step, before we actually create the workflow business logic, is to assign the Power BI Capacity Administrator role to the Logic App System-assigned Managed Identity on Power BI Embedded. Optionally, you can also add it as a Contributor (for broad access). To do that, we need to:
- Access to your Power BI Embedded capacity.
- In the left-hand menu, click the Power BI capacity administrators option under the Settings section, and then click + Add.

- Search for your Logic App System-assigned Managed Identity and click Select.
- Then click Save.
- The fourth step is to finally, within our Logic App workflow, use the HTTP action combined with a Recurrence trigger (e.g., every day at 7 PM) to pause the Power BI Embedded capacities. To do so, we need to:
- On the Logic App page, click on the Logic app designer option under the Development Tools section and then click Add a trigger.

- On the Add a trigger page, select Schedule and then the Recurrence trigger.

- On the Recurrence trigger, set the following configuration: Every day at 19PM.

- We can try to pause the capacity directly. However, if you try to pause a capacity that is already paused, you will get an error. For this reason, we will first obtain the details of the Power BI Embedded capacity and verify the status. To do that, you need to:
- Click Add an action, then on the Add an action page, select the HTTP connector and the HTTP action. And then set the following configuration.
- Change the name of the action to be: HTTP – Get Details of Power BI Embedded (DEV)
- On the URI, set the following:
- https://management.azure.com/subscriptions/{subId}/resourceGroups/{rg}/providers/Microsoft.PowerBIDedicated/capacities/{capacityName}?api-version=2021-01-01
- Set the Method property to GET.
- On the Authentication panel, set the following configuration:
- On the Authentication Type property, set Managed identity.
- On the Managed Identity property, set System-assigned managed identity.
- Click Add an action, then on the Add an action page, select the HTTP connector and the HTTP action. And then set the following configuration.

- Below the HTTP – Get Details of Power BI Embedded (DEV) action, click on Add an action, and from the Add an action page, select the Control and then the Condition action. And then set the following configuration:
- Change the name of the action to be: Condition – If Power BI Embedded (DEV) is started
- On Condition Expression under the Parameters tab, set
- Choose a value to be @body(‘HTTP_-_Get_Details_of_Power_BI_Embedded_(DEV)’)?[‘properties’]?[‘state’]
- The condition will be is not equal to
- And the Choose a value to be Paused

- Under the True branch of the condition, click Add an action, then on the Add an action page, select the HTTP connector and the HTTP action. And then set the following configuration
- Change the name of the action to be: HTTP – Suspend Power BI Embedded (DEV)
- On the URI, set the following:
- https://management.azure.com/subscriptions/{subId}/resourceGroups/{rg}/providers/Microsoft.PowerBIDedicated/capacities/{capacityName}?suspend?api-version=2021-01-01
- Set the Method property to POST
- Set the following Headers:
- Content-Type: application/json
- On the Authentication panel, set the following configuration:
- On the Authentication Type property, set Managed identity
- On the Managed Identity property, set System-assigned managed identity

- You can now repeat the following steps for the other Power BI Embedded capacities, or create this as a child Logic App and invoke it by passing parameters to point to the correct capacity.
- Finally, Save it.
If you run it now, you will see that the workflow runs successfully and the Power BI Embedded capacity is paused.

How can Turbo360 help you save costs in these scenarios?
Among the many features available in Turbo360 for analyzing and optimizing application costs, one stands out. Turbo360 lets you configure and automate the life cycle of specific Azure resources, including Power BI Embedded, Logic Apps, Virtual Machines, and more.
In this configuration, I define a clear schedule. A specific Azure resource runs only between 8:00 PM and 9:00 PM, for a total of one hour per day. This approach helps control usage and significantly reduce unnecessary costs.
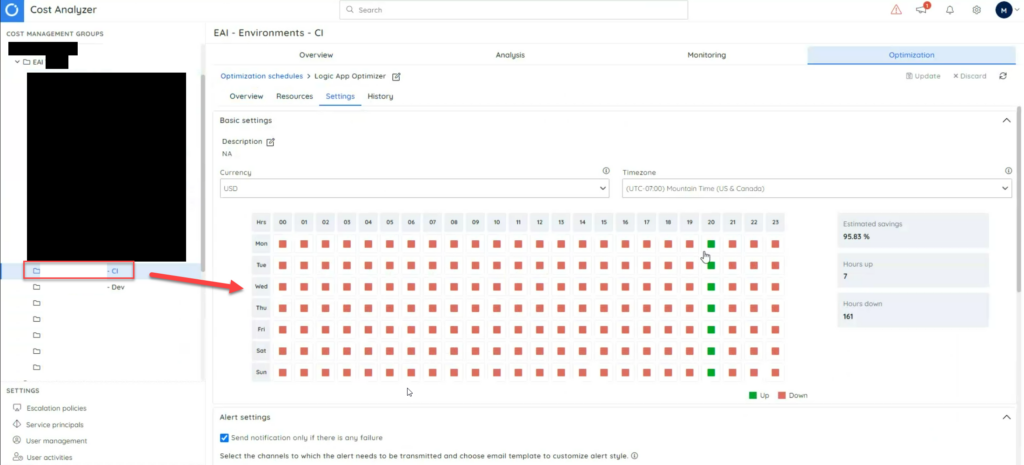
The tool also provides us with a total estimated savings of this particular configuration: 95.83% of savings! For me, this is absolutely awesome! Usually, I’m not responsible for controlling costs for my customers; I only help them find ways to optimize their costs and hope to enable them to save some money. However, I also need to take care of my personal subscription; Otherwise, I will be out of credits.
I hope you enjoy this cost reduction tip, and stay tuned for more content.
Read More: Cloud Cost Optimization Checklist
Hope you find this helpful! If you liked the content or found it useful and want to help me write more, consider buying (or helping me buy) a Star Wars Lego set for my son.

