
You can debatch XML content in Logic Apps similarly to how you handle JSON inputs. This guide will walk you through the process using a sample XML structure. For example, consider the following XML content that we want to debatch:
<People>
    <Person>
        <name>Sandro Pereira</name>
    </Person>
    <Person>
        <name>Luis Rigueira</name>
    </Person>
</People>
📝 One-Minute Brief
Azure Logic Apps can natively debatch XML messages without custom code or external tools. This Friday Fact explains how to split large XML files into individual messages using built‑in capabilities, making it easier to process data in parallel, modernize BizTalk debatching scenarios, and streamline enterprise integration workflows in Azure.
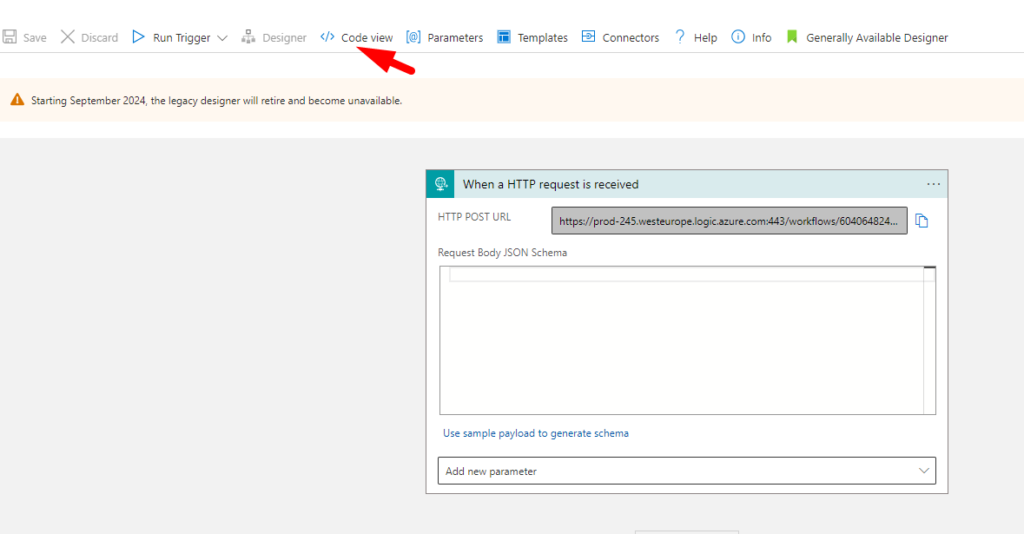
Step 1: Add a Trigger
Start by adding a trigger to your Logic App to handle incoming HTTP requests.
- Trigger: When a HTTP request is received.

Step 2: Switch to Code View
Next, switch to the Code View of your Logic App. This allows you to directly edit the JSON definition of your Logic App (always be careful when working in the code view).
Step 3: Add the splitOn Property
In the triggers section of your Logic App definition, add the following line to enable debatching:
"splitOn": "@xpath(xml(triggerBody()), '/*[local-name()=\"People\"]/*[local-name()=\"Person\"]')"
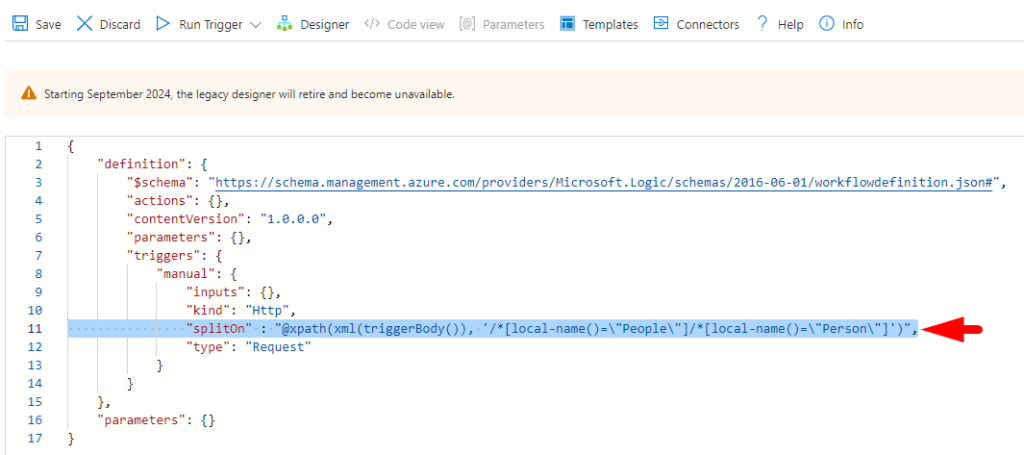
Explanation of the splitOn Property
This line specifies that the splitOn feature is enabled and defines where the split should occur. In this case, it uses the following XPath expression:
/*[local-name()=”People”]/*[local-name()=”Person”]
Breakdown of the XPath
- Root Element: People
- Use /*[local-name()=”People”] to target the People element regardless of namespace.
- Child Elements: Person
- Use /*[local-name()=”Person”] to target each Person element within People.
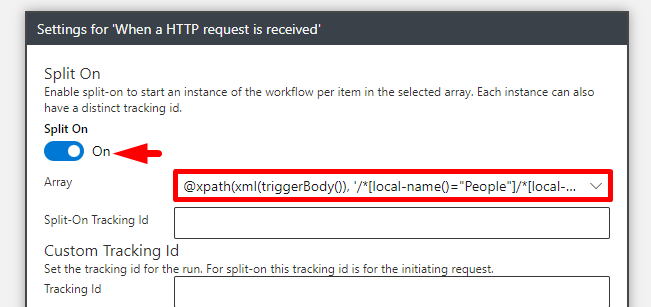
Step 4: Get back into the Designer

Click the three dots (…) on the trigger, then select Settings.

You should see that the splitOn property is enabled and reflects the XPath expression we defined.
Step 5: Use a Compose Action (or another action, like a variable)
Now you can add a Compose action to dynamically select the body of each Person element.

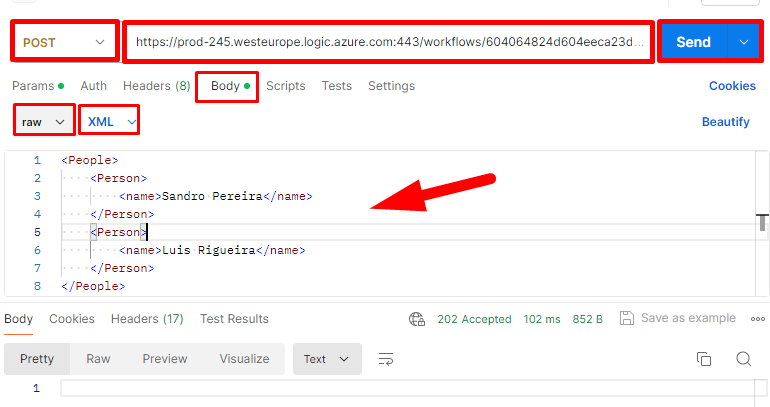
Step 6: Test Your Logic App
- Save your Logic App and copy the URL from the trigger.
- Open Postman and set up a new request:
- Method: POST.Body: Select Raw and set the type to XML.
- Paste your XML content in the body.
- Send the request.
Step 7: Check the Runs
After sending the request, navigate back to your Logic App. You should see two new runs, each corresponding to an individual Person:

Each run will include the names of two people: Luis Rigueira and Sandro Pereira.


And yes, this works regardless of the namespace!
Take a look at the following example:
<?xml version="1.0" encoding="UTF-8"?>
<root xmlns:ns="http://example.com/ns">
    <ns:items>
        <ns:item>
            <ns:name>Item 1</ns:name>
            <ns:value>Value 1</ns:value>
        </ns:item>
        <ns:item>
            <ns:name>Item 2</ns:name>
            <ns:value>Value 2</ns:value>
        </ns:item>
        <ns:item>
            <ns:name>Item 3</ns:name>
            <ns:value>Value 3</ns:value>
        </ns:item>
    </ns:items>
</root>


Just like with JSON, Logic Apps provide a robust way to debatch XML content efficiently. By utilizing the splitOn property with appropriate XPath expressions, you can easily process each element of an XML message independently. This capability enables scalable, flexible workflows, allowing you to handle complex XML structures the same way you would JSON, ensuring seamless integration and data processing in your applications.
To lazy to read? We’ve got you covered! Check out our video version of this content!
Hope you find this helpful! If you enjoyed the content or found it useful and wish to support our efforts to create more, you can contribute towards purchasing a Star Wars Lego for Sandro’s son!

