
Azure Logic Apps adapter overview
The Azure Logic Apps adapter allows BizTalk Server to communicate directly with Azure Logic Apps.
Although you can achieve similar integration by using the HTTP adapter, the Logic App adapter offers a simpler and more streamlined experience.
What changed in BizTalk Server 2020
At this point, you might think this is nothing new. After all, the Logic App Adapter already existed in BizTalk Server 2016, and you would be right.
However, in BizTalk Server 2016, the adapter was an optional feature that required a separate download and manual installation. I previously covered that process in detail in my Step-by-Step Logic App Adapter Installation Guide.
Starting with BizTalk Server 2020, Microsoft includes the Logic App Adapter by default. As a result, you no longer need to install or configure it manually. In fact, almost everything is automatically configured for you during the BizTalk Server installation process.
📝 One-Minute Brief
Explains what’s new in BizTalk Server 2020 Logic App Adapter, covering how the adapter is now installed by default, supports two‑way communication with Azure Logic Apps, and simplifies hybrid integration scenarios.
The Logic App Adapter is one of the adapters that support two-way communications: Receive and Send Messages.
Logic App Receive Adapter
The Logic App Receive Adapter that is responsible for receiving messages from Logic Apps and delivering them to BizTalk is, in fact, a WCF Service that runs inside Internet Information Services (IIS).
To put it to work, you need to apply the following instructions:
Install and Configure an On-premises Data Gateway;
- Go to the On-premises data gateway and download the gateway installer.
- Run the downloaded file when the download is complete. The Terms of Use and Privacy Statement dialog box appears.
- Review the terms and click the Accept button to accept the terms of use and privacy statement.
- Specify the destination folder where you want to install the package.
- Click the Install button to proceed.
- Once the installation is complete, a Sign-in page appears, where you are required to provide your Azure credentials.
- Enter the email address that has a subscription on the Azure portal.
- Click the Sign in button.
- After signing in, the On-premises data gateway window opens a new page to register the gateway.
- Select the Register a new gateway on this computer checkbox to register a new gateway and then click Next.
- The next page of the On-premises data gateway window appears, where you need to provide the data gateway details.
- Enter the name of the data gateway in the New on-premises data gateway name text box.
- We will be using BTS2020LAB01-gw.
- Enter the desired recovery key in the Recovery key text box and confirm the recovery key in the text box below.
- Notice that the default region is North Europe; if you want another one, you should change it here.
- Click Configure to continue.
- Enter the name of the data gateway in the New on-premises data gateway name text box.
- Once the configuration is complete, the On-premises data gateway window displays the status that the gateway is online and ready to be used.
- Click Close.
Create a Data Gateway Resource on Azure
- Sign-in into the Azure Portal using the credentials used for configuring the on-premises data gateway.
- Search for the On-premises data gateway, and from the result list, select the On-premises data gateway option.
- On the On-premises Data Gateways page, click + Add to create a new On-premises Data Gateway.
- On the Create connection gateway page, provide the following details:
- Type the desired name in the Resource Name text box. For example, BTS2020LAB01-cg.
- Select the desired subscription option from the Subscription drop-down list.
- Select the desired resource group option from the Resource Group drop-down list or create a new one.
- Select the desired location from the Location drop-down list.
- This region should match the one you used for the On-premises gateway installation.
- Select the desired On-premises gateway from the Installation Name drop-down list.
- Click the Create button to create a data gateway resource.
Create a BizTalk Server Application to receive a message from Logic App.
- Open the Internet Information Services (IIS) Manager, expand the <Server Name> > Sites > Default Web Sites.
- Right-click the Default Web Site option and select the Add Application option from the context menu.
- On the Add Application window, perform the following configurations:
- Enter the desired alias (name) for your application in the Alias text box.
- Select the application pool that you selected in the Management IIS application.
- Click the Browse button to navigate to the folder that you want to set for the Physical path text box.
- C:\Program Files (x86)\Microsoft BizTalk Server\LogicApp Adapter\ReceiveService.
- Click the Test Settings button to verify the application pool identity and pass the authentication and authorization tests.
- Click the OK button to save the changes.
- Open BizTalk Server Administration, expand BizTalk Server Administration > BizTalk Group > Applications, and expand our application.
- Right-select Receive Ports, select New, and select One-way Receive Port.
- In the Receive Port properties window, enter the following configurations:
- Name: Enter a name for the receive port.
- Select Receive Locations, and select New.
- In the Receive Location properties window, enter the following configurations:
- Enter a Name for the receiving location.
- For the Type, select LogicApp from the list, and select the Configure button.
- In the General tab, configure the endpoint address for your logic app:
- Address: Required. Enter the BizTalk ReceiveService IIS application URL. In our case: /LogicAppTestService/Service1.svc.
- Public Address: Required. This is the public full URL of the service. In our case: http:///LogicAppTestService/Service1.svc.
- In the Binding tab, you can configure any timeout and encoding-related properties of the underlying WCF-WebHttp binding. These properties are helpful when dealing with large messages.
- In the Security tab, configure any security properties.
- Click the OK button to save your configurations.
- For the Receive handler, select PassThruReceive from the list and select OK to save your configurations.
Create our Logic App to send messages to BizTalk Server
And finally, we need to create our Logic App to send messages to BizTalk Server.
- Sign in to the Azure portal. Create a blank logic app.
- After Logic App Designer opens, in the search box, enter Request as your filter, and from the triggers list, select the When a HTTP request is received trigger.
- Select + New step.
- In the search box, enter BizTalk Server as your filter.
- From the connector list, select the Send message action from the BizTalk Server connector.
- Once the action is added to your logic app, you need to set up the connections, perform the following actions:
- Select the option Connect via on-premises data gateway, and on the gateway properties, select the Subscription and the desired Connection Gateway.
- On the Connection Name property, provide a proper name for your connector.
- On the BizTalk Server URL property, provide a public UTL for the Management Application on the BizTalk Server IIS.
- On the Authentication Type property, set Windows and provide a proper Username and Password to access the above service (BizTalkManagementService).
- Select Create.
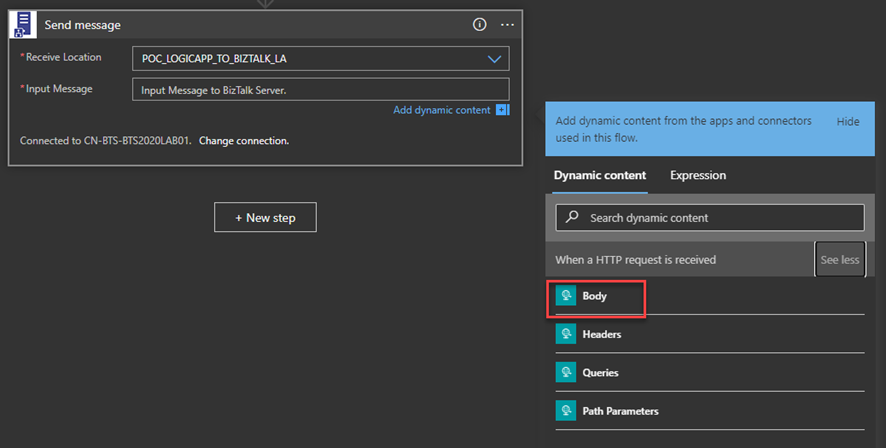
- Once you create the connector, the Send message action will appear on the Logic App designer
- From the Receive Location list, select the receive location we just created above.
- On the Input Message, specify the Body token of the When a HTTP request is received trigger.
Logic App Send Adapter
The Logic App Send Adapter is responsible for sending messages from BizTalk Server to Logic Apps.
To put it to work, you need to apply the following instructions:
Create a Logic App
We need to first create a Logic App in our Azure Subscription that has as a trigger the When a HTTP request is received present in the Request built-in Connector.
- Note: The Logic App adapter doesn’t support the new Logic Apps (preview) that are hosted on the Azure Function runtime.
To do this, we need to:
- We need to configure TLS 1.2 as the default security protocol on BizTalk Server.
- And finally, create a BizTalk Server Application to send a message to the Logic App.
- Right-select Send Ports, select New, and select Static One-way Send Port.
- In the Send Port properties, enter the following:
- Name for the send port. For example, enter POC_SEND_MSG_LOGIC_APP.
- For the Type, select LogicApp from the list, and select the Configure button.
- In the General tab, configure the Callback URI of your logic app trigger by selecting Configure…
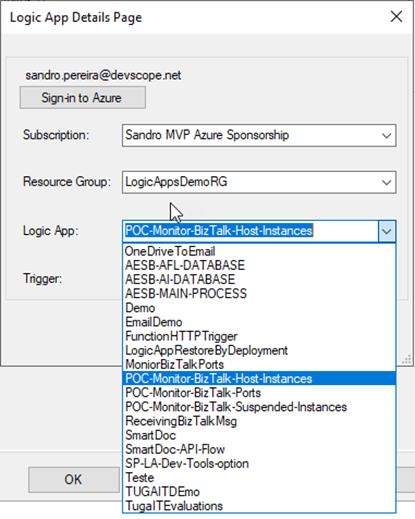
- On the Logic App Details Page, select Sign-in to Azure and authenticate with an Azure account.
- After you authenticate, you can be able to access your Azure and select the Subscription, the Resource Group that contains the Logic Apps, and finally the Logic App and the Trigger.
- The Trigger will always be manual.
- Select OK to save your configurations.
- In the Messages tab, set the content-type header as:
- Content-Type: application/json.
- In the General tab, configure the Callback URI of your logic app trigger by selecting Configure…
Setting up the BizTalk Server 2020 Logic App adapter
As mentioned earlier, almost everything is configured automatically during the BizTalk Server 2020 installation. However, there is a critical bug in the default Logic App adapter setup that affects receiving messages from Azure Logic Apps by using the BizTalk Server Connector.
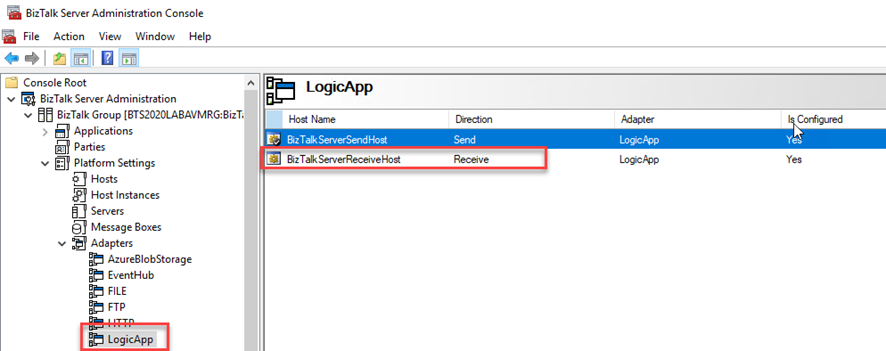
By default, the Logic App Receive handler—also known as the Logic App Receive adapter—runs under the default, In‑Process Host. In most environments, this host is the BizTalkServerApplication or, as shown in the example below, the BizTalkServerReceiveHost.
If you leave this configuration, you will end up having errors when trying to activate a Receive Location that uses the Logic App adapter:
The receive location “Receive Location name” with URL “/iis-application-name/Service1.svc” is shutting down. Details
See more about this error here.
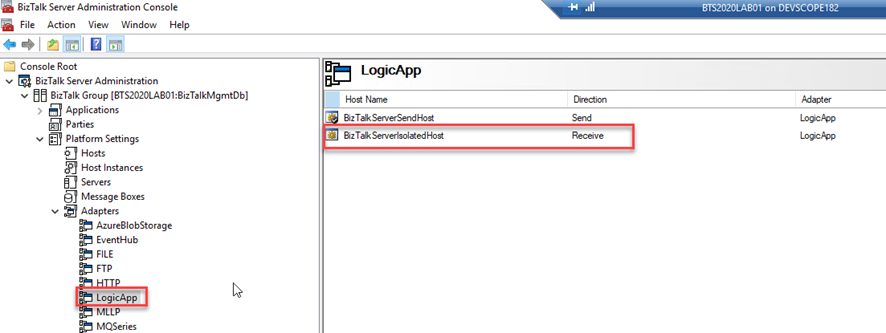
This issue occurs because the Receive Handler is associated with the In‑Process Host, when it should instead be bound to an Isolated Host.
To fix this problem, you need to take the following actions.
- First, remove the Logic App adapter from all assigned send ports and receive locations in your applications.
- For this reason, it is crucial to perform this step immediately after installing and configuring BizTalk Server. Otherwise, the issue may affect existing applications that use the Logic App adapter to send messages to Azure Logic Apps.
- Next, download the BizTalk Server 2020: Scripts to Fix Logic App Adapter installation from GitHub.
- These scripts originate from the Microsoft BizTalk Server Adapter for Logic Apps installer used in BizTalk Server 2016.
- After downloading the scripts, run
RemoveLogicAppAdapter.vbsto unregister the Logic App adapter from the BizTalk Server Configuration Console. - Finally, execute
AddLogicAppAdapter.vbsto properly register the Logic App adapter in the configuration console.

Hope you find this helpful! If you liked the content or found it useful and would like to support me in writing more, consider buying (or helping to buy) a Star Wars Lego set for my son.

