
Sometimes the best option to create a REST API and provide something for to the partners to try it out (documentation or starting to developer their side), especially if the requirements are not completely defined, is not to start coding your backend API, which takes more time to develop and which sometimes will be subjected to constant changes, becoming in many cases an inglorious work and a complete waste of time (… sometimes) but instead to prototype your API in your frontend system. So in this post, I will address the question: How to mock responses in API Management?
API Management provides different, powerful, and easy ways to mock your API’s to return static or dynamic sample responses even when there is no functional backend service capable of providing them. Mocking can be very useful in several scenarios, like:
- Create a proof of concept or demos.
- Test-Driven Development approach: when the API façade is designed first, and the backend implementation comes later or is worked upon in parallel.
- When the backend is temporarily not operating.
- When a specific operation is not yet implemented.
- And so on…
Despite being pretty simple to set up a mock, there are several ways to do so in API Management, some simpler and static, and others more complex and dynamic. So, let’s see all the options.

📝 One-Minute Brief
A practical guide that shows how to use Azure API Management mock responses to prototype APIs quickly, validate contracts, and enable frontend or consumer development without depending on a live backend implementation.
Option 1) Using the return-response policy in the “old” Publisher portal
Using the return-response policy, it would halt execution of the API pipeline (… if it exists) and return a specified response code. You can also send an optional set of headers and a body to the caller.
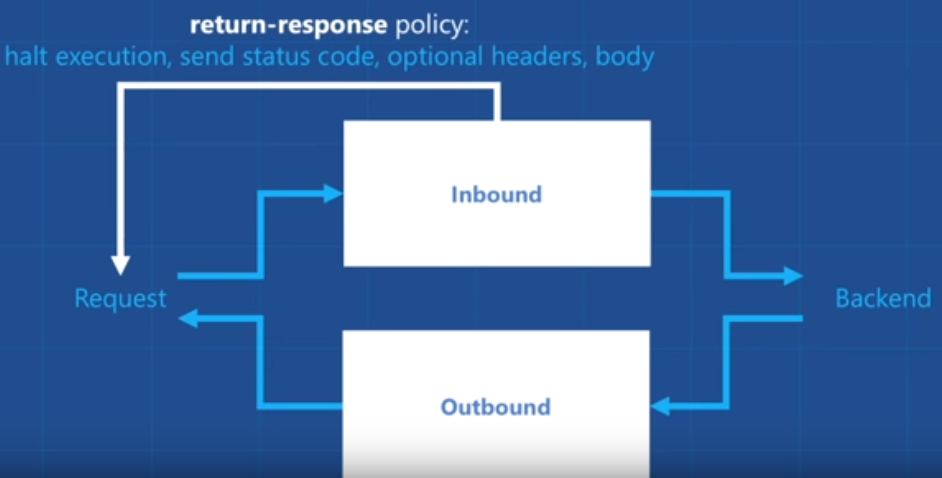
Note: One of the beautiful things on using this policy, comparing with the mock-response policy that we will describe in option 3, is that the mock can be implemented in a very dynamic way if you combine this policy with expressions.
To accomplish that, we need to:
- Access to the “old” Publisher portal by accessing your API Management resource in the Azure Portal, and then click Publisher portal button.
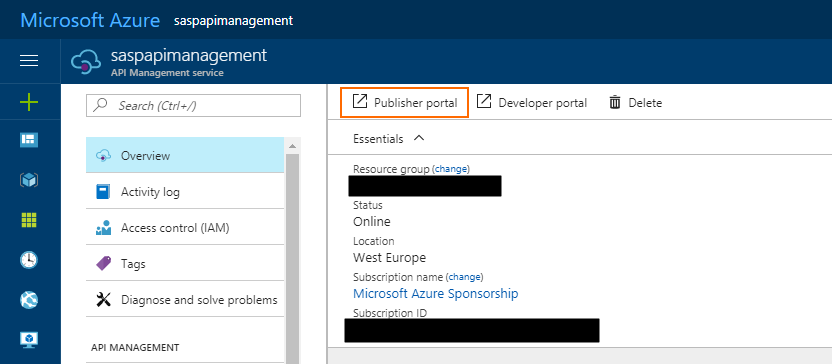
- On the Publisher portal, select the option Policies from the left menu.
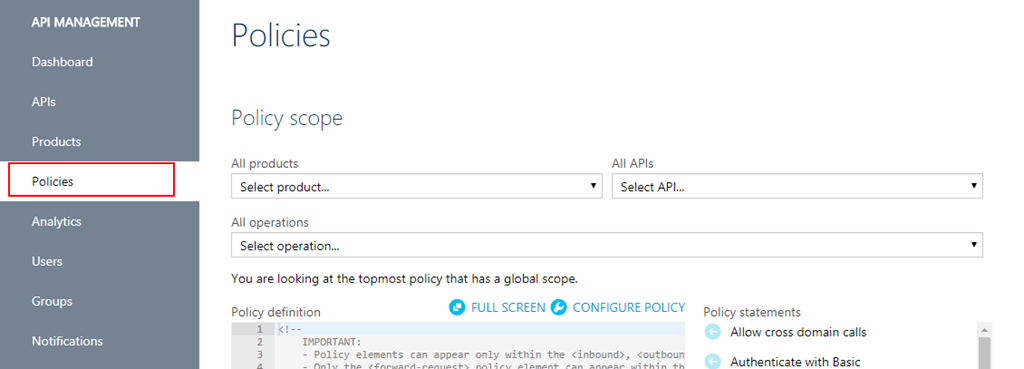
- Note: Policies can be configured globally or at the scope of a Product, API, or Operation.
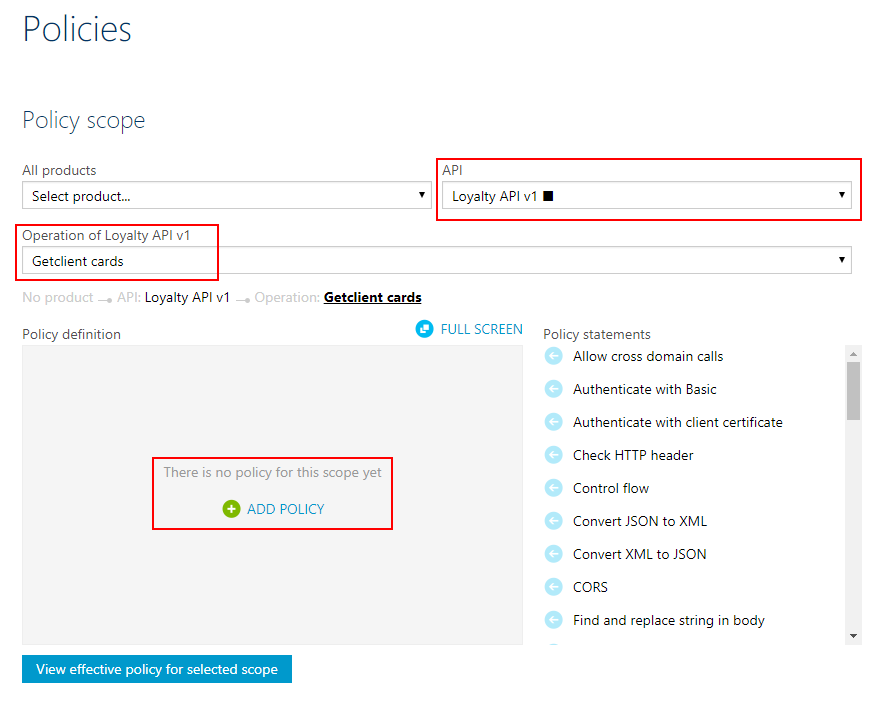
- Add a return-response policy in the inbound section by:
- Focus the cursor in the inbound section, then from the Policy statements toolbox, click the option.
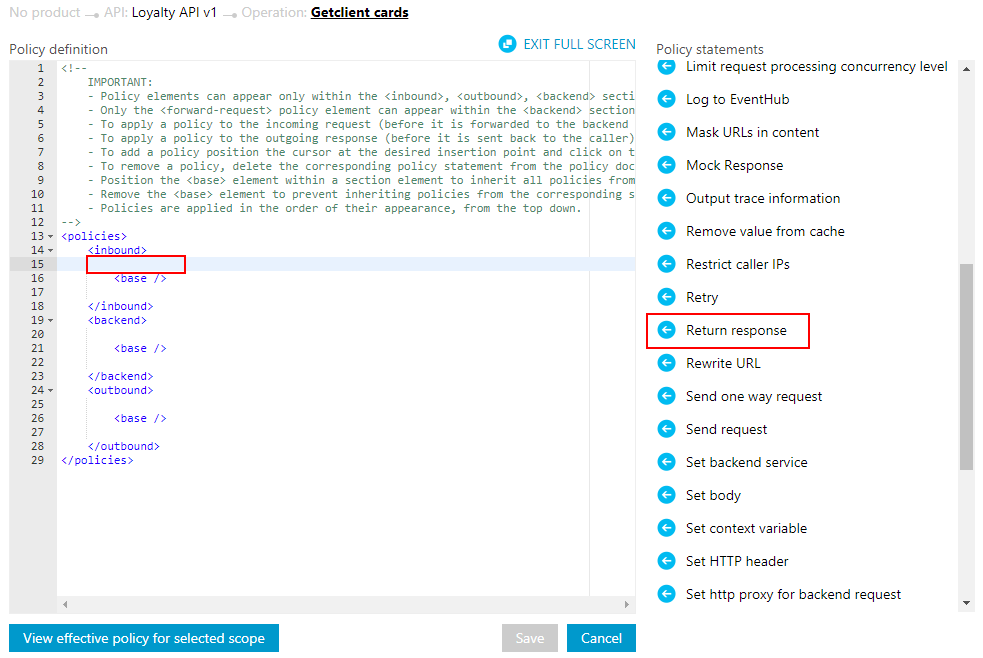
- TIP: When mocking, the policy should always be used in the inbound section to prevent an unnecessary call to the backend.
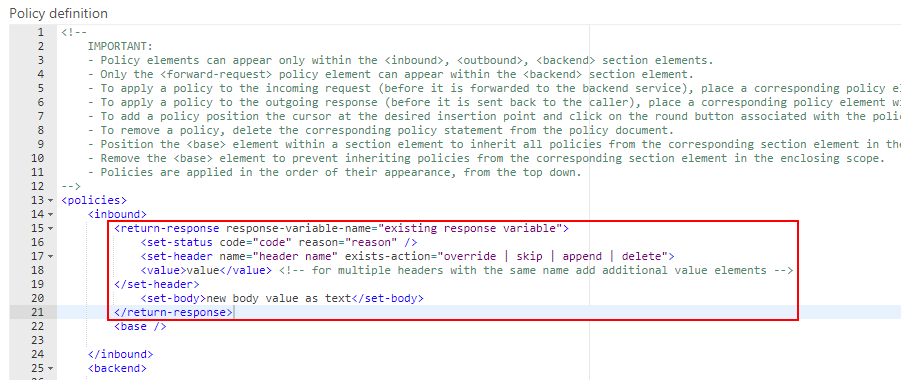
- To simplify our case, we just need to return a 200-status code with a static JSON response, and for that, we need to apply the following policy:
<return-response response-variable-name="existing response variable">
     <set-status code="200" reason="OK" />
     <set-header name="Content-Type" exists-action="override">
         <value>application/json</value>
     </set-header>
     <set-body>{
                 "success": true,
                 "data": {
                    "cards": [
                       {
                          "id": 28,
                          "Name": "Sandro Pereira"
                       },
                       {
                          "id": 56,
                          "Name": "Carolina Pereira"
                       },
                       {
                          "id": 89,
                          "Name": "José Pereira"
                       }
                    ]
                 }
     }</set-body>
</return-response>
- Save the policy so to takes effect the next time a call is made to the operation.
Of course, this policy can be used in many different ways. For example, if you only want to return a 200 OK without a body response, you can use an abbreviated version of the policy that will be represented like this:
<return-response/>
But as I told you earlier, this can also be very dynamic, where they are mocking an Add two integers operation in which the policy will look like this:
<return-response response-variable-name="existing response variable">
     <set-status code="200" reason="OK" />
     <set-header name="Content-Type" exists-action="override">
         <value>application/json</value>
     </set-header>
     <set-body>{
          "success": true,
          "data": "@((Convert.ToInt32(context.Request.Url.Query.GetValueOrDefault("a", "0")) + Convert.ToInt32(context.Request.Url.Query.GetValueOrDefault("b", "0"))).ToString())"
     }</set-body>
</return-response>
Here, I am taking the actual query parameters from the request and dynamically implementing all the operation logic of my backend API inside my policy… pretty cool!
Option 2) Using the return-response policy in the Azure Portal.
This second option is exactly the same as the previous one, but instead of doing it in the “old” Publisher portal, we will accomplish the same goal using the “new” API Management capabilities/functionalities embedded in the Azure portal.
To accomplish that, you need to:
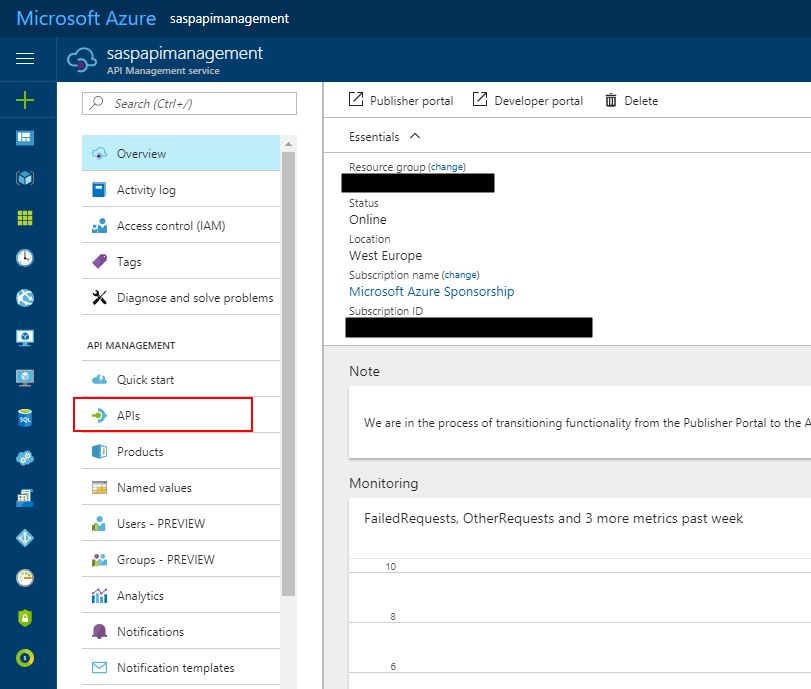
- Access your API Management resource in the Azure Portal and then click the APIs option under the API Management section from the left menu.
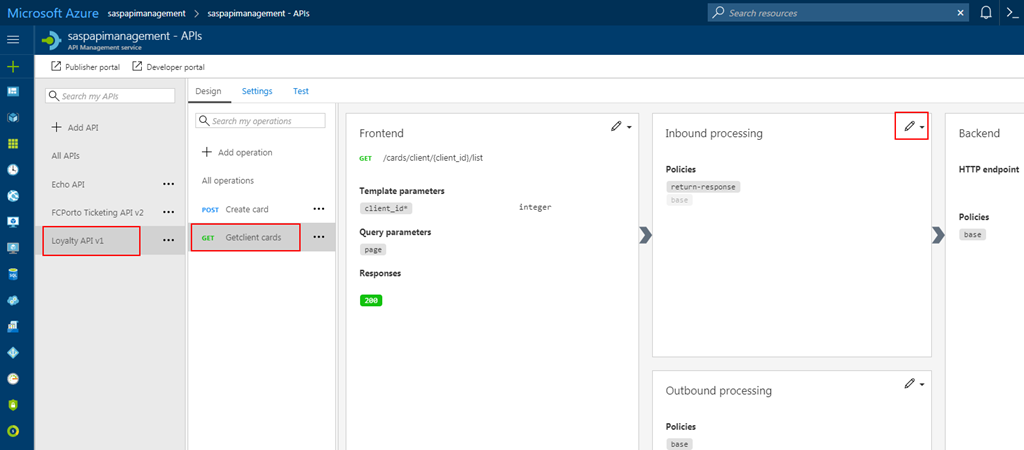
- Select the API from the API list, then from the operation list select the correct operation, and then click the edit button on the Inbound processing policies.
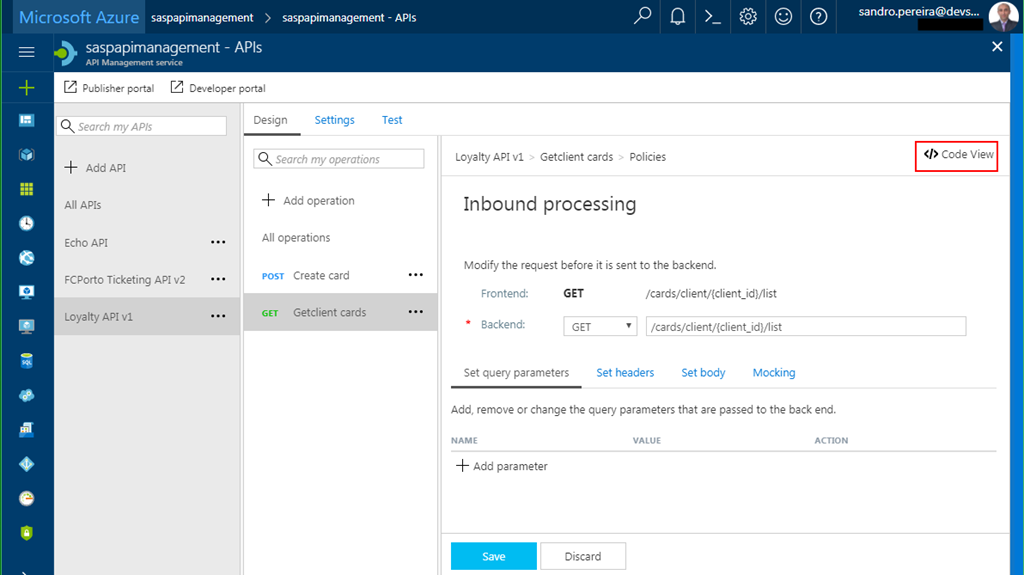
- Click in </> Code View to view or edit your policies as explained earlier in the first option.
- You will find the same experience as the “old” Publisher portal while editing the rules.
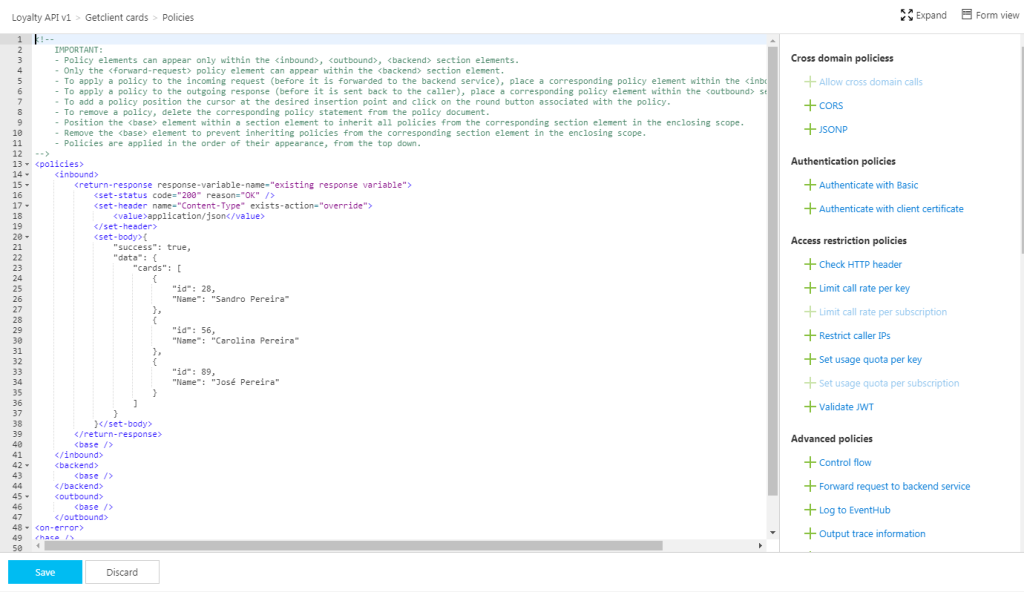
Both options 1 and 2 are the same; the only difference is that in the first option, we use the Publisher portal (this portal still exists because not all functionalities have yet been migrated to the Azure Portal), and in the second, we use the Azure Portal UI.
Option 3) Using the Mock-Response policy
The first two options, which in fact use the same rule, are very useful in several distinct scenarios, especially if you want to implement some intelligence (dynamic responses) in your mock.
But what if you want to combine your mocking cases against the API specifications we used when creating our operations? Fortunately for us, Microsoft released a new policy a few months ago to make this task easier, and you can now use the Mock-Response policy to achieve this effect, which is fully supported through the UI in the Azure Portal.
Note: this policy can also be used in the “old” Publisher portal but I will not address that.
TIP: Once again, you can apply this policy to every section, but its typical usage scenario is on the inbound path to provide a response instead of the backend service and also to prevent unnecessary calls to the backend.
To configure this policy from the Azure Portal, you need to:
- Access your API Management instance, under the API Management section, click APIs, select the API from the API list, then from the operation list select the correct operation, and then click the edit button on the Inbound processing policies to open the Inbound processing editor.
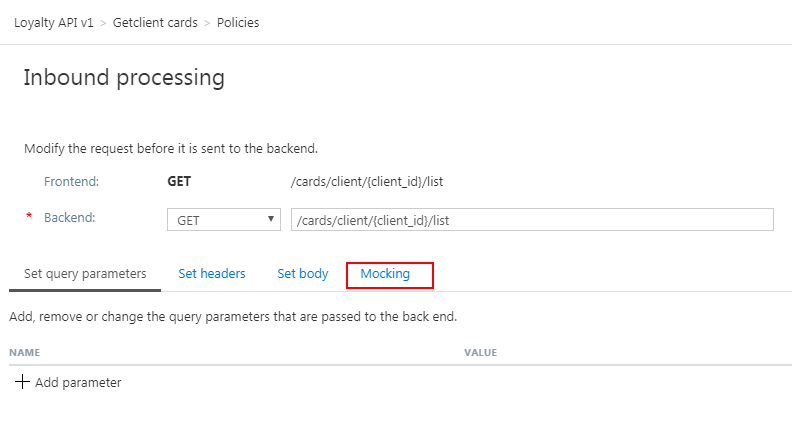
- You will now notice that a tab titled Mocking is available, in which you can configure the desired static response back to your caller by:
- Selecting the Static responses option.
- And what response status should be returned by configuring the API Management will return the following response dropbox.
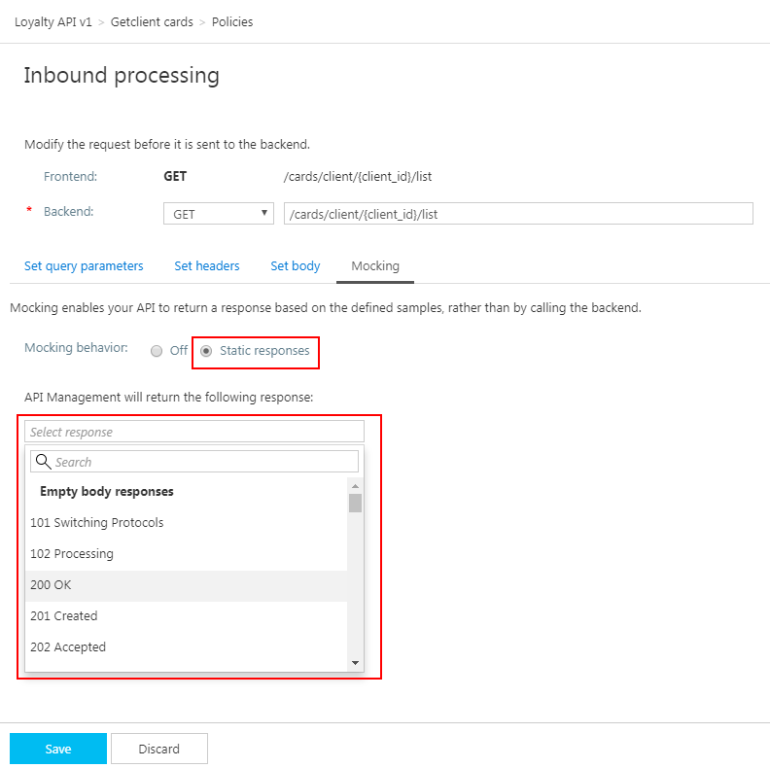
Are you wondering where you can define the response?
If you look at the description of this policy in the documentation, it says: “… as the name implies, it is used to mock APIs and operations. It aborts normal pipeline execution and returns a mocked response to the caller. The policy always tries to return responses of the highest fidelity. It prefers response content examples, whenever available. It generates sample responses from schemas when schemas are provided and examples are not. If neither examples or schemas are found, responses with no content are returned.
So, in other words, when designing the operation specification:
- If you provide expected response types and samples:
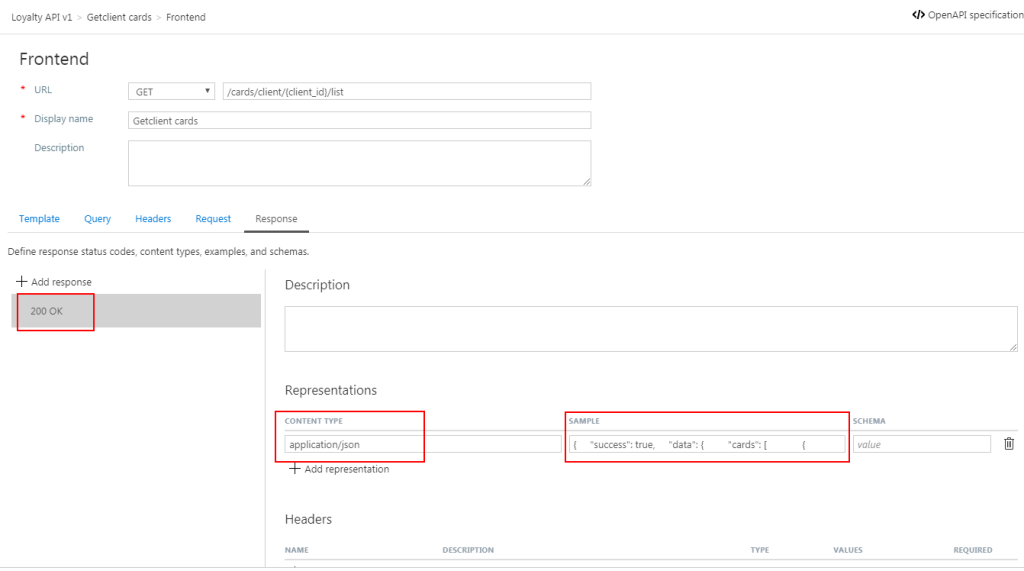
- The mock-response policy will use the sample response you defined as the response to deliver to the caller.
Note: If there are already response status codes, with or without content types, examples and schemas defined, configured on that particular operation (as shown in the figure above), these HTTP status codes will be listed at the top of the API Management will return the following response dropbox on the mocking section.
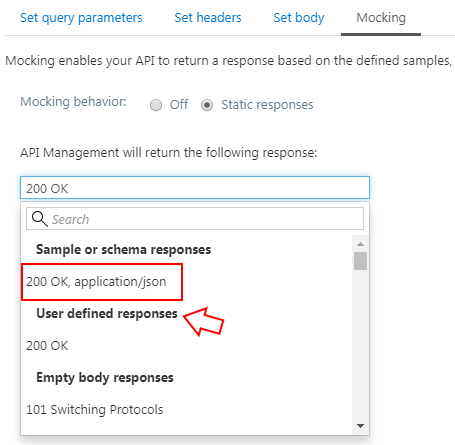
- If you provide a response schema instead of samples, the mock-response policy will generate a sample response from the schema.
- If you don’t define samples or schemas, the policy will return a 200 OK response with no content returned.
Normally, the policy template (or signature) is:
<mock-response status-code="code" content-type="media type"/>
However, similar to the return-response policy, you can use an abbreviated version of the policy that looks like this:
<mock-response/>
And again, it will return a 200 OK status code, and the response body will be based on an example or schema, if provided for this status code. The first content type found will be used, and if no example or schema is found, a response with no content will be returned.
Conclusion
Both mock-response and return-response policies can be used on API Management for prototyping your API frontend. Although they may at first glance appear similar, both policies have advantages and disadvantages and can be used in different scenarios/contexts.
But I will probably say, for mocking purposes, I will use or advise to use the mock-response policy just because it is simpler and will take advantage of the API specification to generate the mock response, which also “forces” the developers (or admins in charge of your frontend) to properly document the APIs.
Hope you find this helpful! If you liked the content or found it useful and would like to support me in writing more, consider buying (or helping to buy) a Star Wars Lego set for my son.