UDDI Services provides Universal Description, Discovery, and Integration (UDDI) capabilities for sharing information about Web services within an organization’s intranet, between business partners on an extranet, or on the Internet. UDDI Services can help improve the productivity of developers and information technology (IT) professionals with more reliable and manageable applications. With UDDI Services, you can prevent duplication of effort by promoting reuse of existing development work.
In a stand-alone installation, all default and optional components are installed on a single server. An instance of SQL Server must be installed before installing UDDI Services. When installing UDDI Services, the local instance of SQL Server is used to host the UDDI Services Database. UDDI Services Web Application and Notification Service are then configured to use the local UDDI Services Database.
📝 One-Minute Brief
UDDI Services provides a standardized way to describe, discover, and integrate Web services within an organization. This guide walks you through the step-by-step installation and configuration of Microsoft UDDI Services for BizTalk 2013. It covers component selection, setting up the UDDI database on SQL Server, and configuring the Notification Service (SMTP). It also includes a crucial troubleshooting tip for the common “Notification Service failure” and instructions on how to verify the installation via the web browser.
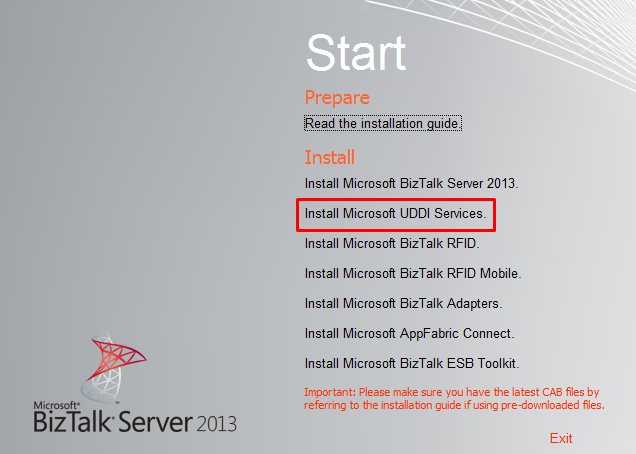
To install Microsoft UDDI Services:
- Close all applications before running setup. Run the BizTalk Server 2013 installer as Administrator.
- On the Start screen, click Install Microsoft UDDI Services.
- On the License Agreement screen, select Yes, I accept the terms in the license agreement to accept the license agreement and click Next.

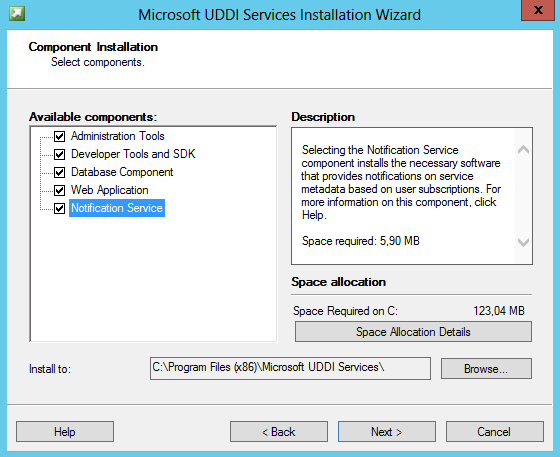
- On the Component Installation screen:
- In Available Components: select and click on the available components you want to install.
- In Install To: specify a location to install UDDI Services components.
- And then click Next to continue.
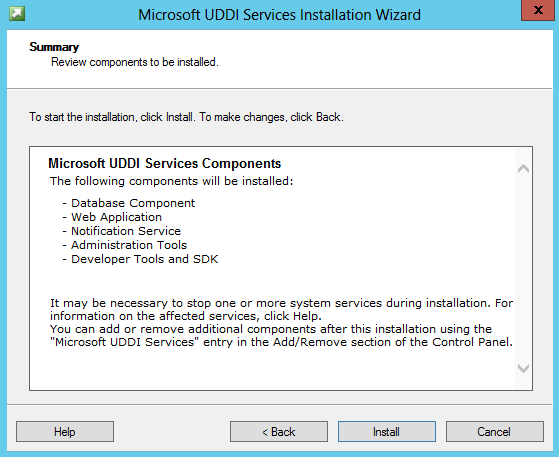
- On the Summary screen, review installation details and then click Install.
- On the Installation Completed screen, select the Launch Microsoft UDDI Services Configuration option and then click Finish to start the UDDI Services configuration.

- On the Microsoft UDDI Services Configuration screen, apply the following configurations and then click Configure to continue:
- Select the Basic configuration option.
- In the Database server name field under Database properties, enter the name of the local computer that will host the UDDI database.
- In the Service credential properties, type the User name and Password for the account that the UDDI services will run under.
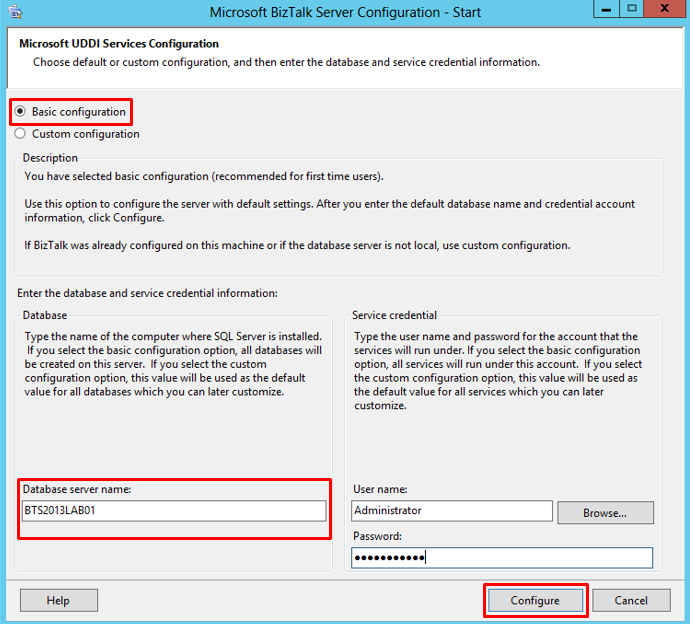
- Note: You may receive a warning if you enter a user name with administrative credentials on this computer. Click Yes to continue.

- On the Summary screen, review configuration information, and then click Next.
- You may receive a warning on the UDDI Services Notification Service. Don’t worry, we’ll deal with that later

- On the Completed screen, review configuration information:
- If the UDDI Services Notification Service fails, which is the case
- Select the Launch Custom Configuration option.
- And then click Finish.
- If the UDDI Services Notification Service fails, which is the case

- On the Microsoft BizTalk Server Configuration (UDDI) screen, from the left pane, select the “UDDI Services Notification Service” option and configure the following settings:
- Select the Enable UDDI Services Notification Service option.
- Under Windows Service, set the service account under which the UDDI Notification Service runs.
- Under SMTP, type the SMTP server for sending e-mail notifications.
- Under E-mail address, type the address of the e-mail account used for sending e-mail notifications.
- Under SMTP Authentication, specify the type of authentication used when authenticating with the SMTP server.
- When finished, click Apply Configuration.

- Click Apply Configuration to apply the configuration that you made.
- On the Summary screen, review configuration information, and then click Next.

- On the Completed screen, review configuration information and then click Finish.

Verify Your Installation
To verify that Microsoft UDDI Services is installed correctly:
- Open Internet Explorer and type http://localhost/uddi, and then hit Enter
- If UDDI Services is installed correctly, you will see the Welcome to Microsoft UDDI Services page.

Related links
- BizTalk 2013 Installation and Configuration – Important considerations before set up the server (Part 1)
- BizTalk 2013 Installation and Configuration – Enable Internet Information Services (Part 2)
- BizTalk 2013 Installation and Configuration – Install Windows Identity Foundation (Part 3)
- BizTalk 2013 Installation and Configuration – Install and configure SMTP Server Feature (Part 4)
- BizTalk 2013 Installation and Configuration – Install Microsoft Office Excel 2013 (Part 5)
- BizTalk 2013 Installation and Configuration – Install Visual Studio 2012 (Part 6)
- BizTalk 2013 Installation and Configuration – Install SQL Server 2012 (Part 7)
- BizTalk 2013 Installation and Configuration – Configure SQL Server Database Mail feature (Part 8)
- BizTalk 2013 Installation and Configuration – Install and Configure BizTalk Server 2013 (Part 9)
- BizTalk 2013 Installation and Configuration – Configure SQL Server Network Configuration protocols (Part 10)
- BizTalk 2013 Installation and Configuration – Validate Mail account used by BizTalk to send BAM Alerts (Part 11)
- BizTalk 2013 Installation and Configuration – Installing BizTalk Adapter Pack (Part 12)
- BizTalk 2013 Installation and Configuration – Install and Configure the Microsoft BizTalk ESB Toolkit (Part 14)
- BizTalk 2013 Installation and Configuration – Configure BizTalk Server SQL Jobs (Part 15)
- BizTalk 2013 Installation and Configuration – Configure BizTalk Server Windows Services (Part 16)
Hope you find this helpful! If you liked the content or found it useful and would like to support me in writing more, consider buying (or helping to buy) a Star Wars Lego set for my son.


hello mr pereira.
my UDDI services weren’t successfully installed.
so i read the log files, the log file said “Message: Cannot install UDDI Services to this operating system version”
my OS is win8 64bit professional.
do you have any recommendation related the problem above?
Hi Ian,
Are you installing BizTalk Server 2013 or BizTalk Server 2010?
Because with BizTalk Server 2013 and according to official documentation you can install UDDI on Windows 8, the same does not apply in 2010.
However I’m not the best person to respond your question because I never install BizTalk Server in Windows 7 or 8, I always install and advice to install in Windows Server for many reasons.
Hi,
I am also getting the same error in win8 Pro.
While configuring the uddi services database component i am getting error:
There is already a database named UDDI3 created. You should backup this database if needed and then remove it.
I tried to remove it from the sql server 2012 but still it comes after a while.
Have u got the the resolution for this?
Hi Sandro,
Thanks for all the great posts.
I’m installing BizTalk 2013, esb 2.2, on Windows Server 2013, SQL server 2013 with BizTalk and SQL on separate boxes.
When attempting to configure UDDI using custom, the configuration tool reports and error “Unable to connect to the database server.” Its not clear to me what should be specified in the Database Data Files Location (defaults to C:Program Files (x86)Microsoft UDDI Servicesdata). If you have done a custom configuration and have any insight you can share it would be appreciated.
Thanks!
Dennis
I get the same error as you Dennis. I’m using BizTalk 2013 R2. I followed this blog by Marcus Rangell: http://thoughtsofmarcus.blogspot.co.za/2009/11/installing-uddi-3-with-separate-sql.html
But it seems to be related to an old issue with BizTalk UDDI where the ‘Default’ database needs to exists. https://support.microsoft.com/en-us/kb/975684
Werner